I thought I should share the design of this simple and inexpensive fletching jig that I designed and made about ten years ago and used to fletch my arrows.
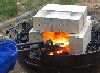
It consists of three pairs of 0.5mm stainless steel sheet strips cut to size that the fletch can be fully sandwiched between them and two 18-20mm thick and about 50mm diameter plywood disks with about 8mm deep grooves to accommodate the strips when the fletch are glued in position. In addition you will need at least three paper clips, four tack nails and four rubber bands. The whole shebang is shown on picture 1.
Picture 2: It shows how a fletching is sandwiched between a pair of stainless steel strips and clipped. You can notice that the strips have been slightly twisted to give the fletching required helix. I twisted them gripping them each end with a pair of pliers and just twisting in opposite directions. I cut the strips using hand metal sheet scissors and filed the edges and corners to dull them. One of the strips in each pair is longer so that the longer ends will fit in the grooves in plywood disks. The grooves in plywood disks were cut using a hacksaw blade just by hand. They are obviously at 120 degrees angles.
Picture 3: Shows al here fletching sandwiched and ready for the glue to be applied. Self adhesive strips can also be used.
Picture 4: Shows the discs and the grooves for the fletching holding stainless steel strips. Each disk has a hole in the centre for the arrow shaft to go through. One of the disks (rear one) also has these elliptical cutouts that are joined to the central hole for the arrow. These are if your shaft has a nock already installed that is of a bigger diameter than the disc central hole you will not be able to remove the rear disk by sliding it over the nock. In this case you will have to remove the rear disk by pushing it forward so that the fletching will pass through these elliptical cutouts. Each disk has a couple of tack nails embedded at opposite sides for the rubber bands to be attached that fix the disk to the shaft at desired location.
Picture 5: Shows the rear disk attached to the shaft using two rubber bands. Rubber bands when installed need to be quite tout to hold the disk firmly in position. For this picture I used an arrow I already have fletched before (about ten years ago) using this very jig.
Picture 6: Shows all the fletching in place. You can also apply additional rubber band around all strips pressing them gently against the shaft until the glue hardens.
Hope someone might decide and make one.
Lou