Finally plucked up enough courage to build another form for a take down recurve. I cut up an old longbow form to save a few dollars. It has been a few years since building a bow and every time I start I say to myself your an idiot. Will take a few photos of the progression although it will be over a period of time.
Cheers Wayno
New Limb Form. Bow is finished Jan 2015
Moderator: Moderators
New Limb Form. Bow is finished Jan 2015
- Attachments
-
- DSCF0005.JPG (163.3 KiB) Viewed 8586 times
-
- DSCF0001.JPG (153.94 KiB) Viewed 8586 times
Last edited by UPTHETOP on Mon Jan 05, 2015 11:41 am, edited 1 time in total.
Justastik Arrow Craft, Its all about the Wood.
Re: New Limb Form.
Be watching with interest. I am currently building my first take down and my second 'curve as the first was a one piece.Really enjoy making 'curves myself.
nil illigitimo in desperandum carborundum
razorbows.com
razorbows.com
-
Gringa Bows
- Posts: 6331
- Joined: Thu Aug 30, 2007 7:09 pm
- Location: Bundaberg QLD
Re: New Limb Form.
Good stuff Wayne,glad to see you having another go mate,its been awhile 

Re: New Limb Form.
Looking good Wayno. Glad to see you are still bitten by the bug.
Cheers... Rod
Cheers... Rod
Re: New Limb Form.
Okay limbs out of the form and adding a few riser damping lams to the limbs. That's what I call them anyways. The woods are Queensland walnut and Osage accent strips, thanks Longbow Steve. Also a picture of the rough cut out riser block after gluing the strips in . I didn't say I was any speed demon.
Cheers Wayno
Cheers Wayno
- Attachments
-
- DSCF0006.JPG (192.4 KiB) Viewed 8485 times
-
- DSCF0011.JPG (138.36 KiB) Viewed 8485 times
Justastik Arrow Craft, Its all about the Wood.
Re: New Limb Form.
Looking good Wayno! Keep it coming!
nil illigitimo in desperandum carborundum
razorbows.com
razorbows.com

Re: New Limb Form.
Re: New Limb Form.
That riser's shaping up well. What I know I'd struggle with is cutting the block accurately enough on a curve to glue the accent lams in. I know any effort of mine would be all over the place.
How'd you do it?
How'd you do it?
https://www.instagram.com/armworks_australia/
Bow making courses, knife making courses, armour making courses and more:
http://www.tharwavalleyforge.com/
Articles to start making bows:
http://www.tharwavalleyforge.com/index. ... /tutorials
Bow making courses, knife making courses, armour making courses and more:
http://www.tharwavalleyforge.com/
Articles to start making bows:
http://www.tharwavalleyforge.com/index. ... /tutorials
Re: New Limb Form.
Yeoman, I have limited equipment and most shaping is done with files and sanding blocks with a little plane work throwen in. I cut the curves only one at a time and glued one at a time also still in the square block shape.. Unlike a sanding machine with most bowyers on the sight who are very good at sanding to shape, I did cut the curve to shape roughly with a bandsaw then put heavy sand paper 80 grit between the two pieces cut and push the two pieces back and forward against each other until the glue line has no gap in it. The main piece being put in an vice so some heavy weight can be applied. Went to 100 grit then 120 to get an even tighter line. It is going to be an hunting bow so there wont be to much flash wood work done here. Will be doing a two bolt system also to each limb to riser because I want it to be strong as possible it is going to cop a hammering over the next decade of hunting.
Cheers Wayno
Cheers Wayno
Justastik Arrow Craft, Its all about the Wood.
Re: New Limb Form.
Wayno, have you ever tried using an bandsaw arc jig for the riser curves? I can't say I've used one myself but I've read good things about them.
And the build is looking good, by the way, the 'hasten slowly' approach seems to be winning out!
And the build is looking good, by the way, the 'hasten slowly' approach seems to be winning out!
Re: New Limb Form.
Hi Wayno,
The bow is coming along nicely, and like you all my riser curves are basically done by hand.
What draw weight are you after?
Daryl.
The bow is coming along nicely, and like you all my riser curves are basically done by hand.
What draw weight are you after?
Daryl.
"And you must not stick for a groat or twelvepence more than another man would give, if it be a good bow.
For a good bow twice paid for, is better than an ill bow once broken. [Ascham]
“If a cluttered desk is a sign of a cluttered mind, of what, then, is an empty desk a sign?” [Einstein]
I am old enough to make my own decisions....Just not young enough to remember what I decided!....
For a good bow twice paid for, is better than an ill bow once broken. [Ascham]
“If a cluttered desk is a sign of a cluttered mind, of what, then, is an empty desk a sign?” [Einstein]
I am old enough to make my own decisions....Just not young enough to remember what I decided!....
Re: New Limb Form.
Nez know never have tried the jig but one day will have to when I make a few more bows will have to make jigs for every step of the process to make it a lot easier. I tend to stick with my maximum production line of one a year, told you I am never in a rush. Daryl I am going for 55lb @ 28 which should give me around the 50 mark at my 26'' draw. It amazes me every time as I looked at every different formula to get the poundage close but just bending the limbs by hand I think they are going to be to light. I only had two lams both Queensland Walnut the same as the riser, one par/ the other tapered to the correct spec ( thanks Rodlong he must hate me turning up in his work shop in the middle of anytime and saying here help me with this), clear glass from binghams and yes has lines through the length,
I don't have any clue what Im doing only the 5th bow I have ever made ( first two have blowen up )and everyone has been completely different. This time as I have always had so much trouble lining limbs to riser and getting limb bolts to actually line up with the riser holes, that's with a binghams jig as well. I thought Im gonna bolt the whole bow together then sand the whole bow strait including the string line figure that one out because I cant. Will post a few photos maybe someone can see something I am doing wrong before I go to far with the rasp.
Boy your an idiot is starting to entire my mind the further Im getting into it.
Cheers Wayno
- Attachments
-
- Having a rough guess at measurement for limb holes
- DSCF0005.JPG (207.17 KiB) Viewed 8400 times
-
- looks about right
- DSCF0006.JPG (243.31 KiB) Viewed 8400 times
-
- to late limb bolts in, always a pain without a jig.
- DSCF0007.JPG (153.45 KiB) Viewed 8400 times
-
- Getting there end limb has a little twist but may sand or pull out when I find the centre.
- DSCF0011.JPG (84.04 KiB) Viewed 8400 times
-
- where's me rasp and files.
- DSCF0012.JPG (196.08 KiB) Viewed 8400 times
Justastik Arrow Craft, Its all about the Wood.
-
longbow steve
- Posts: 3116
- Joined: Tue Jan 30, 2007 3:29 pm
- Location: BLUE MOUNTAINS
Re: New Limb Form.
Looking good Wayno, the Osage and Walnut should look great when you get some finish on it. Cheers Steve
Re: New Limb Form.
Looking fine from where I'm standing!
nil illigitimo in desperandum carborundum
razorbows.com
razorbows.com
Re: New Limb Form.
Making good progress there Wayno. Looking forward to reading the specs.
Have a quick squint at this topic - http://www.ozbow.net/phpBB3/viewtopic.p ... ing+blocks . I reckon these are the bees knees for making sure you have the centre of your limb tips in the right place (before you cut them to width) to avoid limb twist and misalignment with the centre of the riser. Give me a call if you want to give them a go, I'll send you a set to try out.
Cheers... Rod
Last edited by rodlonq on Sat Oct 11, 2014 8:26 am, edited 2 times in total.
Re: New Limb Form.
Wayno, I found getting the areas on the riser [where the limbs bolt on] dead true was a bit of a pain.
Daryl.
Daryl.
"And you must not stick for a groat or twelvepence more than another man would give, if it be a good bow.
For a good bow twice paid for, is better than an ill bow once broken. [Ascham]
“If a cluttered desk is a sign of a cluttered mind, of what, then, is an empty desk a sign?” [Einstein]
I am old enough to make my own decisions....Just not young enough to remember what I decided!....
For a good bow twice paid for, is better than an ill bow once broken. [Ascham]
“If a cluttered desk is a sign of a cluttered mind, of what, then, is an empty desk a sign?” [Einstein]
I am old enough to make my own decisions....Just not young enough to remember what I decided!....
Re: New Limb Form.
Going great guns Wayno, I wouldn't be too concerned about your limb blank alignment at this stage, it all looks pretty good in the photos to me. The next step is one of the critical ones though, put a weighted string line over the approximate center of your limb tips and looking down vertically over the top of the bow move the string across the limb blank tips until it lines up with the center of the riser and both sets of limb bolts. This may put what is the true center line of the bow off to one side or the other at the tips of the limb blanks but if it's within 5mm of your marked center line it should be fine. Any more than 5mm I would consider adjusting the limb fitment a little.
Have a look at this if I've confused you, there's pictures , about 2/3 of the way down the page http://www.ozbow.net/phpBB3/viewtopic.php?f=34&t=11440
Rods tillering blocks are indeed a great tool but I found them a little difficult to use on my recuves, mainly due to the rather extreme amount of preloading in my design.
Rob.
Have a look at this if I've confused you, there's pictures
Rods tillering blocks are indeed a great tool but I found them a little difficult to use on my recuves, mainly due to the rather extreme amount of preloading in my design.
Rob.
The shortest distance between two points is a FLATLINE
 Email; robnicoll(at)bigpond(dot)com
www.flatlinebows.com.au
www.flatlinebows.com.au
Re: New Limb Form.
Went with the string method to find centre and both where a little off about 2mm so adjusted the limb widths. Alright getting close to finishing the tips but want to know from the bowyers is there any general distance to start my string grooves. I have always just got the measurements from other limbs I have and copied them to suit the new bows. The tips and limbs are still a way off finishing before I start the string grooves but put a coat on them to help seal the ends and will move work to the riser for a while to see what sort of shape I will end up with. Although work has just fired up and will be busy for the next 2 weeks from dusk till dawn, a few progress shots.
Cheers Wayno
Cheers Wayno
- Attachments
-
- DSCF0020.JPG (242.79 KiB) Viewed 8325 times
-
- DSCF0024.JPG (160.09 KiB) Viewed 8325 times
Justastik Arrow Craft, Its all about the Wood.
Re: New Limb Form.
Couldn't help myself and got back into the limb tips so I could put a string on the bow and see what corrections I would have to make. DAM was way off with the poundage I guess that's what sorts out the amateurs to the pro bow builders. Was going for around the 50-55 mark and just pulling it back it feels like 40-45 lb mark. Its not going to be a hunting bow I guess, so will have to turn it into a girly target bow at that poundage. (he he ) Its all good fun at this stage.
A few progress shots.
Cheers Wayno
A few progress shots.
Cheers Wayno
- Attachments
-
- DSCF0015.JPG (211.1 KiB) Viewed 8299 times
-
- DSCF0013.JPG (178.25 KiB) Viewed 8299 times
-
- DSCF0011.JPG (234.96 KiB) Viewed 8299 times
-
- DSCF0006.JPG (231.35 KiB) Viewed 8299 times
Justastik Arrow Craft, Its all about the Wood.
Re: New Limb Form.
Wow!!!!!!
The best trophies I can hope to acquire as a husband, father, friend or hunter are MEMORIES!
They will travel with me wherever life's path leads...
They will travel with me wherever life's path leads...
-
Gringa Bows
- Posts: 6331
- Joined: Thu Aug 30, 2007 7:09 pm
- Location: Bundaberg QLD
Re: New Limb Form.
Looking good
Re: New Limb Form.
That look pretty danged good from where I'm standing!
nil illigitimo in desperandum carborundum
razorbows.com
razorbows.com
Re: New Limb Form.
Very nice Wayno,
I like the tip overlay treatment, neat, tidy and effective.
Daryl.
I like the tip overlay treatment, neat, tidy and effective.
Daryl.
"And you must not stick for a groat or twelvepence more than another man would give, if it be a good bow.
For a good bow twice paid for, is better than an ill bow once broken. [Ascham]
“If a cluttered desk is a sign of a cluttered mind, of what, then, is an empty desk a sign?” [Einstein]
I am old enough to make my own decisions....Just not young enough to remember what I decided!....
For a good bow twice paid for, is better than an ill bow once broken. [Ascham]
“If a cluttered desk is a sign of a cluttered mind, of what, then, is an empty desk a sign?” [Einstein]
I am old enough to make my own decisions....Just not young enough to remember what I decided!....
Re: New Limb Form.
Looking great Wayno, i like your tip overlays too.
Cheers... Rod
Cheers... Rod
Re: New Limb Form.
Bit of progress on the riser cutting the shelf out slowly slowly.
Cheers Wayno
Cheers Wayno
- Attachments
-
- DSCF0004.JPG (202.24 KiB) Viewed 8227 times
-
- DSCF0020.JPG (206.33 KiB) Viewed 8227 times
-
- DSCF0023.JPG (188.07 KiB) Viewed 8227 times
Justastik Arrow Craft, Its all about the Wood.
Re: New Limb Form.
Like your work, very neat especially with the tips and the overlay fades.
nil illigitimo in desperandum carborundum
razorbows.com
razorbows.com
Re: New Limb Form.
Looking good Wayno.
Re: New Limb Form.
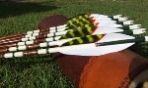
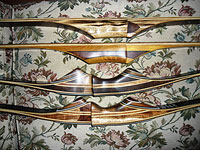
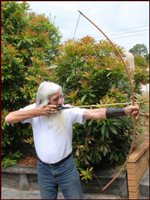
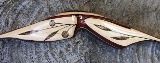
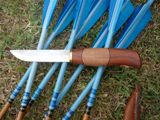
Well had a town and house move, computer back on and have finished the bow. Am very happy shoots strait, quiet and dead in the hand. Its only number 4 but am getting better with every bow. PHOTOS. First lot of arrows out of the quiver at about 12 mts.
Cheers Wayno
Cheers Wayno
- Attachments
-
- DSCF0001.JPG (254.85 KiB) Viewed 8141 times
-
- DSCF0003.JPG (182.21 KiB) Viewed 8141 times
-
- DSCF0057.JPG (179.46 KiB) Viewed 8141 times
-
- DSCF0061.JPG (57.62 KiB) Viewed 8141 times
-
- DSCF0069.JPG (73.54 KiB) Viewed 8141 times
-
- DSCF0071.JPG (93.02 KiB) Viewed 8141 times
Justastik Arrow Craft, Its all about the Wood.
Re: New Limb Form. Bow is finished Jan 2015
Wow Wayno...that's a flash looking bow. Congrats on turning out a great looking and functional bow. Very envious of blokes like you who can do this...
The best trophies I can hope to acquire as a husband, father, friend or hunter are MEMORIES!
They will travel with me wherever life's path leads...
They will travel with me wherever life's path leads...
Re: New Limb Form. Bow is finished Jan 2015
Great result Wayno. You'll have to knock some of the shine off it before you take it hunting mate , very nice finish.
Edit... What weight did it finish up at Wayno?
Cheers... Rod
Edit... What weight did it finish up at Wayno?
Cheers... Rod