Warts and all Hip Quiver Build Along

How to make a Bow, a String or a Set of Arrows. Making equipment & tools for use in Traditional Archery and Bowhunting.

Moderator: Moderators

Post Reply
Message
Author
User avatar
perry
Posts: 1925
Joined: Tue Sep 05, 2006 9:59 pm
Location: morayfield qld australia

Warts and all Hip Quiver Build Along

#1 Post by perry » Sat May 15, 2010 1:34 pm

Well folks I started this Hip Quiver a short time ago and have been doing dribs and drabs with it as the mood moves me. It's looking untidy at the moment as I've made a few mistakes already but as it gets closer to being finished I will tidy it up.

Here's the Quiver pattern cut out and partially marked for the hole punch and tooling to begin
Quiver pattern.JPG
Quiver pattern.JPG (23.65 KiB) Viewed 2224 times
A close up of the Python's head outline just cut with the Swivel knife. When the tooling's done the Pythons head will look as though it's peering out from behind the accessory pouch
Python head and swivel knife.JPG
Python head and swivel knife.JPG (37.5 KiB) Viewed 2224 times
Here's a sneak preview
Quiver pattern with pouch and acsent.JPG
Quiver pattern with pouch and acsent.JPG (25.89 KiB) Viewed 2224 times
regards Jacko
Last edited by perry on Sat May 15, 2010 1:57 pm, edited 1 time in total.
"To my deep morticication my father once said to me, 'You care for nothing but shooting, dogs and rat catching, and you will be a disgrace to yourself and all your family.' "

- Charles Darwin

User avatar
UPTHETOP
Posts: 1187
Joined: Mon Jun 11, 2007 9:03 pm
Location: Dalby
Contact:

Re: Warts and all Hip Quiver Build Along

#2 Post by UPTHETOP » Sat May 15, 2010 1:38 pm

Perry keep us posted on the progress love to watch things taking shape.
Love that chital skin as well.

Cheers Wayno
Justastik Arrow Craft, Its all about the Wood.

User avatar
Mick Smith
Posts: 4957
Joined: Mon Feb 21, 2005 9:09 pm
Location: Surf Coast Victoria

Re: Warts and all Hip Quiver Build Along

#3 Post by Mick Smith » Sat May 15, 2010 6:02 pm

Hey Jacko, that's going to look unreal!

I can't wait to see it finished. 8)

Mick
There is no use focusing on aiming if you don't execute the shot well enough to hit what your are aiming at.

Bill
Supporter
Supporter
Posts: 960
Joined: Tue Apr 27, 2004 6:24 pm
Location: Wodonga
Contact:

Re: Warts and all Hip Quiver Build Along

#4 Post by Bill » Sun May 16, 2010 10:44 am

Looking good, :) just keep feeding the information about yourbuild along, 8) I just love build alongs and all you talented people out there :mrgreen: .........Bill

User avatar
perry
Posts: 1925
Joined: Tue Sep 05, 2006 9:59 pm
Location: morayfield qld australia

Re: Warts and all Hip Quiver Build Along

#5 Post by perry » Sun May 16, 2010 2:21 pm

The Quivers coming along OK, punched the holes for the lacing and began tooling the Pythons head. Forgive me not posting pictures of how I moulded the body of the pouches. It has been the most time consuming part of the project so far. I had pictures of the first pouch I made but decided the square sides it had did not flow into the Quiver.

Originally I was doing the Gum Leaf and Gum flower pattern on the Quiver and tooled up this Armguard but changed my mind. I'll make a matching Snake theme Armguard next project and put this semi finished Armguard away until the mood moves me to finish it or make a matching Quiver for it.
Pouches and Armguard.jpg
Pouches and Armguard.jpg (69.37 KiB) Viewed 2156 times
The mistakes I eluded to earlier are quite obvious in this photo with the holes for the pouches each having alignment issues and a stitch in each will be longer than others. I'll be using a Lazy S stitch which will mask the mistakes. In the finished product you'd be doing well to notice them.

The eyelet centre bottom of the Quiver - idea is to hang a 1.5" or 2"plaited leather tail off it to tie in as the tip of a Snakes tail.

A cryptic match with the Snake theme - the belt loop of the quiver will not be sewn in but will have press studs so it can be easily removed from a belt. Through the week I will be tooling a pair of Dice showing "Snake Eyes" a pair of 1's onto the top of the Quiver that will fold to the front and be held in place by the press studs
holes punched in pattern.jpg
holes punched in pattern.jpg (25.54 KiB) Viewed 2156 times
Coming along! Not sure on the lacing style yet. A 2 tone [ brown and beige ] triple cordova springs to mind but I may also continue with the Lazy S as it's as strong as a Saddle stitch, looks good and is quite fast to do. Am not sure if the Quiver will be dyed using Antiquing medium or if I'll jump in the deep end and dye the Python as close to the same colour's as the printed Calf hide overlays. I have not done the multiple colour dying before
Coming along.jpg
Coming along.jpg (110.83 KiB) Viewed 2156 times
regards Jacko
"To my deep morticication my father once said to me, 'You care for nothing but shooting, dogs and rat catching, and you will be a disgrace to yourself and all your family.' "

- Charles Darwin

Bill
Supporter
Supporter
Posts: 960
Joined: Tue Apr 27, 2004 6:24 pm
Location: Wodonga
Contact:

Re: Warts and all Hip Quiver Build Along

#6 Post by Bill » Sun May 16, 2010 3:47 pm

8) Good, good, good :D .........Bill

User avatar
stringnstik
Posts: 1106
Joined: Tue Oct 21, 2008 12:09 pm
Location: Cranbourne

Re: Warts and all Hip Quiver Build Along

#7 Post by stringnstik » Mon May 17, 2010 7:53 am

Super job Jacko, loving this and imagining how its going to turn out. Love the thought process too and the speed with wich your knocking it up. Im lucky if I get an hour in one sitting. Ahh family life :)
"I am the arrow..the arrow is me...together as one...I fly to thee"
"the stick maybe crooked and the string hath no form,
then married by bowyer, transforms when first drawn"
"twang....thud"

User avatar
muntries
Posts: 296
Joined: Tue Nov 17, 2009 9:10 am
Location: Ballarat

Re: Warts and all Hip Quiver Build Along

#8 Post by muntries » Mon May 17, 2010 11:10 am

Hi Jacko, I was thinking of getting into some of the leather work. Where did you get your tools and equipment from? Looks fantastic, are those gum leaves gonna be coloured separately? Will look pretty good. I wouldn't worry too much my the mistake in the holes, I could hardly notice anything.

Simon
"With staff in hand, the hunter stood on Radholme's dewy lawn" The Hunters Song (Olde Lancashire Poem) by Richard Parkinson.

User avatar
perry
Posts: 1925
Joined: Tue Sep 05, 2006 9:59 pm
Location: morayfield qld australia

Re: Warts and all Hip Quiver Build Along

#9 Post by perry » Mon May 17, 2010 9:54 pm

Evening all, work got in the way today, just when I was feeling creative aswell. Before work and during my lunch break I found time to dye the pouches using black Antiquing medium, they really POP now and my ordinary hole spacing will disappear with the Lazy S stitch done in 3mm black lace. Not sure if I'll rub them back to distress / age them.

I have not 100% decided yet on the final Colour scheme, but the image in my mind just now is to combine the Black and Dark Brown Antiquing medium, perhaps with the Dice and Python done in various depths of colour that the black medium will allow and the body of the Quiver using the dark brown medium.
dyed pouches.jpg
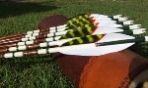
dyed pouches.jpg (57.27 KiB) Viewed 2104 times
I also managed to cut with the Swivel knife the Dice just about to roll Snake eyes a short time ago. It's not quite finished as I need to use the beveling and modeling tools as I've began too with the Python to give the Dice a 3D effect The border you can see will be followed using a Barbed wire border pattern, you may be able to see the beginnings of Barb wire pattern in some of the other photo's in the corner sections.

Picture the top of the Quiver with the Dice pattern folded over to the front of the Quiver so your eyes are drawn to the Snake eyes, the flap held in place by press studs against the Calf hide snake skin print 8). I am considering cutting either a smaller circle inside the single circle or a larger circle outside so the Dices single dots looks more like eyes, I'll sleep on it
Snake eyes.jpg
Snake eyes.jpg (72.71 KiB) Viewed 2104 times
Simon I have not done true to life dye jobs. The floral design is really begging to be done true to life. An Australian master leather craftsman I discovered recently does Native flora tooling that he dyes with a masters touch true to life - stunning work. Check this out http://www.petermain.com/parent.htm Strange thing is I first tooled Aussie flora about 3 years ago and I was amazed to see how closely the designs I was drawing and the background I used mimicked his and I had never seen his work before. Of coarse I am still using antique medium instead of multiple colours and there's the slight issue of Master craftsman Vs mug hack. It's just a matter of me finding a spare $100 to buy some dyes and an instruction manual - then I'll tackle that Armguard and dye it as true to life as I can. Who knows in about 50 years I might be good at it :D

I haunted a great leather shop called Crispin's Leather and the vast majority of the tools I have I bought on clearance sales for a few $ each. Full price you will pay up to $20 each. She is winding back her business with a view to retirement to be open 2 mornings a week but does do mail order.

Crispin Leather is the best leather shop around in my view. I just jumped in the deep end years ago and started making things and Crispin's helped me out along the way. She's in Kedron Park Rd Wooloowin Brisbane. She is only open on Wednesday and Thursday mornings for over the counter sales but operates a mail order service.

http://www.crispinleather.com.au/

Also have a look at Birdsall Leather, they are in Sydney. Have not used them myself but am assured by good mates they are good to deal with and their website is well constructed with pictures to assist in selecting what you need

http://www.birdsall-leather.com.au/


There's also Packer Leather, I only use them out of convenience as they are 10 minutes from home.

http://www.packerleather.com/

Best advice I can give mate is to get along to a local leather craft store, ask about lessons and get taught the proper techniques and how to use the tools correctly, perhaps buy a book or 2 with projects that appeal and follow the directions. I am bumbling along learning as I go as until recently did not have any pattern or how too books other than a lacing manual. You might guess I bought the Peter Main book

regards Jacko
"To my deep morticication my father once said to me, 'You care for nothing but shooting, dogs and rat catching, and you will be a disgrace to yourself and all your family.' "

- Charles Darwin

Bill
Supporter
Supporter
Posts: 960
Joined: Tue Apr 27, 2004 6:24 pm
Location: Wodonga
Contact:

Re: Warts and all Hip Quiver Build Along

#10 Post by Bill » Mon May 17, 2010 10:04 pm

Getting better all the time :) ..........Bill

User avatar
perry
Posts: 1925
Joined: Tue Sep 05, 2006 9:59 pm
Location: morayfield qld australia

Re: Warts and all Hip Quiver Build Along

#11 Post by perry » Fri May 21, 2010 8:17 am

Warts and all Folks :( and thats what you got :oops: Things have gone south. Not to worry ,live and learn, I've got just enough leather left to start another to finish this build along. I was shattered as the Python looked awesome

Earlier I mentioned some mistakes without listing them all. The major one has been to use an inferior part of the hide, the Belly. Generally it does not tool as well as it's weaker and thinner and as a result you gotta be prepared to accept that if you use it it will not be as neat off the swivel knife as thicker stouter parts of the hide.

Unfortunately quality tooling leather is very expensive, I can't afford for the amount of craft I do for myself. You put in X amount of work with rubbish materials even if it is good work and the result will be rubbish. I decided a few weeks back I may sell the odd tooled armguard to finance my Archery and was going to buy quality leather to do it with. I'll still do that but I have bought the poor quality hide for the last time for personnel work.

Check the photo out, the Python has split out of the Quiver body at the points where it's most heavily tooled, all around the edges. On close inspection the leather in the area of the tooled design is more open grained and pliable than the surrounding leather. Good on me :lol: who else would not notice this until it's to late. It's not the end of the world in that I can cut out the profile of the Python and applique it for a 3D effect on another project. The rest of the Quiver body is fine for making pouches or knife sheaths etc from.
the price you pay.jpg
the price you pay.jpg (42.5 KiB) Viewed 2074 times
And the slightly modified "new beginning". Just enough leather left and all I had to modify was the top of the Quiver to a single press stud. I will have to buy some more fake snake print leather next Wednesday. No big deal as I won't need it before then. This piece of Belly leather is heavier and stiffer than the first piece I used and I am wondering about the wisdom of tooling another python head on it. I'll try not to be so heavy handed on this one, perhaps not use the swivel knife at all which will effect the depth of the tooling and how the pattern pops - we'll find out together
starting again.jpg
starting again.jpg (36.73 KiB) Viewed 2074 times
regards Jacko
"To my deep morticication my father once said to me, 'You care for nothing but shooting, dogs and rat catching, and you will be a disgrace to yourself and all your family.' "

- Charles Darwin

User avatar
Chase N. Nocks
Posts: 1463
Joined: Thu Jan 04, 2007 10:33 am
Location: Brisbane, Australia

Re: Warts and all Hip Quiver Build Along

#12 Post by Chase N. Nocks » Fri May 21, 2010 9:17 am

Mate it is a pity about the snake...looked a bit like the sock puppet from the Telstra commercials though....

Nah, just winding you up mate, it looked awesome!

As for affording better leather well we need to work on me getting some basic tools and getting started in the leather work then we can share the cost..Also I want to talk to you about the backquiver you made when I see you on the weekend...bring it with you.
I am an Archer. I am not a traditional archer, bowhunter, compound shooter or target archer.....I am an Archer
"Shooting the Stickbow"

....enforced by the "whistling grey-goose wing."
"The Witchery of Archery"

User avatar
perry
Posts: 1925
Joined: Tue Sep 05, 2006 9:59 pm
Location: morayfield qld australia

Re: Warts and all Hip Quiver Build Along

#13 Post by perry » Fri May 21, 2010 10:00 pm

Ok, I took a day off work with a virus today and have used the time to get back on track. This piece of leather seems to be fine with none of the enbrittlement which wrecked the last try. Hard to believe this piece was right next to the last piece in the 1/4 hide I bought. I was saving it for a new 19th Century style hunting bag. None the less I decided not to cut the pattern in with the swivel knife just in case and used the modeling tool for 100% of the detail work, did not put a beveling tool, swivel knife or a plastic mallet anywhere near it and the leather's integrity is fine. All the major detail is done and it's ready for dye now.
Ready for dye.JPG
Ready for dye.JPG (33.6 KiB) Viewed 2047 times
With not cutting the pattern in for fear of the crappy leather I have posted this photo for comparison between the Armguard which has been swivel cut and modeled and Mach 2 of the Quiver where the Python pattern has just been modeled. The swivel knife cut and modeled pattern is deeper and more detail is able to be used. The Python pattern that's just been modeled while it looks good does not have the depth / pop as much. The shading around the outside of the floral pattern from the compression caused by the modeling tool will add texture and depth under Dye while I think the Python will not show as boldly.
swivel cut and just modelled.JPG
swivel cut and just modelled.JPG (39.93 KiB) Viewed 2047 times
Tomorrow I'll dye the Quiver, glue on the lining and the reinforcement. I hope I can stay patient as I could of had this finished this weekend if I had a new piece of the fake snake print calf hide. I can't use the old bit as it's got holes punched in it to fit the failed Quiver and this one has a differant design. I need to call into Crispin's Leather, they're open to the public on Wednesday's and Thursdays. An option I thought of today was to call into Packer Leather on Monday on the way to work and buy a $11 black Roo hide and use it in place of the fake snake. I'd prefer to be patient

regards Jacko
"To my deep morticication my father once said to me, 'You care for nothing but shooting, dogs and rat catching, and you will be a disgrace to yourself and all your family.' "

- Charles Darwin

User avatar
UPTHETOP
Posts: 1187
Joined: Mon Jun 11, 2007 9:03 pm
Location: Dalby
Contact:

Re: Warts and all Hip Quiver Build Along

#14 Post by UPTHETOP » Sat May 22, 2010 1:47 pm

Coming along great mate. The longer it takes the better it turns out just like building arrows I say.

Cheers Wayno
Justastik Arrow Craft, Its all about the Wood.

User avatar
perry
Posts: 1925
Joined: Tue Sep 05, 2006 9:59 pm
Location: morayfield qld australia

Re: Warts and all Hip Quiver Build Along

#15 Post by perry » Sat May 22, 2010 7:38 pm

I laced on the Pouches and dyed the Quiver today using black antiquing medium. With some careful buffing and retouching it nearly matches the fake snake print. Can't say I'm in love with it, a bit too gold? but I don't have a complete picture until the new fake snake facing is on. I am struggling with the wait until Wednesday morning to buy the new piece of fake snake print hide for the face of the Quiver, just wanna get this finished and move on to that hunting bag I was talking about earlier.
nearly done.jpg
nearly done.jpg (50 KiB) Viewed 2018 times
regards Jacko
"To my deep morticication my father once said to me, 'You care for nothing but shooting, dogs and rat catching, and you will be a disgrace to yourself and all your family.' "

- Charles Darwin

Bill
Supporter
Supporter
Posts: 960
Joined: Tue Apr 27, 2004 6:24 pm
Location: Wodonga
Contact:

Re: Warts and all Hip Quiver Build Along

#16 Post by Bill » Sun May 23, 2010 11:29 am

Perry it's still looking Good 8) :wink: 8) ..........Bill

User avatar
perry
Posts: 1925
Joined: Tue Sep 05, 2006 9:59 pm
Location: morayfield qld australia

Re: Warts and all Hip Quiver Build Along

#17 Post by perry » Sun May 23, 2010 9:56 pm

Righto folks - it's not too Gold anymore, final distressing work is done on the Quivers dye job. It's looks as though its been through the mill, washing machine and done 10 rounds with Mohamed Ali. I'm hoping first impression will be OMG whats he done and then in time it'll grow on ya sort of like a homely woman.

I'm still to line the Quiver to protect the pouch lacing from sharp arrow heads and attach the new piece of fake snake, is it Wednesday yet and I'll be lacing it together using black 3mm lace in a Lazy S stitch and sealing it with a hard gloss finish that will likely be rubbed back to a matt or satin finish
Distressed.jpg
Distressed.jpg (58.34 KiB) Viewed 1994 times
"To my deep morticication my father once said to me, 'You care for nothing but shooting, dogs and rat catching, and you will be a disgrace to yourself and all your family.' "

- Charles Darwin

User avatar
perry
Posts: 1925
Joined: Tue Sep 05, 2006 9:59 pm
Location: morayfield qld australia

Re: Warts and all Hip Quiver Build Along

#18 Post by perry » Wed May 26, 2010 9:23 pm

Last Friday's virus is still holding on and I've been going to work out of misguided loyalty but this morning as I struggled out of bed I decided to have another sick day and give myself a chance to kick this wog. As you can see I used the time to finish this Hip Quiver.

Again not everything went quite to plan. After I glued and laced the fake snake onto the top section of the quiver I noticed about midway down where a section about 1cm X 4 cm has formed a slight air bubble. I spread the glue well smoothed it onto the Quiver body evenly and weighted it down for 3 hours to dry but it still did not stick. You'd be hard pressed to notice but :x :x I know it's there.
Finished (4).jpg
Finished (4).jpg (112.38 KiB) Viewed 1968 times
back veiw.JPG
back veiw.JPG (71.27 KiB) Viewed 1968 times
It's turned out quite heavy and solid, it should take years of hard use. I am quite happy with how the distressing process has given the hip quiver an aged appearance. The lacing is protected by reinforcing pieces of leather with the holes spaces down the middle so sharp arrow heads cant cut it and I've put rivets in the top corner of the Quivers section that holds the arrows and along the bottom for extra broadhead insurance

All that's left to do now is rub the gloss back to a matt finish with 0000 steel wool and rub a bit of Dubbin or similar into it but that I'm in no hurry for that.

The Python looks a bit friendly as well, the eye is not quite right :?: but overall this is my best tooling effort to date

I have not played this virus quite right as I'm feeling a lot better, so well in fact I will be back at work tomorrow. With luck I could have milked another couple of days off and arrived at the Barambah Trad shoot on Friday arvo to give this Quiver a whirl - are well, perhaps next time

regards Jacko
"To my deep morticication my father once said to me, 'You care for nothing but shooting, dogs and rat catching, and you will be a disgrace to yourself and all your family.' "

- Charles Darwin

User avatar
perry
Posts: 1925
Joined: Tue Sep 05, 2006 9:59 pm
Location: morayfield qld australia

Re: Warts and all Hip Quiver Build Along

#19 Post by perry » Sat May 29, 2010 11:10 pm

Didn't quite make it to the shoot, had the car packed and was leaving straight after work. At lunch time went to the bank - No money :twisted: Minister of finances decided there was a more important thing to spend it on :cry:

Not quite part of the Quiver build along but I did post an earlier picture. Today I finished the Armguard with the Gum leaves and Gum flowers on it, again with the black Antiquing medium. I also added a little of the dark brown medium to add to the aged appearance. The cat was being most helpful - it's female also :wink:
Gum leaves and flowers.jpg
Gum leaves and flowers.jpg (91.48 KiB) Viewed 1936 times
regards Jacko
"To my deep morticication my father once said to me, 'You care for nothing but shooting, dogs and rat catching, and you will be a disgrace to yourself and all your family.' "

- Charles Darwin

Post Reply