Sketch a tiller quickly and accurately
Posted: Sun Jun 14, 2009 12:45 pm
This came up on another forum, and I thought it might be useful here as well.
Many beginning (all bowyers, really) bowyers work alone. Because of this, they often don't have experience or a helping eye to point out the finer details of tiller.
One way around this is to have a perfect tiller to compare with. Not many people will let you leave one of their bows strung and full-drawn to compare your own bow against though. The answer is to have a line draw of a bow's tiller drawn behind wherever you are tillering the bow.
But how to do that? If I can't tiller a perfect shape, how in the world am I going to sketch one?
To draw a good tiller shape for regular bows, you need to be able to draw an ellipse. Fortunately, it's really easy.
You need a big huge right angle, like a board of MDF, a long slat of wood, like 40 inches long, and some butcher's paper.
A circle is a round form with one radius and one focal point, and an ellipse is a round form with two radii and two foci. Knowing what size/shape ellipse to draw is a little difficult to start with, so I'll be a bad teacher and just give you the answer. Below is a scale draing of an ellipse which has radii of 24 and 32". I have used this and found the resulting bows to be very good bows.
With your long slat, drill a hole close to one end big enough for a pencil and secure the pencil in (later). From this hole, measure out 24" and drive a nail through so it pokes out the other end. Do the same again 32" from the pencil hole. Now affix your pencil.
The next bit is a bit difficult to explain in words so see the image below.
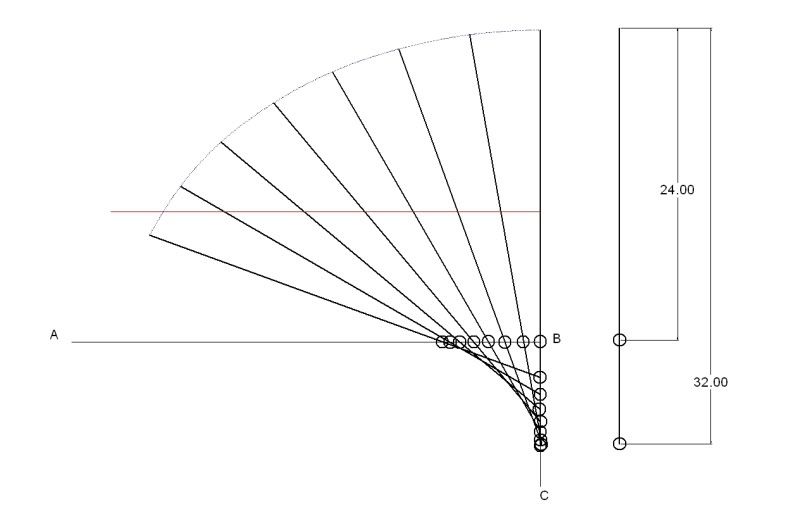
What you have to do is lay your MDF board down on the butcher's paper and weight it all down so it don't move none. The you put the slat up against the board so that the 24" nail is at AB and the 32" nail is somewhere along BC. Then push the 24" nail along the line AB, ensuring that the other nail is always pressed hard against BC.
The pencil will trace the perimiter of the ellipse, seen as the blue line. I recommend tracing this onto your tiller wall directly as the paper will likely get a bit ratty through the tiller process.
So now you have a drawn tiller behind your bow on the tiller stick. You will more easily see where more bend is needed, and where there is too much already. I recommend placing it such that the back of the bow follows the line. Technically it should be the neutral plane, but then you won't be able to see it!
When a bow is drawn to 28", the tips will have moved very close to 14" behind the back of the grip. The red line represents this distance, and is where your nock will sit at full draw.
If you make a bow exactly to this curve, it will end up at 66 inches long, and have a bendy handle. If you want a rigid handle bow, then draw your curve 3-4 inches offset to the left to account for the length of half the handle.

When you've made a couple, you can experiment with different shapes of ellipse. To make a longer bow, increase both radii. To make it more whip ended, shorten the long radius. To make it more circular, increase the short radius.
I hope this will prove useful/helpful to some of the bowyers out there.
Dave
Many beginning (all bowyers, really) bowyers work alone. Because of this, they often don't have experience or a helping eye to point out the finer details of tiller.
One way around this is to have a perfect tiller to compare with. Not many people will let you leave one of their bows strung and full-drawn to compare your own bow against though. The answer is to have a line draw of a bow's tiller drawn behind wherever you are tillering the bow.
But how to do that? If I can't tiller a perfect shape, how in the world am I going to sketch one?
To draw a good tiller shape for regular bows, you need to be able to draw an ellipse. Fortunately, it's really easy.
You need a big huge right angle, like a board of MDF, a long slat of wood, like 40 inches long, and some butcher's paper.
A circle is a round form with one radius and one focal point, and an ellipse is a round form with two radii and two foci. Knowing what size/shape ellipse to draw is a little difficult to start with, so I'll be a bad teacher and just give you the answer. Below is a scale draing of an ellipse which has radii of 24 and 32". I have used this and found the resulting bows to be very good bows.
With your long slat, drill a hole close to one end big enough for a pencil and secure the pencil in (later). From this hole, measure out 24" and drive a nail through so it pokes out the other end. Do the same again 32" from the pencil hole. Now affix your pencil.
The next bit is a bit difficult to explain in words so see the image below.
What you have to do is lay your MDF board down on the butcher's paper and weight it all down so it don't move none. The you put the slat up against the board so that the 24" nail is at AB and the 32" nail is somewhere along BC. Then push the 24" nail along the line AB, ensuring that the other nail is always pressed hard against BC.
The pencil will trace the perimiter of the ellipse, seen as the blue line. I recommend tracing this onto your tiller wall directly as the paper will likely get a bit ratty through the tiller process.
So now you have a drawn tiller behind your bow on the tiller stick. You will more easily see where more bend is needed, and where there is too much already. I recommend placing it such that the back of the bow follows the line. Technically it should be the neutral plane, but then you won't be able to see it!
When a bow is drawn to 28", the tips will have moved very close to 14" behind the back of the grip. The red line represents this distance, and is where your nock will sit at full draw.
If you make a bow exactly to this curve, it will end up at 66 inches long, and have a bendy handle. If you want a rigid handle bow, then draw your curve 3-4 inches offset to the left to account for the length of half the handle.
When you've made a couple, you can experiment with different shapes of ellipse. To make a longer bow, increase both radii. To make it more whip ended, shorten the long radius. To make it more circular, increase the short radius.
I hope this will prove useful/helpful to some of the bowyers out there.
Dave