Page 1 of 2
And so the recurve journey begins....
Posted: Tue Mar 03, 2015 9:09 am
by rodlonq
19" riser with 15 degree limb planes

- TDRiser2.JPG (116.03 KiB) Viewed 7863 times
Chopping off the excess bits - part 1. Going to try to leave the rest in place until the limbs are fitted and I am sure of where centre is.

- TDRiser3.JPG (99.04 KiB) Viewed 7863 times
I was tempted to not put the back overlay on and just let the glue dry. Fortunately the overlay is just as nice, if not better. I could sit and look at this timber for hours. More pics to come.

- TDRiser4.JPG (96.79 KiB) Viewed 7863 times
Thanks for looking.
Cheers... Rod
Re: And so the recurve journey begins....
Posted: Tue Mar 03, 2015 10:04 am
by greybeard
Rod,
The riser looks good, what timbers have you used?
My take down riser [symmetrical] pattern is similar to yours; I don’t do any work on the belly of the riser block until the bow is braced. I also use symmetrical risers on my one piece recurves.
Chances are one limb will be a little softer which allows you to nominate the top limb and aid in tillering.
Daryl.
Re: And so the recurve journey begins....
Posted: Tue Mar 03, 2015 10:35 am
by Gringa Bows
Very nice Rod
Re: And so the recurve journey begins....
Posted: Tue Mar 03, 2015 10:38 am
by Bill

Good one Rod, I'll be watching this story line with great enthusiasm.

Re: And so the recurve journey begins....
Posted: Tue Mar 03, 2015 5:08 pm
by bigbob
Looking good so far Rod. What is the timber, it looks a bit like beefwood. Also good idea to leave riser in 'block' form until the limbs are mounted, particularly if at least two sides are nice and square to each other.
Re: And so the recurve journey begins....
Posted: Tue Mar 03, 2015 8:09 pm
by rodlonq
Thanks for the encouraging words fellas. The timbers are WA Lacey She Oak with Burdekin Plum between. The accents are Qld Silver Ash and WA Jarrah.
Here is my 15 degree jig for truing up the limb planes on the 6" belt sander.
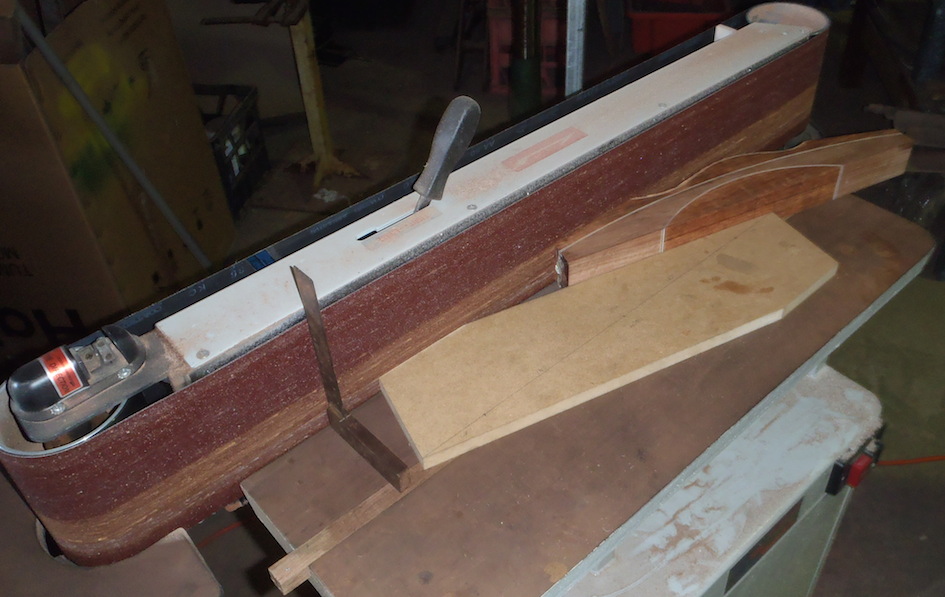
- TDRiser5.JPG (162.88 KiB) Viewed 7809 times
The riser overlay (QLD Silver Ash and WA Lacey She Oak) went on last night and the Jarrah limb plane overlays went on this morning. All glue dags removed and it is ready to go in the oven @ 65C for the whole day tomorrow to properly cure the Smoothon.
- TDRiser6.JPG (160.71 KiB) Viewed 7809 times
Daryl, you can see the asymmetry in the above photo a lot clearer. The limb planes are symmetric about the centre line (as are the accents). I have the pivot point exactly in the centre of the riser. However the highest point of the bump on the back of the riser is 3/4" above centre rather than in the centre of the bow. Providing I do the limb planes properly, if I find a particular set of limbs shows negative tiller I should be able to swap them lower for upper & upper for lower to end up with the same amount of positive tiller. All sound good in theory.... yup

. I could leave shaping the back of the riser till last as well if I wasn't going to put overlays on it. I like the idea of the limb plane overlays going on after the riser overlays so the riser overlay becomes enclosed. I have a one piece riser on the drawing board and it is symmetrical so the limb with positive tiller can be elected for the top (same as my one piece longbows).
On Thursday I will give the sides a final sand in the drum sander to make sure they are properly parallel the fit the inserts and pins. Hopefully on Friday evening and Saturday I will make a limb form and than make some limbs on Sunday.... Would be nice to have it ready for the next hunters round on March 14.
Cheers... Rod
Re: And so the recurve journey begins....
Posted: Wed Mar 04, 2015 8:32 am
by bigbob
Lacey she oak heh? That actually was my first thought but only having seen a couple of photos of it and never the 'real thing' decided against. That's a big score Rod finding a bit of that.Like your idea of the limb pad angle jig too. Riser looks of similar proportions to the footed riser I use on my takedown.
Re: And so the recurve journey begins....
Posted: Wed Mar 04, 2015 7:22 pm
by rodlonq
Got a few small drying checks in the riser today while it was curing. I erred on the side of caution and only took it to 60C as well. Nothing that a bit of thin CA won't fix I think, but should I have put a bowl of water in the oven with it to stem the rapid change in moisture content?
Cheers.... Rod
Re: And so the recurve journey begins....
Posted: Wed Mar 04, 2015 7:37 pm
by bigbob
Sent you a pm Rod.
Re: And so the recurve journey begins....
Posted: Sun Mar 08, 2015 3:10 am
by rodlonq
A few more pics. Had a few late nights getting everything ready but I hope it was worth it

.
I made a router pattern of half of the form and doweled it to the from blank so I could flip it and have exact symmetry. It is much easier to shape a single sheet of MDF only half the size of the form than it is to deal with a 72" x 18" x 2" slab on the band saw and sander benches.

- RouteringForm.JPG (96.21 KiB) Viewed 7719 times
The laminations for two limbs all layer out and ready to glue up. Veneers are Red Gum. The core has a QLD Silver Ash parallel lamination (cabinet veneer) above the wedge and a vertical bamboo tapered lamination below the wedge.
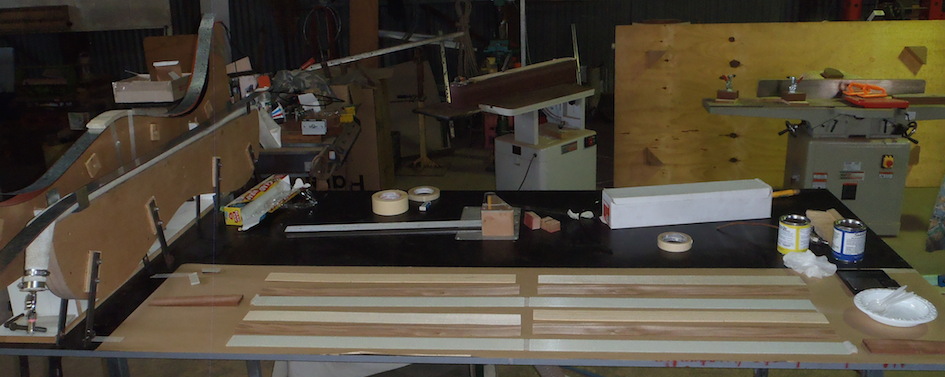
- ReadyToGlueUp.JPG (116.04 KiB) Viewed 7719 times
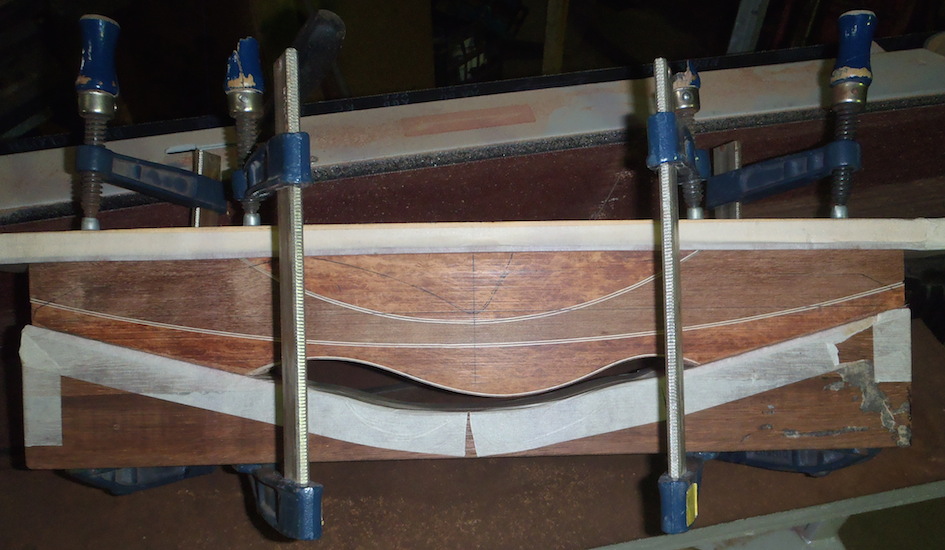
The glue up is done and the limbs are cooling in the form under pressure. The riser is having a chip being glue back in place. I tried shaping the riser with a router pattern jig (sitting on the jointer in the photo above) but it was not good on the "rising grain".

- LimbsCooked.JPG (154.58 KiB) Viewed 7719 times
I was going to wait until the limbs were fitted before shaping the riser but I couldn't stand there doing nothing while the limbs cured
. It is only roughed out so far and hopefully will be a lot closer to being finished of with string groove, riser bolt and tip overlays by tomorrow night.
Re: And so the recurve journey begins....
Posted: Sun Mar 08, 2015 8:55 am
by bigbob
Interesting your form for doing both limbs at once, Rod. Certainly speeds the process up. i thought about doing a similar thing with the latest form I'm building for a 58'' take down but in the end only had enough ply in the shop to make the single limb form.Yours is looking good.
Re: And so the recurve journey begins....
Posted: Sun Mar 08, 2015 10:14 am
by UPTHETOP
Rod looking really good mate, Id leave the shaping of the riser until the limbs are fitted as you have heaps more wood to play with lining everything up. But as I know you to well it will all fit perfectly together what specs are you going for will be interesting to see how close you get with all those maths calculations roaming around in the paper work.
Cant wait to see it.
Cheers Wayno
Re: And so the recurve journey begins....
Posted: Sun Mar 08, 2015 1:17 pm
by bigbob
I'd echo Wayno 's thoughts about leaving the riser shaping until the limbs are fitted. Leaves plenty of room to 'fudge ' a little if needs be.
Re: And so the recurve journey begins....
Posted: Mon Mar 09, 2015 1:13 pm
by rodlonq
Put on the limb bolt, limb pad and belly overlays last night.

- LimbOverlays.JPG (193.08 KiB) Viewed 7673 times
Drilled the pin and bolt holes and installed brass tube bushes in the holes.
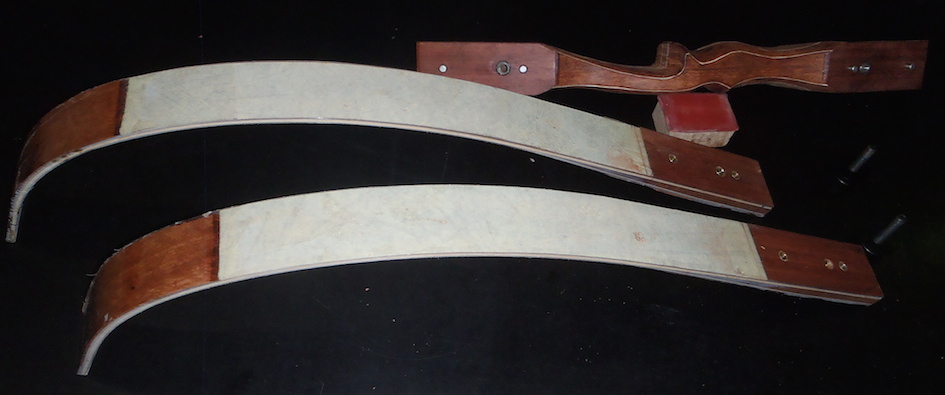
- LimbBushesIn.JPG (105.32 KiB) Viewed 7673 times
Made up a "bracing tree"that I can use to flex the bow and get my tillering blocks onto the blank limb tips to check centre alignment.
- BracingTree.JPG (302.73 KiB) Viewed 7673 times
Time to bend it.... Thanks for looking fellas.
Re: And so the recurve journey begins....
Posted: Mon Mar 09, 2015 1:24 pm
by rodlonq
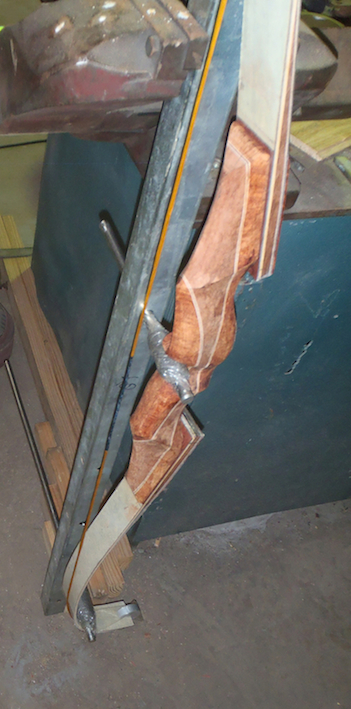
Well.... that was fun..... NOT. Was pulling the top limb to get the tillering block on and got some string slap (and a bit of limb tip too I think)

Not good

My gut instinct was to put a clear glass overlay on the back of the riser to give it tensile strength and also protect it from the inevitable damage that will happen by putting the bow down on the ground. I told myself "it will be right, it'll look better without the overlay"....


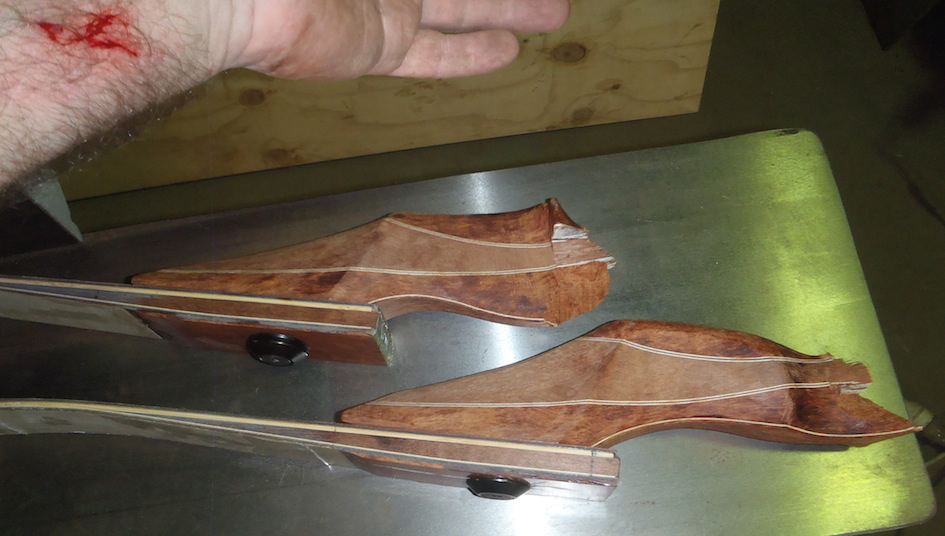
- BrokenRiser.JPG (143.24 KiB) Viewed 7671 times
Well the next one is going to be a lot better even if it is not as pretty as I envisaged this one would be. We learn by our mistakes and today I got schooled big time this morning

At least (Daryl, Wayno and Bob), I will have the limbs fitted to the next riser before I start shaping it
Re: And so the recurve journey begins....
Posted: Mon Mar 09, 2015 1:32 pm
by bigbob
Oh man! what a calamity Rod! Can you see any underlying cause for such a dramatic result? That's a real bummer.
Re: And so the recurve journey begins....
Posted: Mon Mar 09, 2015 2:07 pm
by UPTHETOP
Rod cant believe it still broke in half you must of been jumping on it with your full body weight ? The riser is always the last thing I shape after fitting the limbs. Ive got a solid block of rose wood which maybe big enough to get an riser out of, you could run over it with a truck and it wont brake that stuff, your welcome to it if you want . Hope the arm heels better then the pride mate. You gotta love building bows Rod it is a wonderful pass time.
Cheers Wayno
Re: And so the recurve journey begins....
Posted: Mon Mar 09, 2015 2:29 pm
by greybeard
rodlonq wrote:....At least (Daryl, Wayno and Bob), I will have the limbs fitted to the next riser before I start shaping it.....
Rod, definately bad news about the riser, but judging by the break I think the lacey oak would have failed at some stage.
Some of the timbers with that sort of grain pattern don't seem to fare well under tension.
If i need to use these timbers I run an iron bark beam back to belly and for the length of the riser.
It is difficult to ascertain if a strip of glass on the back of the riser would have prevented this failure.
Daryl.
Re: And so the recurve journey begins....
Posted: Mon Mar 09, 2015 4:30 pm
by bigbob
Daryl has some wise advise there Rod. An 'I' beam running the length of the riser is sound policy on any wood that's a bit of an unknown quantity.
Re: And so the recurve journey begins....
Posted: Mon Mar 09, 2015 5:11 pm
by rodlonq
Thank you for the input fellas. I have used centre beams in risers before to "beef" them up. On all of my previous one piece bows (straight laid and deflex/reflex) the back glass has run the entire length of the bow. I would not expect a tension failure at the back of the riser with glass there, after all, that is what glass is for.
The grain in the Lacey She Oak is looks very short and wavy. It looks more like burl than wood now that I see it broken. I am almost 100% sure the failure was in tension at the back of the bow and would have been prevented with a sturdy overlay.
I started out with a full-size block of each timber so I have the compliment (Burdekin Plum back and belly and WA Lacey She Oak centre flair) to the broken riser sitting on the shelf already cut to marry together. It will be more resistant to tension failure with the BP at the back and belly. I think my next riser will have black fibre glass accents either side of the centre flair (instead of the QLD Silver Ash and Jarrah) and a clear fibreglass overlay at the back.
Oh... and I forgot to answer your question earlier Wayno. Was aiming for 60#@28" for this set of limbs.
Cheers... Rod
Re: And so the recurve journey begins....
Posted: Thu Mar 12, 2015 10:48 am
by Muz1970
Bugga Rod, I was really enjoying reading this post. Was looking forward to seeing the timbers shine in the finished riser.
Re: And so the recurve journey begins....
Posted: Thu Mar 12, 2015 5:02 pm
by rodlonq
It still coming mate, won't let a little speed bump like this stop me....
Cheers... Rod
Re: And so the recurve journey begins....
Posted: Fri Mar 13, 2015 10:23 am
by Flatliner
Bummer Rod, and it was coming up so nice too.
I gave up trying to use the tiller blocks on the recurves cause it just felt like there was too much tension created trying to bend the whole limb blank to get them on. I had visions of the block tearing the center of the out of the limb, never would have expected the riser to give way like that though. Although as suggested above I do fit the limbs before shaping the riser.
That kind of break is one of the reasons why I run my accent veneers through the riser the other way.
Oh well live and learn hey, like they say, if at first you don't succeed so much for sky-diving

.
Rob.
Re: And so the recurve journey begins....
Posted: Fri Mar 13, 2015 3:51 pm
by Mick Smith
I wasn't expecting that. I've been keeping an eye on this thread, but seeing as I know so little about making these sorts of bows I having contributed at all. It was looking so good too.
At least you've got the right attitude Rod. You've taken it on board and you've learnt from it and your enthusiasm is undaunted.
Re: And so the recurve journey begins....
Posted: Sun Mar 15, 2015 11:05 pm
by rodlonq
Well it has taken a while but I have caught up on progress it seems. Rob, I am in agreement with you, it seems to tie an awful lot of force to get the tillering blocks on. Turns out I could have just marked the middle of the limb tips and taken it from there. It's just the way that the fella on this Fred Bear video (at about 2:45)
https://www.youtube.com/watch?v=rlp9QfitBs8 makes it look so easy.
Riser V2.0. with black fibreglass in all 3 accent strips. I think it'll be tough enough now. In the photo the limb plane overlays of clear glass are being glued on.
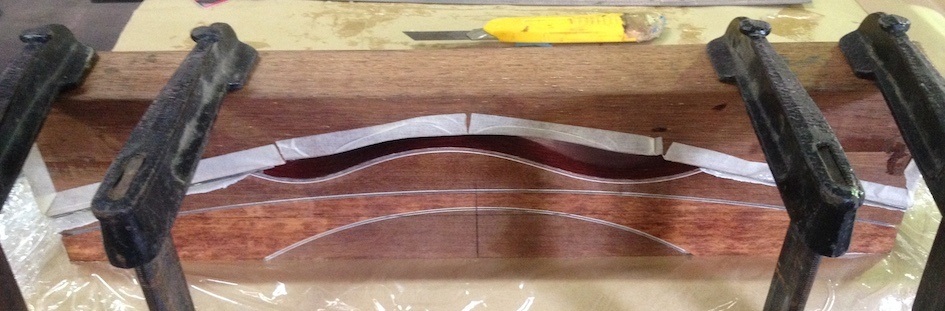
- RiserV2.JPG (129.84 KiB) Viewed 7572 times
A close up peek of the Lacey She Oak under the clear glass riser overlay

- RIserV2CloseUp.JPG (175.86 KiB) Viewed 7572 times
Checking the alignment of the limbs with tillering blocks.

- TillerBlocks.jpg (22.29 KiB) Viewed 7572 times
Checking the alignment of the limbs again before any further progress is made on the riser
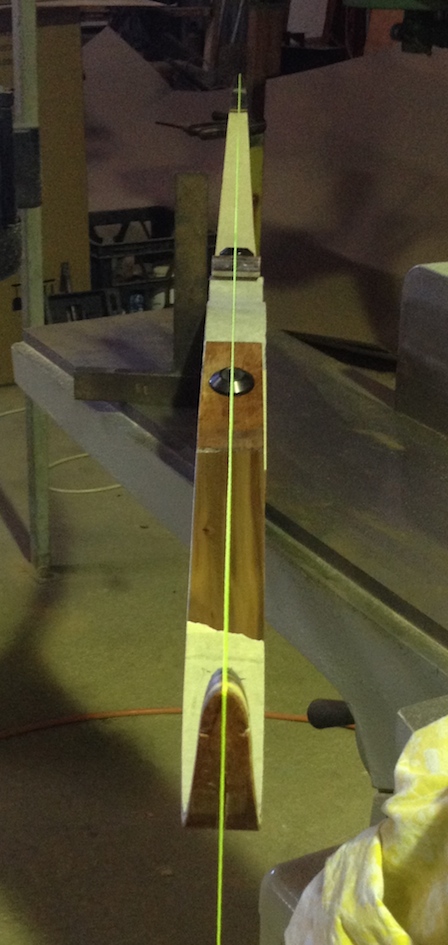
- Stringline.jpg (160.79 KiB) Viewed 7572 times
And one more pic of the assembled bow before shaping the riser starts.
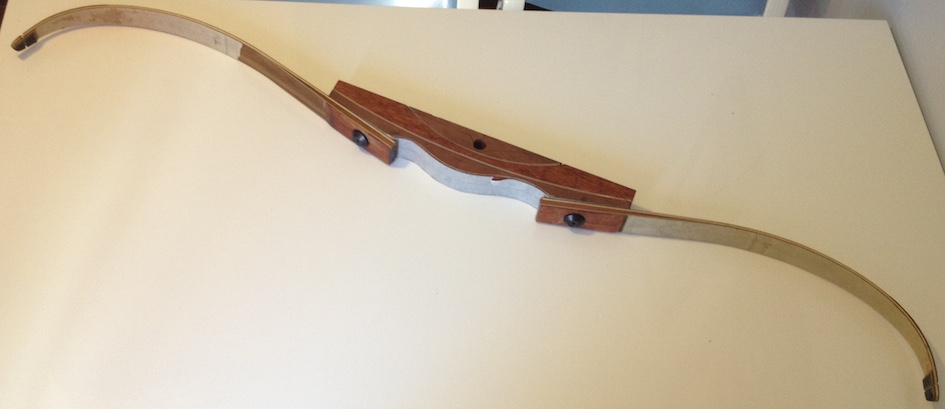
- Assembled1.JPG (79.38 KiB) Viewed 7572 times
Might be a while before there is much else to look at, got a lot on this week.
Cheers.... Rod
Re: And so the recurve journey begins....
Posted: Mon Mar 16, 2015 7:33 am
by kerry
Looking good Rod ,fingers crossed for you mate , cheers Kerry
Re: And so the recurve journey begins....
Posted: Mon Mar 16, 2015 7:41 pm
by rodlonq
Today I'll let the pictures do the commentary as I have to attend to some domestic chores... Thanks for looking.
Knocked off early today and got into it.

- TillerTree1.JPG (45.39 KiB) Viewed 7550 times
Looks the goods but is too much bow for me at the moment

- Recurve1.JPG (47.11 KiB) Viewed 7550 times
These limbs are a bit too much for me. I stopped measuring at 26" AMO draw length cos I am a big chicken...
Note the brace height is really low, I need to make a shorter work string.
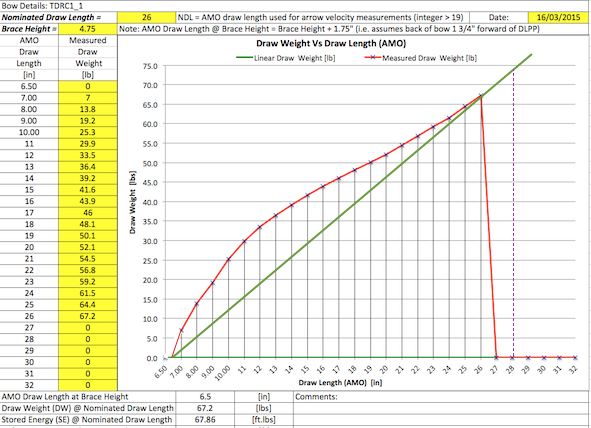
- DF_Vs_DL_1.png (156.16 KiB) Viewed 7550 times
I need to hire the hulk (or Graydon) to get the money shot cos I can't get it back to my draw length...
Cheers... Rod
Re: And so the recurve journey begins....
Posted: Mon Mar 16, 2015 8:20 pm
by hunterguy1991
Very nice bow Rod!! You guys make making these look and seem so dam easy!!
Really need to get my act together and have a crack at one soon.
Re: And so the recurve journey begins....
Posted: Tue Mar 17, 2015 9:40 am
by bigbob
Looking good Rod. Like you I have found that hitting the right weight with a recurve is MUCH harder than a longbow. I mike all my lams and even finish them off lying prone on a bench with a block and sandpaper to bring them right up to specs. One thou can equal 1 # so doesn't take much to get well over weight. Still pleased for you that you have a working bow, even if you might be making another set of limbs if you keep it!
Re: And so the recurve journey begins....
Posted: Wed Mar 18, 2015 4:24 pm
by Muz1970
Great workmanship, Bow looks Sweet......Looks like you need some 750gn arrows and a trip to the NT.