First projects out of the heat box

How to make a Bow, a String or a Set of Arrows. Making equipment & tools for use in Traditional Archery and Bowhunting.

Moderator: Moderators

Post Reply
Message
Author
User avatar
yeoman
Posts: 1563
Joined: Mon Mar 08, 2004 1:32 pm
Location: Canberra

First projects out of the heat box

#1 Post by yeoman » Sat Oct 18, 2014 6:36 am

I thought the best test to run in the new heat box would be to glue up a couple of staves and see how long it took to set the EA 40.

I had a stave cut out already waiting to go. I also had a stave already backed that had delaminated in one place, and using a knife, I was able to pry the rest of the backing off without tearing the backing or the stave. A sure sign of a bad glue-up, or a bad glue.

I mixed up just over half a disposable cup (maybe 2/3....I can't remember) of Smooth On EA 40. It has a long pot life which meant I didn't have to rush the process. I managed to glue both staves up (quite generously) and had about 1/6 of a full cup of epoxy left over. I wrapped each stave in cling wrap then applied the tire strip binding. The I braced both bows backwards to impart some reflex. One of the bows, a 66" pyramid stave, I put 6" of reverse brace into. The other, a 73" stave, got 9".

I strung them in reverse using nylon. This proved to be a mistake as the strings stretched, I think due to the heat, and so when I got the bows out they were quite a bit lower in brace height.

I used a cheap 24 hour electrical timer set to two hours. I checked the staves at this point and there were still a couple of tacky bits on the belly of the staves (they were put in back-down), so I put the box back on for another hour. All epoxy was rock solid by then. Although, just to see what would happen I put the cup of leftover epoxy in the bottom of the box, where it's coldest, and that was set after two hours.

Wrapping the staves in cling wrap prior to binding meant the rubber strips came off super easy. However I remembered immediately after unwrapping that in my West System epoxy days, I would cover the outside of the boo backing with duct tape to protect it from the globules of excess epoxy. Lesson (re)learned.

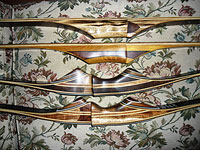
The pyramid bow stave turned out okay. It now has about 2" of reflex.

Image

It will take some wrestling in the early stages of tillering, until I get a short string on. No idea what draw weight will come out of this. I think I'd be happy with about 45#.

The longer stave has just over 5" of reflex. However the reflex is unevenly distributed, heavily biased to one limb which almost looks recurved.

Image

Now, trying to tiller this bow with so much reflex would be absurd. It was never my intention to tiller this bow out as-is.

What I plan to do is cut each limb shorter and delfex them, either through gluing to a riser or perhaps a fitting them into a takedown assembly. As an illustration, here I've traced the limb profiles in deflex onto some MDF:

Image

Perhaps what I can do is cut the left limb to length and use it as the upper, and cut the right limb a little shorter and use it as the lower. By cutting the right limb shorter, it will alleviate a little bit of the excess reflex. Or rather, compensate for the lack of reflex in the other limb.

Or perhaps I'm worrying too much.

But in conclusion, I'm very happy with the performance of the Smooth On EA 40 so far. Easy to measure, mix and spread, and with heat....quick to harden.
https://www.instagram.com/armworks_australia/

Bow making courses, knife making courses, armour making courses and more:
http://www.tharwavalleyforge.com/

Articles to start making bows:
http://www.tharwavalleyforge.com/index. ... /tutorials

User avatar
greybeard
Supporter
Supporter
Posts: 2992
Joined: Tue Feb 07, 2006 9:11 am
Location: Logan City QLD

Re: First projects out of the heat box

#2 Post by greybeard » Sat Oct 18, 2014 4:30 pm

yeoman wrote:I thought the best test to run in the new heat box would be to glue up a couple of staves and see how long it took to set the EA 40......But in conclusion, I'm very happy with the performance of the Smooth On EA 40 so far. Easy to measure, mix and spread, and with heat....quick to harden.
Dave, that is a good result for your first try with heat curing.

Once you resolve the issue of maintaining symmetrical reflexing in the staves it should be clear sailing ahead.

Daryl.
"And you must not stick for a groat or twelvepence more than another man would give, if it be a good bow.
For a good bow twice paid for, is better than an ill bow once broken.
[Ascham]

“If a cluttered desk is a sign of a cluttered mind, of what, then, is an empty desk a sign?” [Einstein]

I am old enough to make my own decisions....Just not young enough to remember what I decided!....

User avatar
rodlonq
Posts: 2096
Joined: Wed May 06, 2009 3:02 pm
Location: Ingham NQ

Re: First projects out of the heat box

#3 Post by rodlonq » Sat Oct 18, 2014 5:41 pm

Well done Dave, I don't think you will ever regret using smooth-on.

User avatar
bigbob
Posts: 4098
Joined: Sat Jul 10, 2010 8:55 pm
Location: sunshine coast

Re: First projects out of the heat box

#4 Post by bigbob » Sat Oct 18, 2014 6:18 pm

rodlonq wrote:Well done Dave, I don't think you will ever regret using smooth-on.
totally agree on both counts!
nil illigitimo in desperandum carborundum
razorbows.com

User avatar
yeoman
Posts: 1563
Joined: Mon Mar 08, 2004 1:32 pm
Location: Canberra

Re: First projects out of the heat box

#5 Post by yeoman » Sat Oct 18, 2014 6:22 pm

Thanks guys.

I think I'm onto a winner with this EA 40 stuff.

The asymmetric reflex really doesn't bother me. This bow was off the scrap heap, and about two or three 'to-do' items from being cut into garden stakes. I know I can get even reflex. I've done it dozens of times.
https://www.instagram.com/armworks_australia/

Bow making courses, knife making courses, armour making courses and more:
http://www.tharwavalleyforge.com/

Articles to start making bows:
http://www.tharwavalleyforge.com/index. ... /tutorials

Post Reply