'Newbies build along'
Moderator: Moderators
'Newbies build along'
If my crap photos are suitable and Jeff can re-size them then i may post a 'newbies' build along, mistakes and all. i am cheating slightly as the bow is nearly finished, cause I didnt want to end up looking a complete dork, with a big stuff up .This build along would highlight the problems a new comer can face ,which i investigated thoroughly in the interests of providing factual detail. Thats my story anyway . I am very happy with how it is going to this point.
nil illigitimo in desperandum carborundum
razorbows.com
razorbows.com
-
Stickbow Hunter

- Supporter

- Posts: 11637
- Joined: Sat Jul 26, 2003 8:33 pm
- Location: Maryborough Queensland
Re: 'Newbies build along'
Sounds great mate, get started!!!  Email me the photos when you're ready.

Jeff
Love it!!!bigbob wrote:This build along would highlight the problems a new comer can face ,which i investigated thoroughly in the interests of providing factual detail.
Jeff
Re: 'Newbies build along'
Hi Bob yes it's not as easy as a lot of people think Bob but your having a go . I made three selfbows last week and they all went bang. Yowie. 
Re: 'Newbies build along'
Gonna start editing photos tonight Jeff , probably send some tomorrow.
nil illigitimo in desperandum carborundum
razorbows.com
razorbows.com

Re: 'Newbies build along'
Good onya Bob, really looking forward to seeing how this goes.
Lately, if life were treating me any better, I'd be suspicious of it's motives!
Re: 'Newbies build along'
I'm a bit more wary Keith, mine are laminated boo' with glass. If it goes bang I'll be givin the game away! Craig once I get my lam grinder sorted and re arrange my workshop my offer still stands.
nil illigitimo in desperandum carborundum
razorbows.com
razorbows.com

Re: 'Newbies build along'
Cool Bob,
Looking forward to it
Hazard
Looking forward to it
Hazard
Politics is a game played by dishonest people to gain an unfair advantage!
Never under estimate the strength of a cornered coward.
Everyone is entitled to be stupid, but some abuse the privilege.
http://www.bowmanstaxidermy.com.au

Never under estimate the strength of a cornered coward.
Everyone is entitled to be stupid, but some abuse the privilege.
http://www.bowmanstaxidermy.com.au
Re: 'Newbies build along'
Way to go Bob  , hows that lam grinder coming along?
Rob.
Rob.
The shortest distance between two points is a FLATLINE
 Email; robnicoll(at)bigpond(dot)com
www.flatlinebows.com.au
www.flatlinebows.com.au
-
Gringa Bows
- Posts: 6331
- Joined: Thu Aug 30, 2007 7:09 pm
- Location: Bundaberg QLD
Re: 'Newbies build along'
Good stuff Bob,looking forward to the pics 

Re: 'Newbies build along'
Cant wait Bob, looking forward to seeing your work.
Cheers........ Rod
Cheers........ Rod
Re: 'Newbies build along'
Thanks everybody, just hope i havent shot my mouth off too soon as i still havent finished it completely yet . Other words still time for me to invent a way to screw it up.Rob, still chasing a pump motor then its all go. i bought one on fleabay for $1.25 but the guy wont go through with it as he stipulated pickup only and I wanted him to use a courier at my expense. Wont be too hard to get one though as I havent tried locally.Gotta go and finish this bow!
nil illigitimo in desperandum carborundum
razorbows.com
razorbows.com
Re: 'Newbies build along'
Okay here we go. As a first timer at building a laminated bow I thought I might pass on what experiences I occur in building a glass backed bamboo core laminated bow. I know a lot of people probably wont want to go to the expense and trouble of building their own hotbox, and laminating jig but seeing as I went that way i will pass on what i've discovered. The hot box is a necessary piece of equipment if your using Smooth on epoxy which is highly recommended. This is made from 2 sheets of 8'x4' ply, dimensions 88'' long 22'' high and 12'' wide[ my apologies for imperial measurements, but most bow material is in this format] It is cut 6'' down from the top to form 2 seperate sections which are then joined by piano hinges. The heat source is 10 100w light globes [ 75 w halogen. These globes are wired in parallel and are usually controlled by a thermostat. I managed to cook mine before I used it so now just rely on a digital thermometer. i find that I have to periodically 'crack 'the lid to regulate the temp. It should be 60c for about 8 hours. This box is lined throughout with Alfoil to retain the heat. care should be taken when using not to tear the foil.
- Attachments
-
- 004.JPG (95.39 KiB) Viewed 3696 times
Last edited by bigbob on Mon Oct 17, 2011 7:34 pm, edited 3 times in total.
nil illigitimo in desperandum carborundum
razorbows.com
razorbows.com
Re: 'Newbies build along'
The form is also made from 3 sections of ply glued and laminated together with screws. As this has to be cut into 2 dont place screws where the cut will be made. this form is 72'' long and 1 1/2'' thick. This thickness is suitable for the type of longbow I am making and is straight layed. The form follows the straight section of limbs and the riser shape at the centre. It is used in conjunction with a air hose which is inflated to spread even pressure over the bow, while in the form.
- 009.JPG (93.12 KiB) Viewed 3693 times
Last edited by bigbob on Mon Oct 17, 2011 7:36 pm, edited 1 time in total.
nil illigitimo in desperandum carborundum
razorbows.com
razorbows.com
Re: 'Newbies build along'
Bandsawing the form to shape
- Attachments
-
- 010.JPG (80.33 KiB) Viewed 3696 times
Last edited by bigbob on Mon Oct 17, 2011 7:37 pm, edited 1 time in total.
nil illigitimo in desperandum carborundum
razorbows.com
razorbows.com
Re: 'Newbies build along'
- 012.JPG (126.64 KiB) Viewed 3693 times
Last edited by bigbob on Mon Oct 17, 2011 7:40 pm, edited 2 times in total.
nil illigitimo in desperandum carborundum
razorbows.com
razorbows.com
Re: 'Newbies build along'
Lookin good Bob Have fun.
Re: 'Newbies build along'
- 008.JPG (76.67 KiB) Viewed 3696 times
Last edited by bigbob on Mon Oct 17, 2011 7:42 pm, edited 2 times in total.
nil illigitimo in desperandum carborundum
razorbows.com
razorbows.com
Re: 'Newbies build along'
- 009.JPG (85.9 KiB) Viewed 3696 times
Last edited by bigbob on Mon Oct 17, 2011 7:43 pm, edited 1 time in total.
nil illigitimo in desperandum carborundum
razorbows.com
razorbows.com
Re: 'Newbies build along'
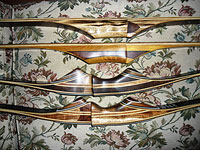
Lams ripped on table saw.
- Attachments
-
- 035.JPG (94.26 KiB) Viewed 3696 times
Last edited by bigbob on Mon Oct 17, 2011 7:47 pm, edited 1 time in total.
nil illigitimo in desperandum carborundum
razorbows.com
razorbows.com
Re: 'Newbies build along'
- 045.JPG (77.49 KiB) Viewed 3696 times
Last edited by bigbob on Mon Oct 17, 2011 7:48 pm, edited 2 times in total.
nil illigitimo in desperandum carborundum
razorbows.com
razorbows.com
Re: 'Newbies build along'
- 016.JPG (83.86 KiB) Viewed 3696 times
Last edited by bigbob on Mon Oct 17, 2011 7:51 pm, edited 2 times in total.
nil illigitimo in desperandum carborundum
razorbows.com
razorbows.com
Re: 'Newbies build along'
Once I got back its time now to do a 'dry run' to see if all is well with the set up Seems I missed the glue up on the riser. The lay up is sitting on top of what will be my new lam grinder courtesy of picking the brains of Rob of flatline fame.
- Attachments
-
- 020.JPG (80.13 KiB) Viewed 3696 times
-
- 024.JPG (187.07 KiB) Viewed 3696 times
Last edited by bigbob on Mon Oct 17, 2011 7:56 pm, edited 4 times in total.
nil illigitimo in desperandum carborundum
razorbows.com
razorbows.com
Re: 'Newbies build along'
Good on ya for this, Bob. I've wanted to try this for a couple of years but have felt intimidated by my lack of knowledge and skills. Seeing you have a crack at it is encouraging. Whenever you're ready and it suits you... excepting between Aug 26th and Sep 4th 'cause I'm heading West for a week with The Northern South East Qld Contingent of Bowhunters and Reprobates to laugh, learn & and enjoy being away from The City ... give me a yell and I'll be on my way, mate!
Good on you, too Daryl, over the last few years I've been aware that you help and encourage many a hopeful novice, and help to refine the skills of those that show enough talent to be a potential bowyer. Although you seem to be a man who doesn't seek accolades, and may even be a little embarrassed at the attention, that's a contribution that should be acknowledged and applauded!
Good on you, too Daryl, over the last few years I've been aware that you help and encourage many a hopeful novice, and help to refine the skills of those that show enough talent to be a potential bowyer. Although you seem to be a man who doesn't seek accolades, and may even be a little embarrassed at the attention, that's a contribution that should be acknowledged and applauded!
Last edited by Nephew on Sat Aug 13, 2011 1:27 pm, edited 2 times in total.
Lately, if life were treating me any better, I'd be suspicious of it's motives!
-
Gringa Bows
- Posts: 6331
- Joined: Thu Aug 30, 2007 7:09 pm
- Location: Bundaberg QLD
Re: 'Newbies build along'
Looking good so far Bob.
Re: 'Newbies build along'
Thanks Rod, Craig and Rod. Been wanting to do this for a long time also, and if it wasnt for the help and encouragement from people like LBRod, Greybeard and not the least Jeff himself then I wouldnt have ever managed to do so . iIam in your collective debts and grateful for your very valuable help and advise. This site is truly one that we all can be thankful for. There is so much knowledge on here that even a no hoper like myself feels capable of better things.
nil illigitimo in desperandum carborundum
razorbows.com
razorbows.com
Re: 'Newbies build along'
Well after the dry run its time to do the 'cook'. Realised I have been taking 'photos' of doing the fades on the riser but camera's memory was full. Duh! so that parts gone. Suffice to say that it can be shaped very well on a drum sander but as everyone says be ultra careful at the extremities as they have to be paper thin, so the transposition between lams and riser fades is invisible.[ in theory]The form has a layer of clingwrap layed right along its length to protect the form from the oozing glue when in the press.First photo shows the formica strip which is laminated to the lower form covered. Now EACH surface that is be glued has a coating of smooth on epoxy applied to it The backing glass is layed on first with roughened side upward and epoxy applied. Then each 'boo lam is coated and placed in turn on the form It is highly advisable to cover your worksurface with old paper to protect against glue drippings, and to wear disposable gloves.Once the first 3 lams are in place[ this depends on the manner you construct your bow as people have different methods of where the lams go. this bow has 3 lams at the back [ target ] side and one lam on the belly side running up the riser.this last lam is in 2 pieces to finish at the riser .The riser is placed on after epoxy coating each side and centered with the the centreline mark on the form [ forgot to mention about centre mark] the 2 belly lams are applied and the belly glass is also coated on the down side and layed on. Now it gets interesting as with all the epoxy things get very slippery and care must be taken to ensure all lams are in line and the riser is centered. Packing tape is used to pull down the last lam and the glass. How well this is done will show up in the glue lines once the bow comes out of the hotbox.Another layer of clingwrap is placed over the layup and a pressure strip which is a thin length of metal[ I used a length from a plumbing supply about 1.5mm thick. this distributes the pressure from the air hose evenly all along the form. Forgot to mention that the lams should be placed in hotbox for 30mins or so prior to layup to remove any moisture, and the lams once cooled should be wiped thoroughly with metho to remove all fine dust and polutants. This is a very messy game and dust can invade every where. Before glue up make sure that all dust residues are vacuumed up cause they can get windblown by the slightest breeze[ ask me]! duh Also forgot to mention that bothe front and back sides of the glass must be covered with a tape to protect them during the building process. I bought high temp stuff from Binghams but have been reliably informed that ordinary masking tape will stand the 60c temp in the hotbox.
- Attachments
-
- 021.JPG (79.47 KiB) Viewed 3695 times
Last edited by bigbob on Mon Oct 17, 2011 7:58 pm, edited 3 times in total.
nil illigitimo in desperandum carborundum
razorbows.com
razorbows.com
Re: 'Newbies build along'
layup taped down and ready for hotbox
- Attachments
-
- 022.JPG (73.29 KiB) Viewed 3695 times
Last edited by bigbob on Mon Oct 17, 2011 7:59 pm, edited 1 time in total.
nil illigitimo in desperandum carborundum
razorbows.com
razorbows.com
Re: 'Newbies build along'
Once the taping is done then the deflated airhose is placed on and the upper form fitted. The airhose is inflated to a few lbs to help force out air bubbles, then increased to around 20 lb, wait a few minutes and then go all the way to 60 - 70lb.. Another thing before using airhose always check EACH time it is used for air leaks as pressure loss in the hotbox would result in a ruined bow.It is good practice to cover the pressure strip and airhose in clingwrap too as the oozing epoxy can grab anything [ ask me!]
- Attachments
-
- 027.JPG (99.69 KiB) Viewed 3695 times
Last edited by bigbob on Mon Oct 17, 2011 8:00 pm, edited 1 time in total.
nil illigitimo in desperandum carborundum
razorbows.com
razorbows.com
-
Stickbow Hunter
- Supporter
- Posts: 11637
- Joined: Sat Jul 26, 2003 8:33 pm
- Location: Maryborough Queensland
Re: 'Newbies build along'
Going well Bob!!!  What tape did you use to hold the lams etc in place; the stuff with fibre glass type reinforcement?
Jeff
Jeff
Re: 'Newbies build along'
Yep Jeff, got some filament tape I think its called from a office supply place.Ultra strong as its fibreglas reinforced.
I am going to do an alteration to my form too as i have been thinking [ had to take aspros after] and it is cumbersome to have to lift the form to wrap the tape around each time and dont like just running the tape over the lams and just down each side . what I am going to do is drill a series of holes in the lower form at appropriate spots and glue short dowels in extending a little each side. Because the tape is very strong I will be able to go over the lam down a side wrap around a dowel and back over the lam down the the other end of the dowel. This will excert a great deal of force on the lams and should result in better glue lines especially at the riser.
I am going to do an alteration to my form too as i have been thinking [ had to take aspros after] and it is cumbersome to have to lift the form to wrap the tape around each time and dont like just running the tape over the lams and just down each side . what I am going to do is drill a series of holes in the lower form at appropriate spots and glue short dowels in extending a little each side. Because the tape is very strong I will be able to go over the lam down a side wrap around a dowel and back over the lam down the the other end of the dowel. This will excert a great deal of force on the lams and should result in better glue lines especially at the riser.
Last edited by bigbob on Sun Aug 14, 2011 9:33 am, edited 1 time in total.
nil illigitimo in desperandum carborundum
razorbows.com
razorbows.com