Feather burner

How to make a Bow, a String or a Set of Arrows. Making equipment & tools for use in Traditional Archery and Bowhunting.

Moderator: Moderators

Post Reply
Message
Author
User avatar
rodlonq
Posts: 2096
Joined: Wed May 06, 2009 3:02 pm
Location: Ingham NQ

Feather burner

#1 Post by rodlonq » Wed Feb 23, 2011 7:57 pm

It didn't work :lol: I got it all together and tried it out. The wire stayed stone cold cos my battery charger has built in short circuit protection :lol: Well it looks like I can justify the purchase of a bench top variable voltage/current power source now. I've always wanted one to use for calibrating instruments and testing low voltage eqiupment.

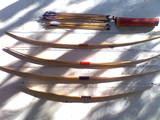
The wire in the rig now is only 1 mm 316L TIG wire but I have some 0.9 mm Nichrome heating element wire on the way. Nichrome wire is not that dear for this purpose , $20 for a 50 foot roll. You only need a foot for each different fletch design you want to make. The TIG wire has twice the resistance and is likely to get soft at high temp where the Nichrome wont. Here are a few pics of the burner without any results yet.

The non-compliant battery charger and the burner.
OA View.JPG
OA View.JPG (150.47 KiB) Viewed 2918 times
A wave design and a complimentary wavy flu-flu design for 6 fletch arras.
Top view.JPG
Top view.JPG (145.78 KiB) Viewed 2918 times
The guide for the nock (or tapered shaft) is made with a 90 degree countersinking rose, just use light pressure to polish the surface.
Nock View.JPG
Nock View.JPG (116.78 KiB) Viewed 2918 times

I thought it might be useful to post some data for NiChrome wire in case anyone wants to have a go at this. It is also really useful to be able to calculate the required voltage, current or resistance by using Ohms Law: Volts = Amps X Ohms. Using the charts and knowing the output of your power source you should be able to select a wire size that suits. Just be careful it doesn't get to skinny or I reckon it will loose shape too easy.
NiCrAmps.png
NiCrAmps.png (178.51 KiB) Viewed 2918 times
NiCrOhms.png
NiCrOhms.png (179.83 KiB) Viewed 2918 times
And a plan I found that provided the required fodder to chew on.
Plans.png
Plans.png (160.13 KiB) Viewed 2918 times
I am really looking forward to trying this out with a decent power source and giving it a go, but still got to dip, crest and fletch (with some splices :) ) some arras first.

Cheers..... Rod
Last edited by rodlonq on Thu Nov 03, 2011 10:15 am, edited 2 times in total.

User avatar
Bandsaw
Posts: 136
Joined: Mon Apr 19, 2010 9:30 am
Location: Hunter Valley

Re: Cold feather burner

#2 Post by Bandsaw » Thu Feb 24, 2011 6:35 am

Cant wait to see the end result mate. It looks cool.

Ben
Never trust a man who, when left alone in a room with a tea cozy, doesn't try it on. - Billy Connolly

User avatar
Gringa Bows
Posts: 6331
Joined: Thu Aug 30, 2007 7:09 pm
Location: Bundaberg QLD

Re: Cold feather burner

#3 Post by Gringa Bows » Thu Feb 24, 2011 7:05 am

Very interesting.........

User avatar
rodlonq
Posts: 2096
Joined: Wed May 06, 2009 3:02 pm
Location: Ingham NQ

Re: Feather burner

#4 Post by rodlonq » Sun Feb 27, 2011 7:28 pm

Well it works! I did a trial using a cheap dowel with only two feathers on so I could do a direct side by side comparing of the shapes. I had it too hot for the normal fletch and burnt the wood a bit (4 V). It would have been very harsh on a paint job I think. I then tried it on the flu flu side with a bit less voltage (3.6 V) which considering the longer wire would have reduced the current a lot. A lot of this problem will be reduced with the Nichrome wire because it is designed for heating elements and has a very coefficient of thermal expansion.

There are a lot of thing to learn from it the first time around.

When the wire gets hot it expands which causes it to get longer. The pattern changes shape a bit but more importantly it sneaks a little closer to the shaft... need to account for this with a bit more clearance during set up while cold.

I kept testing it with scraps of feather and the hotter wire cut more cleanly and with less pressure, and is easier to scrape residue off - but at the risk of burning the shaft, or worse lacquer or a time consuming cresting job.

Do this outside unless you want to be sleeping with the dog. The lady of the manor will not like the smell or you if you do this inside. Some photos of the test follow. I took some video cam footage but I don't even know how to get it onto the computer, let alone onto the forum.

I was checking the voltage wit ha multimeter because the analog gauges on the power source don't have very good resolution.
Test setup.JPG
Test setup.JPG (155.41 KiB) Viewed 3253 times
I like the normal fletch however I am undecided about the fancy flu-flu design (planned for 6 fletch flu-flu)
Test Result.JPG
Test Result.JPG (131 KiB) Viewed 3253 times
The wire was too hot and only about 1/2 mm from the shaft on the first cut. The other side was much cleaner.
Test burnt wood.JPG
Test burnt wood.JPG (94.14 KiB) Viewed 3253 times
I think I have enough confidence to use this equipment on a set of arrows that I have put a lot of time into sealing, capping cresting and fletching but I think I will do another couple of quick trials first :D

Cheers.... Rod

MUSS
Posts: 20
Joined: Sat Apr 18, 2009 9:22 am
Location: Nth QLD

Re: Feather burner

#5 Post by MUSS » Sun Feb 27, 2011 8:49 pm

mate top effort!
walkin alittle - looking lots

User avatar
rodlonq
Posts: 2096
Joined: Wed May 06, 2009 3:02 pm
Location: Ingham NQ

Re: Feather burner

#6 Post by rodlonq » Mon May 02, 2011 6:29 pm

I have made a couple of mods to the feather burner :D .

An adjustable nock reciever to adjust for different shaft size or fletch placement along the shaft
Nock receiver.JPG
Nock receiver.JPG (139.96 KiB) Viewed 3198 times
I bought a few spare ribbons for the Young feather burner and made one up the same shape as the wire one in the first trial. To be honest the TIG wire worked just as well (and took more power) but is probably not as durable.
Ribbon element.JPG
Ribbon element.JPG (156.89 KiB) Viewed 3198 times
I cut the side of the shaft rest so it is easier to get the fletched shaft close to the wire without any accidental burning.
Overall burner.JPG
Overall burner.JPG (160.04 KiB) Viewed 3198 times
The resulting shape and the design of the next set of shafts to be fletched
Arrows.jpg
Arrows.jpg (184.81 KiB) Viewed 3198 times
I made a tapering tool to go on my 12" disc sander. It needs more work but it does a very nice job. I will keep my tru-centre tool for field repairs on broken arras during hunting trips (if I ever get off my backside and go huntin that is).
Tapering tool.JPG
Tapering tool.JPG (153.33 KiB) Viewed 3198 times
Thanks for looking.

Cheers....... Rod

User avatar
Gringa Bows
Posts: 6331
Joined: Thu Aug 30, 2007 7:09 pm
Location: Bundaberg QLD

Re: Feather burner

#7 Post by Gringa Bows » Mon May 02, 2011 6:43 pm

They look the goods Rod :wink:

User avatar
Nephew
Posts: 3046
Joined: Thu Aug 23, 2007 1:28 pm
Location: Coochiemudlo Island,Moreton Bay, Qld.

Re: Feather burner

#8 Post by Nephew » Mon May 02, 2011 7:12 pm

Handy sort of a bloke, aint ya, Rod? :wink: :D
Lately, if life were treating me any better, I'd be suspicious of it's motives!

User avatar
Stickbow Hunter
Supporter
Supporter
Posts: 11637
Joined: Sat Jul 26, 2003 8:33 pm
Location: Maryborough Queensland

Re: Feather burner

#9 Post by Stickbow Hunter » Mon May 02, 2011 7:25 pm

Good set up mate, well done!!!

Jeff

User avatar
terryzac
Posts: 492
Joined: Sun Jul 12, 2009 4:18 pm
Location: south of brizzy

Re: Feather burner

#10 Post by terryzac » Mon May 02, 2011 7:29 pm

top effort rod. need to make one of these myself, will save me having to buy fletches as i have lots of fethers

terry

User avatar
dmm
Posts: 241
Joined: Tue Apr 06, 2010 9:10 pm
Location: Melbourne, Australia

Re: Feather burner

#11 Post by dmm » Sat May 07, 2011 9:20 am

rodlonq wrote:It didn't work :lol: I got it all together and tried it out. The wire stayed stone cold cos my battery charger has built in short circuit protection :lol: Well it looks like I can justify the purchase of a bench top variable voltage/current power source now. I've always wanted one to use for calibrating instruments and testing low voltage eqiupment.
Glad you got all this working. I was wondering if it would also have worked to connect the battery charger to a car battery, and then connect the battery to your circuit.

I'm a little wary of the idea of short circuiting a car battery, but then, "current is pulled", the voltage is known, and if something was to give, it would be your heating wire.

If this did work, it would be a more low cost solution for others.

Also I was wondering why this burning is done on the finished shaft, rather than earlier as it must be done on the feathers I buy? Is it because it's difficult to clamp them without a shaft?
Last edited by dmm on Sat May 07, 2011 1:50 pm, edited 1 time in total.
David
--
Sky TDX 17 riser with Kaya Carbon Tomcat limbs(25H-36#) short Beiter button and rest.

User avatar
Jeffro
Posts: 1157
Joined: Mon Oct 31, 2005 3:33 pm
Location: sydneyMWFA,NewcastleHVTA

Re: Feather burner

#12 Post by Jeffro » Sat May 07, 2011 1:33 pm

Rod you could try an electronic 12v halogen downlight transformer or an iron core one for that matter as your power supply.Ive seen it used to heat a bit of heating wire before.

Got me thinking I might try to make one aswell

User avatar
rodlonq
Posts: 2096
Joined: Wed May 06, 2009 3:02 pm
Location: Ingham NQ

Re: Feather burner

#13 Post by rodlonq » Tue May 10, 2011 2:15 pm

Thanks for the encouraging words fellas.

David, I think a 12 V battery would bring the 0.9 wire to about 1200 C in no time - way too hot for feather burning and would probably melt it. You need to be able to turn down the voltage somehow, maybe a shunt resistor would do it. The pre-cut feathers are chopped, not burned. You can buy a chopper to do this at home and I have one, but I like the customising aspect of a burner and some feather splicing methods need it to finish off. Have a look at

http://www.tradbits.com.au/index.php?pa ... 1&Itemid=1

Jeffro, A transformer would be good if you can control the voltage output, if it works as a dimmer it may do the job. You only need 3 - 4 V depending on the length, diameter and resistivity of the wire you are using. A fixed 12 V unit would have the same effect as a battery with regard to temperature. Could be a good cheap alternative though if it is adjustable. One of the reasons I bought a variable power supply is so I can adjust the speed of my cresting machine within a reasonable band of the nominal 6V to see if it runs smoother at different speeds.

Cheers....... Rod

alaninoz
Posts: 218
Joined: Wed Apr 09, 2008 6:22 am
Location: Canberra, Australia

Re: Feather burner

#14 Post by alaninoz » Fri Aug 05, 2011 7:44 pm

Well, after making my own feather chopper and trying Axel's method of burning feathers, I finally got around to making a feather burner like Rod's. No pictures yet - Rod's looks better anyway. Used wood from the scrap pile, some bolts and nuts I had lying around, and got Mark Harvey to import some burner strips - thanks Mark.

Gave it a try today and it worked a treat. The only problem was I didn't take enough notice of Rod's warnings about voltage control. The power supply I initially used didn't have enough grunt so I tried a hulking great 12V transformer I had lying around. Ended up doing a bit of pyrography on one of my shafts. I think a better power supply is in order.
Alan

User avatar
rodlonq
Posts: 2096
Joined: Wed May 06, 2009 3:02 pm
Location: Ingham NQ

Re: Feather burner

#15 Post by rodlonq » Mon Aug 08, 2011 7:57 am

Good stuff Alan.

User avatar
Stickbow Hunter
Supporter
Supporter
Posts: 11637
Joined: Sat Jul 26, 2003 8:33 pm
Location: Maryborough Queensland

Re: Feather burner

#16 Post by Stickbow Hunter » Mon Aug 08, 2011 11:28 am

Sounds like you learned a bit in the process mate and will end up with a useful addition to your arra making equipment; good onya. :D

Jeff

User avatar
stringnstik
Posts: 1106
Joined: Tue Oct 21, 2008 12:09 pm
Location: Cranbourne

Re: Feather burner

#17 Post by stringnstik » Mon Aug 08, 2011 4:13 pm

Grand effort, nout stoppin ya now
"I am the arrow..the arrow is me...together as one...I fly to thee"
"the stick maybe crooked and the string hath no form,
then married by bowyer, transforms when first drawn"
"twang....thud"

alaninoz
Posts: 218
Joined: Wed Apr 09, 2008 6:22 am
Location: Canberra, Australia

Re: Feather burner

#18 Post by alaninoz » Mon Aug 08, 2011 8:23 pm

Always learning - though some lessons I could live without!

I got the new power supply and tried it out on Sunday. Much better voltage and temperature control now. The finish (tru-oil) is still being discoloured a bit but at least the wood isn't being scorched. I'll continue to experiment with voltage and the distance of the filament from the shaft. Might also try a different finish - I've been wanting to try Massey finish for a while. This may not happen for a while though as I got plenty of arrows at the moment.

One thing I initially had trouble with was setting the distance between the filament and the shaft. Every time I adjusted it something else went out of whack. Didn't matter if I tried bending the filament or loosening the bolts and adjusting there. Eventually got it right but it was a pain.

As a result I had the idea of building a feather burner where the shaft holder has three degrees of freedom. I put together a rough 3D model of this idea in Google Sketchup and a snapshot of the model is attached. Don't know if I'll ever get around to building it, but it was a good exercise sorting it out. If I did build it I'd leave a bit of slop between the slots and the bolts so I could align the shaft holding slots properly. I'm not ready to go to the trouble of building gimballed shaft holders.
Attachments
3D model snapshot.
3D model snapshot.
Model.jpg (40.64 KiB) Viewed 2994 times
Alan

User avatar
rodlonq
Posts: 2096
Joined: Wed May 06, 2009 3:02 pm
Location: Ingham NQ

Re: Feather burner

#19 Post by rodlonq » Tue Aug 09, 2011 11:18 am

Your model looks good Alan, plenty of adjustment there.

After a few trials I found the wire does not need to be anywhere near glowing red (about 600C). If you have a multimeter measure the resistance of your wire and its length and work out the Ohms/foot of wire. You can then use the chart above as a guide to a target current. I found 6 amps for 0.9 mm NiCr wire to be sufficient heat (should be about 330 -340C). It cuts the feather a bit slower but is a much cleaner process and no shaft burning. I cant recall what current I found to be good for the NiCr strip but will let you know after I next visit the shed. I still haven't made up the arras with the blue cresting yet :roll: :oops:

Cheers...........Rod

alaninoz
Posts: 218
Joined: Wed Apr 09, 2008 6:22 am
Location: Canberra, Australia

Re: Feather burner

#20 Post by alaninoz » Tue Aug 09, 2011 7:33 pm

Rod:

Thanks for the tips. I'm using a NiCr strip from a Young feather burner that I got from Mark Harvey. I was using about 4.0 volts measured on a DMM and about 10 amps measured on the front panel of the power supply - one similar to the one you've got. I found that anything less than 4.0 volts wasn't giving me a clean cut. Maybe I was trying to rotate the shaft too quickly. I was going to measure the temperature (the DMM has a temperature probe) but I forgot.

One thing I did try was wrapping the shafts with masking tape before burning the feathers. This worked well where the tape was. The discolouration was between the feathers as I didn't tape that area. Maybe I will next time. I noted that the masking tape wasn't discoloured at all. Maybe the Tru-oil finish is particularly temperature sensitive.
Alan

alaninoz
Posts: 218
Joined: Wed Apr 09, 2008 6:22 am
Location: Canberra, Australia

Re: Feather burner

#21 Post by alaninoz » Wed Aug 10, 2011 4:38 pm

Got out the temperature probe today and the reading was 280C - a bit lower than Rod's calculation from the table. 280C seems a bit low, but then, as the movie says, paper burns at 451F (~230C).
Alan

Post Reply