Build a long , sort of , picture heavy

How to make a Bow, a String or a Set of Arrows. Making equipment & tools for use in Traditional Archery and Bowhunting.

Moderator: Moderators

Post Reply
Message
Author
dawallace45
Posts: 352
Joined: Fri Aug 13, 2004 7:16 pm
Location: Miriam Vale Queensland Australia

Build a long , sort of , picture heavy

#1 Post by dawallace45 » Wed Sep 22, 2010 3:52 pm

Some weeks back some one asked that the next time I built a bow that I supplied more pictures as I built it so here goes

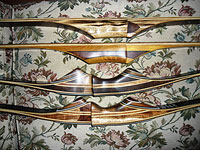
First off the some details

The bow is 68" nock to nock , 70" all up

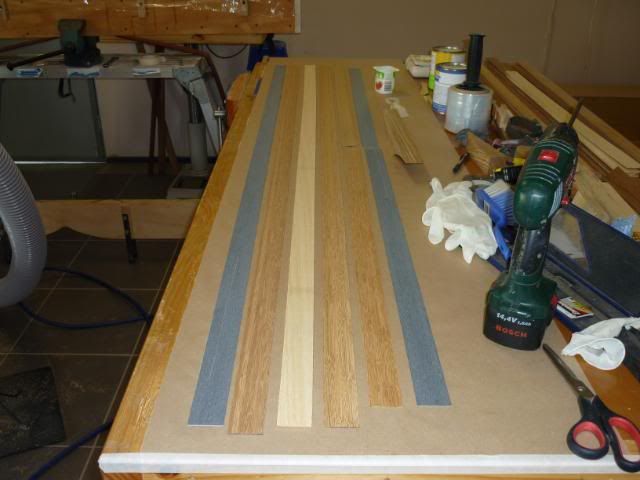
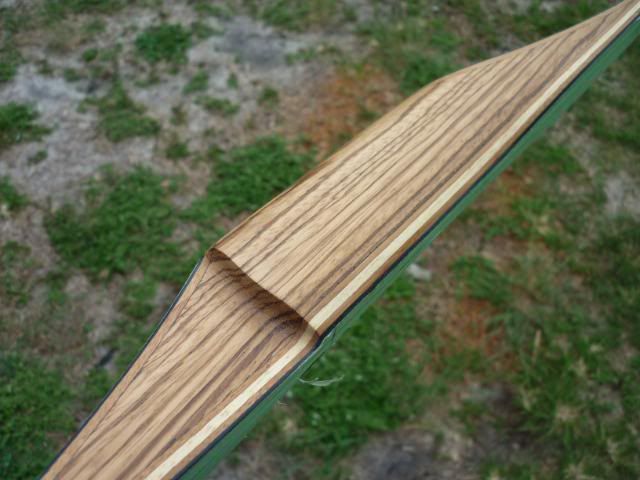
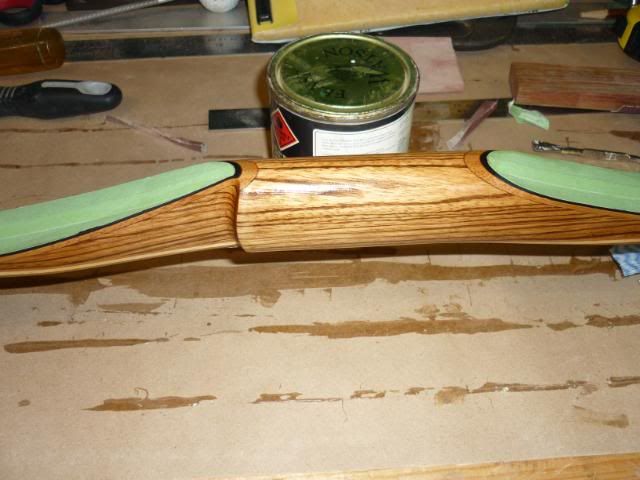
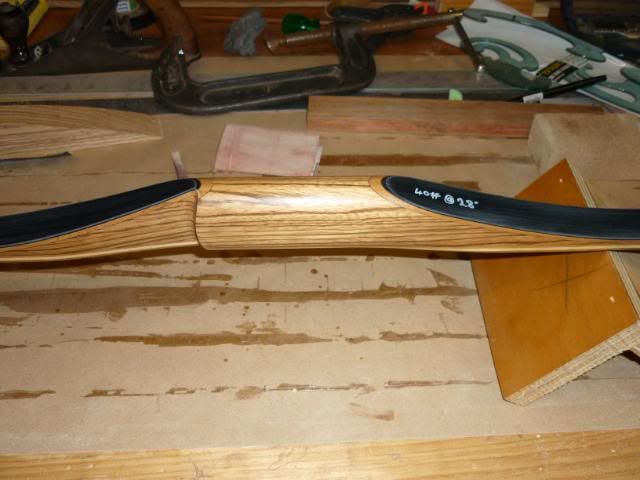
The Riser is Zebra wood , 16"

One tapered lamination and three parallel laminations
Taper is Coffee Bamboo .103"

Parallel laminations
2x .064 " Coffee bamboo
1x .101 " Tulip wood

Fibreglass laminations
2x .040 " Black

Draw Weight 40# @ 28"

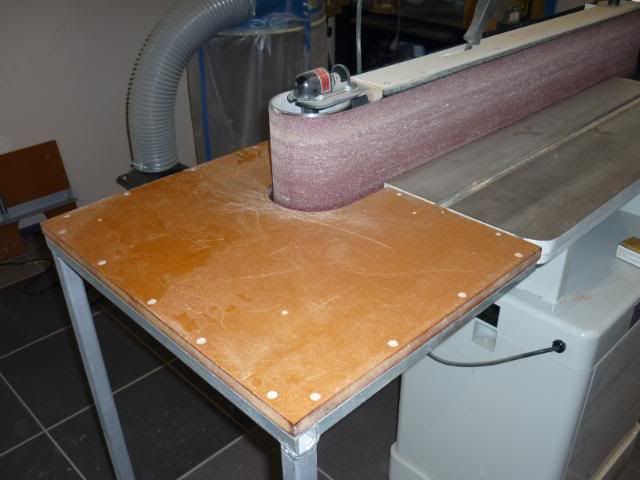
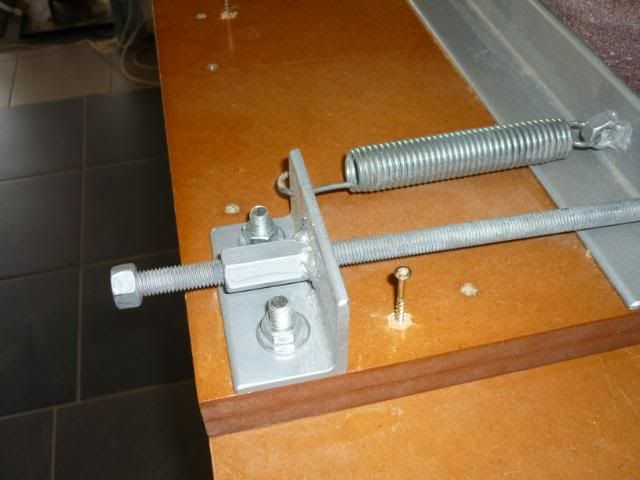
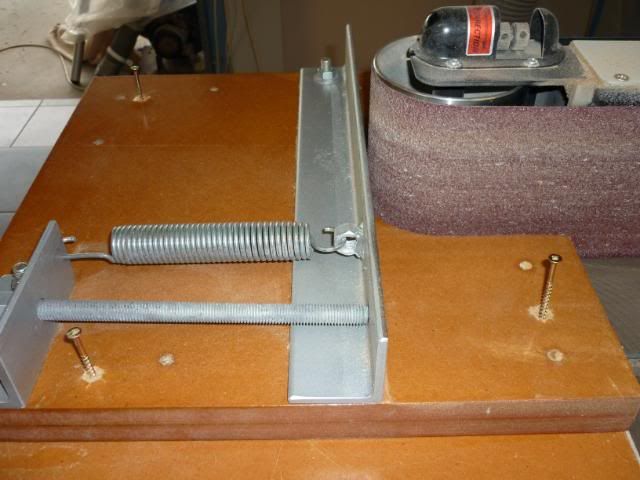
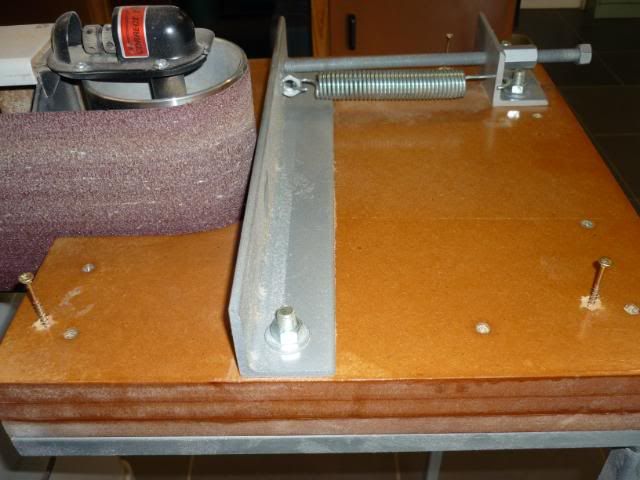
First off I cut and grind my laminations , I use a attachment I made up for my big belt sander
Image
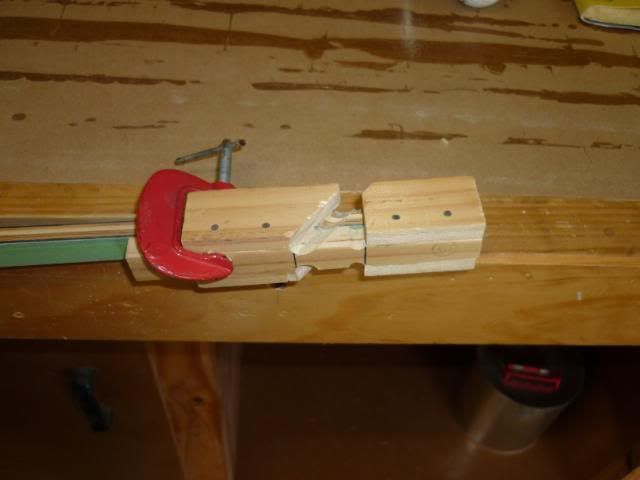
I then mark out and cut out the Riser on my Band saw then grind to the line on the big belt sander
Image
Image
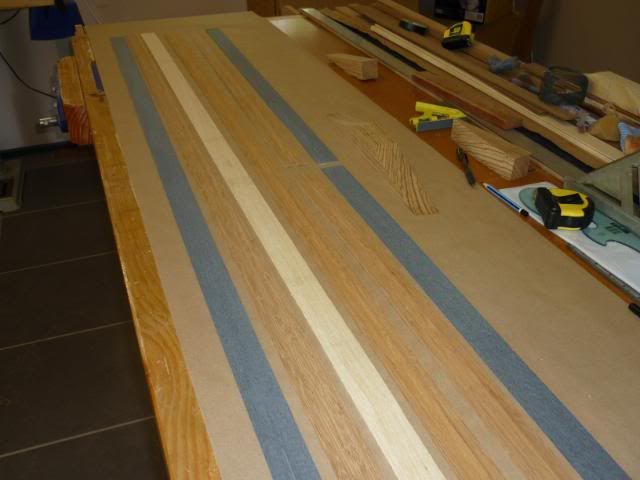
My bench is set up with a roll of Brown paper on one end , when I go to do a new bow I roll it out and tape down one end , when the bow is finished I cut off the old paper and roll out a new lot , makes it cleaner for epoxy work
Image

I double check the laminations and the riser tape up the face side of the fibreglass strips with 8 day masking tape then do a dry run by putting the lot into the bow press and inflating the air hose , if all is well it comes out again and into the hot box to warm up ,
Image
While that is happening I set out the bench with all the stuff I'll need for the next step , I set out the epoxy , I use smooth on , I make it up to a 110 gm batch , that seems to work out just right for me , I use a 40 mm plastic scraper to spread it , I always put several pair of rubber gloves on the bench handy and make sure the press is set up and the glad wrap , tape and such are handy and a covering of Glad wrap is on the bow form
Image
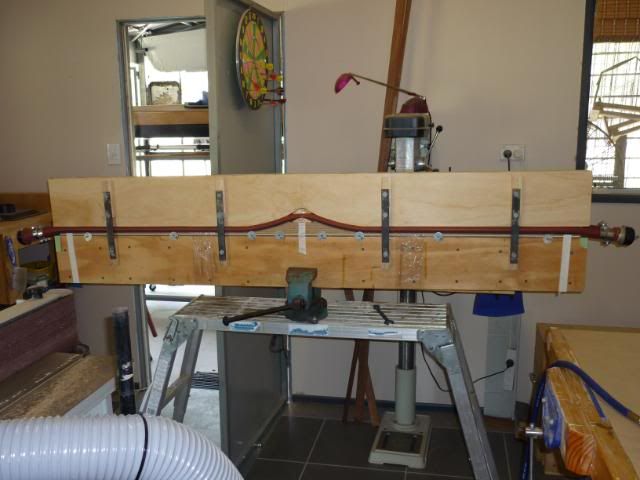
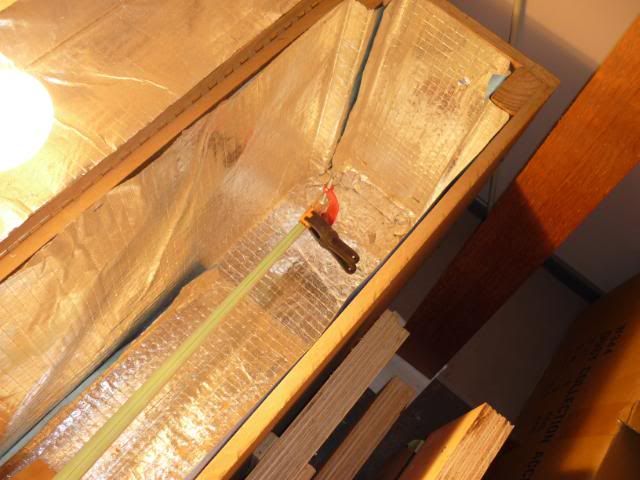
Once the laminations are warmed up I put them on the bench , mix the epoxy and start work , when all surfaces are coated it's in to the form with the riser held into place with filament tape , more glad wrap goes on the Lamipanel strips I use between the bow and the air hose , I then put more Filament tape on the very ends , flip the mudguard washers along the form into place and nip them up to hold the laminations in place evenly and then use a plastic film hand dispenser to wrap the form from the ends to hold the lot into place evenly , the air hose then goes on and the top form and it's all bolted up tight and the air hose inflated slowly with a gap of 30 seconds or so every 10 psi , then into the hot box

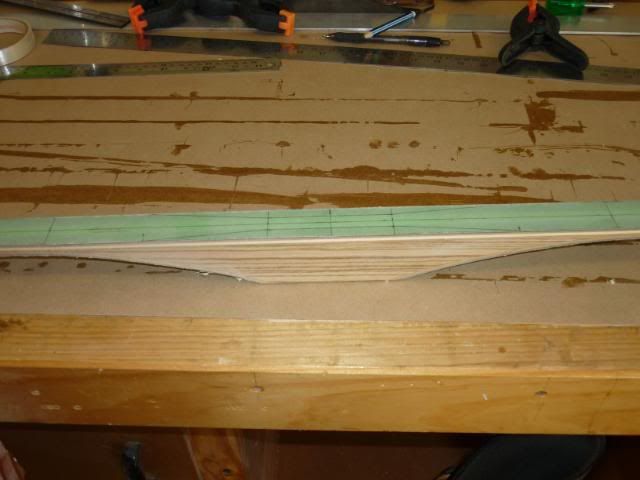
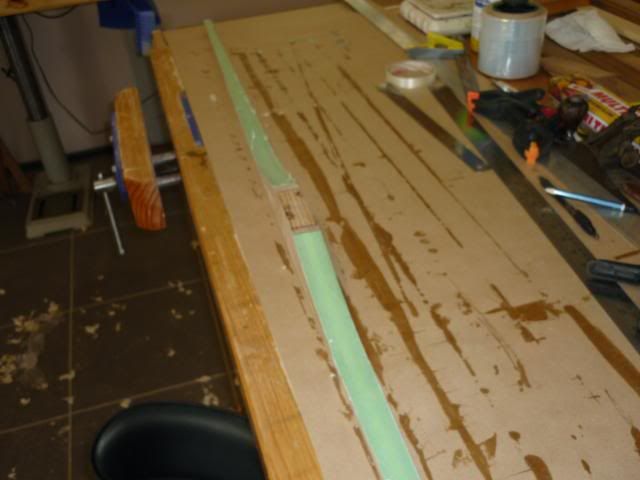
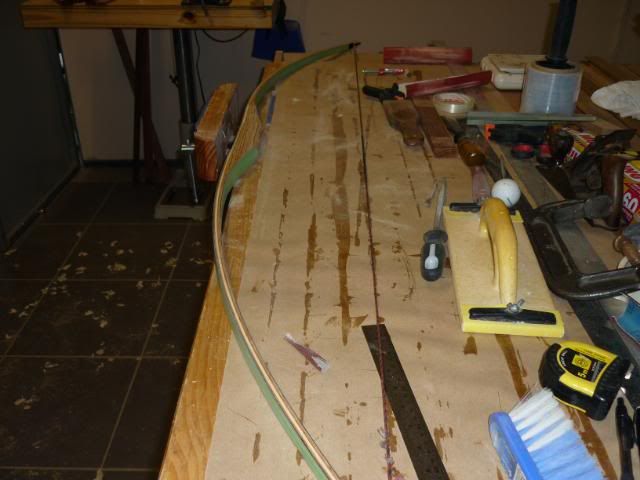
Next morning out it comes and the plastic wrap comes off and then the epoxy dags are ground off on the big belt sander
Image
Image
Image
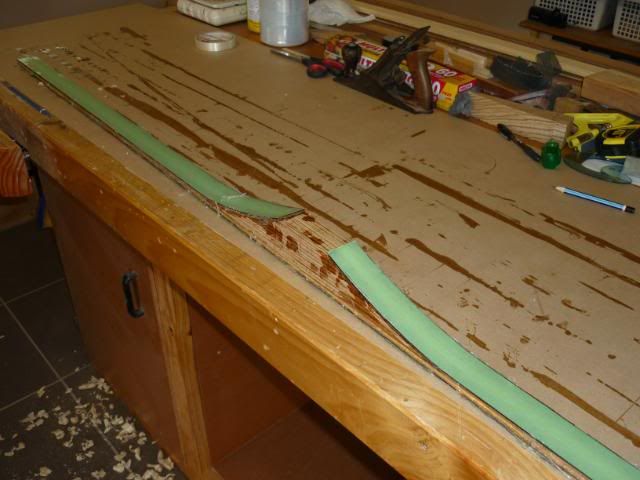
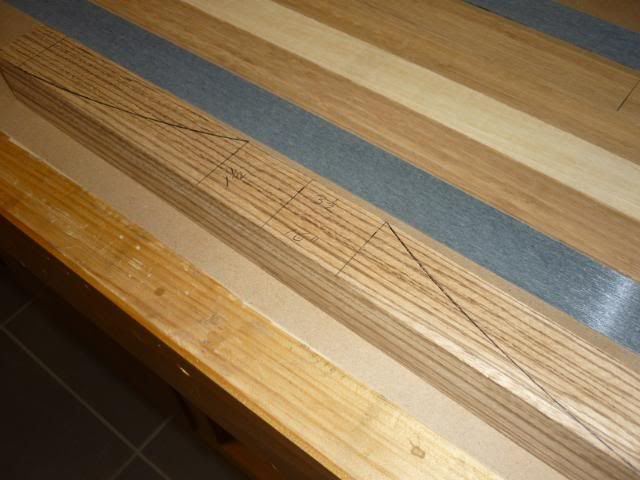
Then the straight edge goes on and the centre is marked , then the bow marked out ,
Image
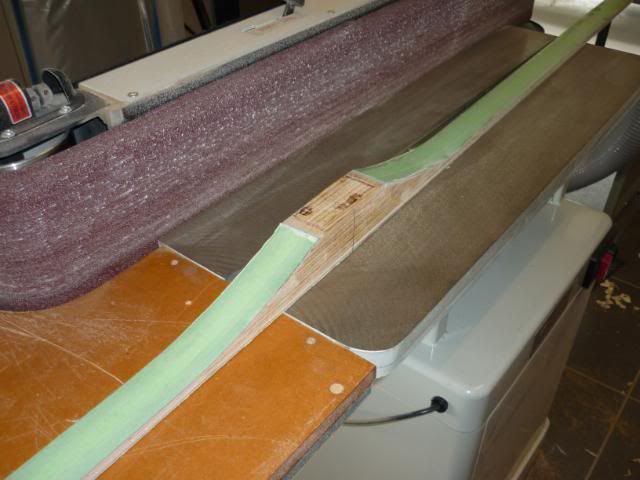
Once it's marked out I cut it out on the Triton Bench saw , I used to use the Bandsaw but it's too expensive on blades , with the triton I get 10 bows from the one blade instead of just one
Image
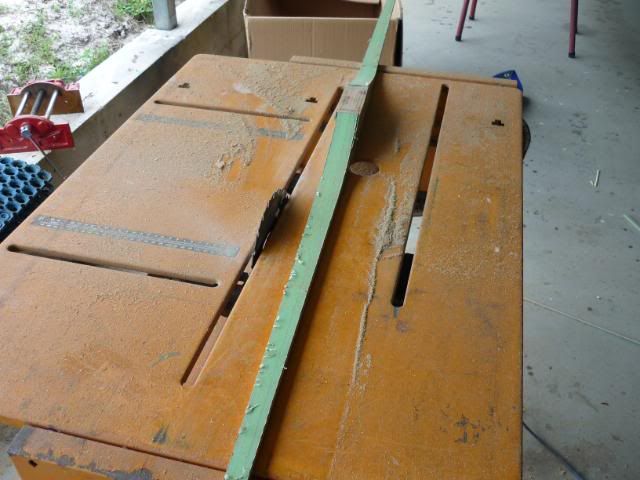
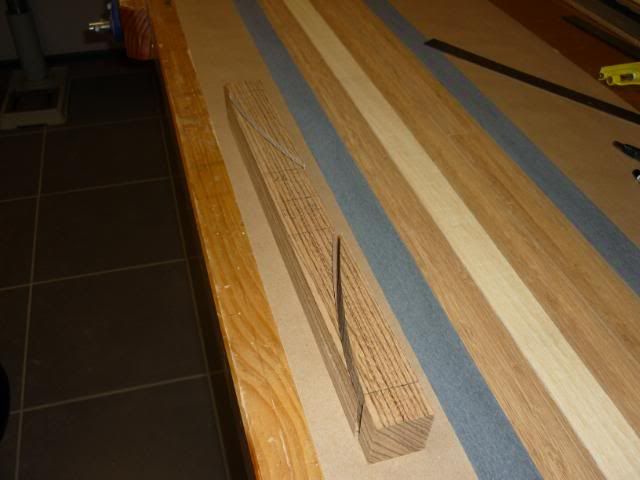
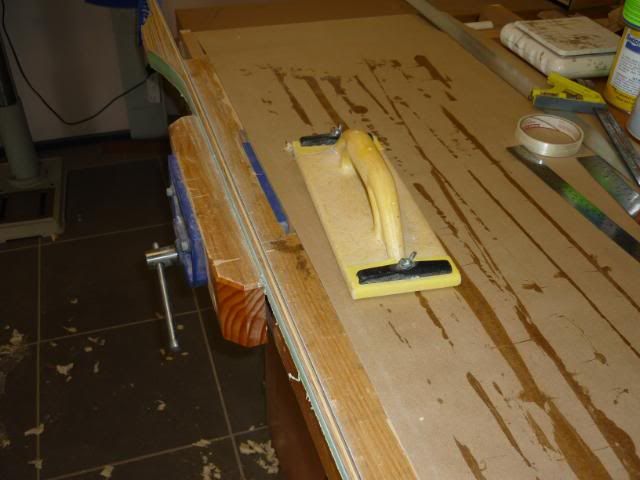
Then back onto the big belt sander to grind almost up the the marked lines for the limbs and the riser is ground to the correct width , I have made them 1 1/4" but prefer to make bows 1 1/8" wide
Image
Image
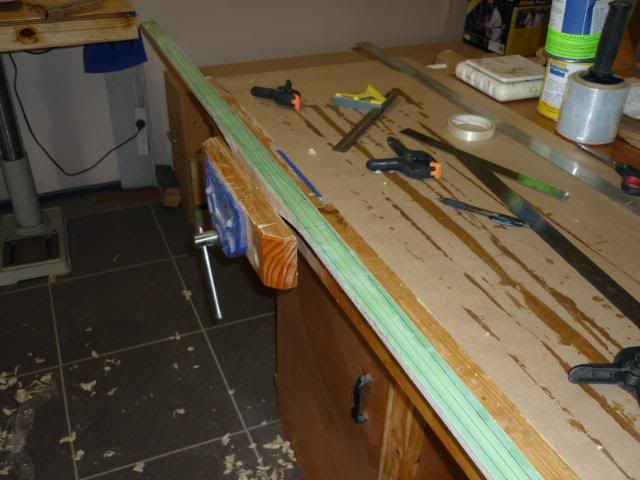
Then into the vise and sanded down to the line by hand
Image
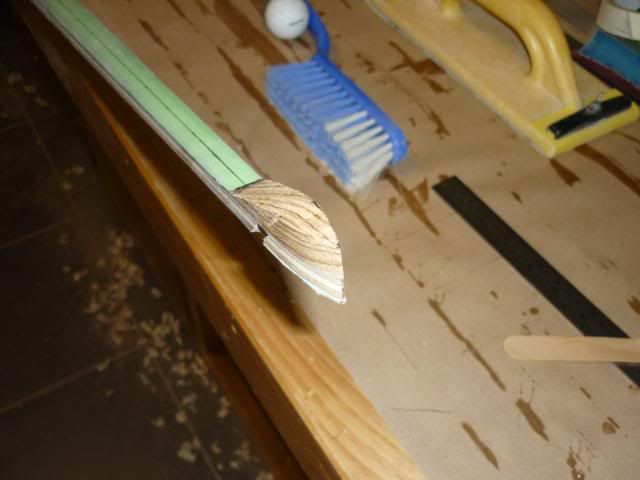
At this stage I then File the string nocks ,
Image
Image
string the bow and check for limb twist , check the draw weight , check both limbs are bending equally and check tiller , mark the top limb and mark out the shelf , I make the main cuts for the shelf with a tenon saw then take it to my smaller linisher and rough out the shelf , then back to the vise and the rasp , once the shelf is pretty much rasped out I take the bow back to the big linisher and rough shape the riser , then back to the vise and rasp ,
Image
after the rasp I start with a block of wood that has one edge slightly rounded and I wrap that with 80 grit fabric backed sand paper , I use that to finish shaping the riser grip and shelf , I like the shelf to be slightly curved on all faces with no corners to create weak spots , I go from 80 grit to , 120 then 180 , 240 and then 400 grit ,
Image
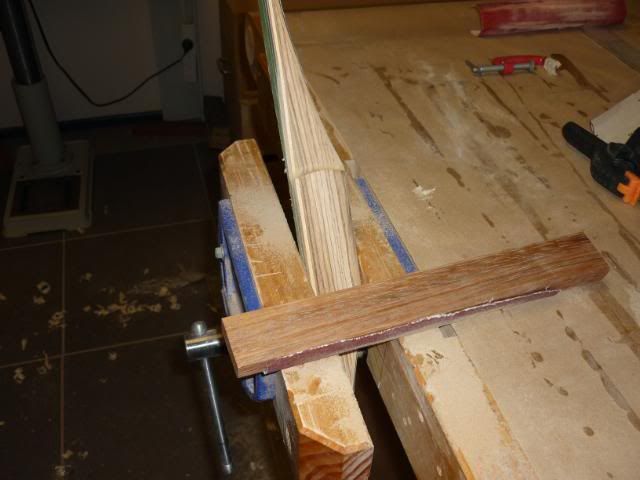
I then epoxy on some Zebra wood strips for the string nock overlays and into the hot box
Image
next day I grind the overlays close to profile on the linisher and then start with the rasp ,
Image
Image
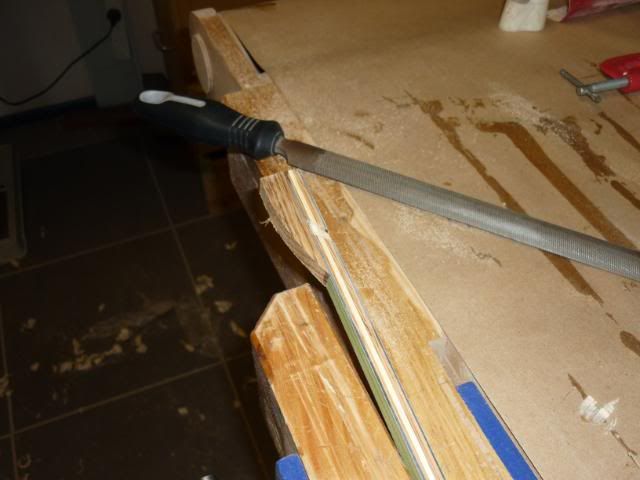
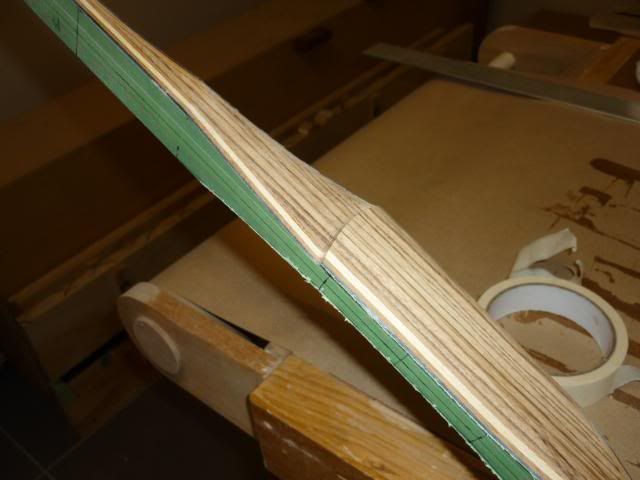
After the tips are roughed out with the rasp I clamp the bow to the bench and start working with strips of fabric backed sandpaper in a shoe shine style to final shape and sand the tips , seems to work out a couple of hours work in each one to get just right
Image
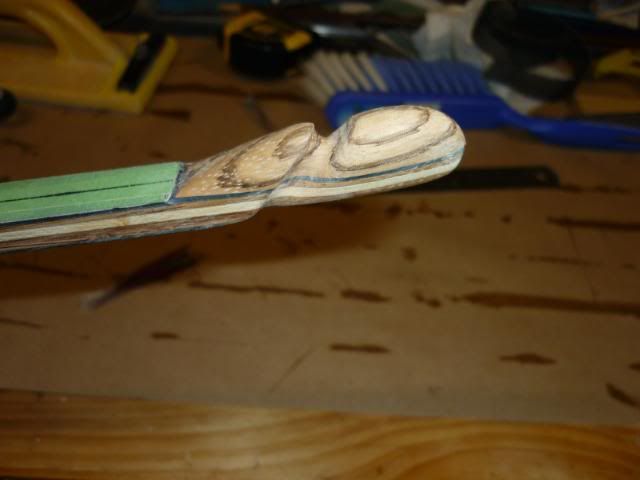
at this stage I sand the tips , sides of the limbs and riser again with 400 grit and take it out into the sun to check over again for any sanding marks ,
Image
I then apply sanding sealer with finger and let dry
Image
Image
when dry I sand with 1000 grit wet and dry and fine steel wool , then another coat of sanding sealer and let dry , more fine sanding and then the tape comes off the limbs and then I sand the glass with 150 wet and dry then 240 and 400 grit , not a lot of sanding , just cleaning it off basically , I sand the corners to give a nice rounded edge and then use a paint pen to mark the draw weight
Image
At this stage I would normally clear coat but it's raining and has been for the last few days and may be for the next few day so since I haven't of yet made my self a spray booth I'll have to wait , I now use a Acrylic clear coat that gives a bit more gloss and a harder finish than the old clear enamel I used to use

David

User avatar
GrahameA
Posts: 4692
Joined: Thu Mar 10, 2005 4:28 pm
Location: Welcome to Brisneyland, Oz

Re: Build a long , sort of , picture heavy

#2 Post by GrahameA » Wed Sep 22, 2010 5:00 pm

Hi David.

What blade are you using in the Triton?

What is the Big belt sander?

Nice bow. :D
Grahame.
Shoot a Selfbow, embrace Wood Arrows, discover Vintage, be a Trendsetter.

"Unfortunately, the equating of simplicity with truth doesn't often work in real life. It doesn't often work in science, either." Dr Len Fisher.

User avatar
Stickbow Hunter
Supporter
Supporter
Posts: 11637
Joined: Sat Jul 26, 2003 8:33 pm
Location: Maryborough Queensland

Re: Build a long , sort of , picture heavy

#3 Post by Stickbow Hunter » Wed Sep 22, 2010 5:02 pm

The bow looks good Dave and thanks for the build-a-long.

Jeff

dawallace45
Posts: 352
Joined: Fri Aug 13, 2004 7:16 pm
Location: Miriam Vale Queensland Australia

Re: Build a long , sort of , picture heavy

#4 Post by dawallace45 » Wed Sep 22, 2010 5:17 pm

Thanks guys

The blade in the saw in the triton is Irwin thin kerf 24 tooth

Hopefully the bow will look even better once the clear coat is sprayed on

I've got two bows waiting spraying now

The big sander is a hare and forbes L-80 https://www.machineryhouse.com.au/Produ ... kCode=L112

Works well , The only tool I have that I use almost as much is my bandsaw

David
\

User avatar
Stickbow Hunter
Supporter
Supporter
Posts: 11637
Joined: Sat Jul 26, 2003 8:33 pm
Location: Maryborough Queensland

Re: Build a long , sort of , picture heavy

#5 Post by Stickbow Hunter » Wed Sep 22, 2010 5:55 pm

dawallace45 wrote:The blade in the saw in the triton is Irwin thin kerf 24 tooth
Grahame & Dave,

A comment regarding the saw blades. I prefer the 60 tooth blades for cutting the glued up bows. I also use the Irwin thin skerf blades which were made in New Zealand but now seem to be made in China. I haven't tried the China made ones yet so don't know if they will last as well. The last time I got some I managed to find two made in NZ ones. :D

Jeff

User avatar
bigbob
Posts: 4098
Joined: Sat Jul 10, 2010 8:55 pm
Location: sunshine coast

Re: Build a long , sort of , picture heavy

#6 Post by bigbob » Wed Sep 22, 2010 7:29 pm

thanks for your post build along. Very good and instructive.
nil illigitimo in desperandum carborundum
razorbows.com

dawallace45
Posts: 352
Joined: Fri Aug 13, 2004 7:16 pm
Location: Miriam Vale Queensland Australia

Re: Build a long , sort of , picture heavy

#7 Post by dawallace45 » Wed Sep 22, 2010 7:36 pm

Jeff
Wanted a blade with more teeth but it was all that bunnings had in the 7 1/4" size

David

User avatar
Gringa Bows
Posts: 6331
Joined: Thu Aug 30, 2007 7:09 pm
Location: Bundaberg QLD

Re: Build a long , sort of , picture heavy

#8 Post by Gringa Bows » Wed Sep 22, 2010 11:09 pm

Good Build along Dave...........

Bill
Supporter
Supporter
Posts: 960
Joined: Tue Apr 27, 2004 6:24 pm
Location: Wodonga
Contact:

Re: Build a long , sort of , picture heavy

#9 Post by Bill » Thu Sep 23, 2010 7:10 am

Hi Dave,
:D
I believe I was the one that asked, that if on your next build would you mind showing the production of the bow as a build along.

Well you have done a truely great job and I thank you for it.

Bill.

longbow steve
Posts: 3116
Joined: Tue Jan 30, 2007 3:29 pm
Location: BLUE MOUNTAINS

Re: Build a long , sort of , picture heavy

#10 Post by longbow steve » Thu Sep 23, 2010 8:54 am

I like the lam grinding attachment on you sander Dave :) . Any chance of some photos of how you have attached it ?

Bill
Supporter
Supporter
Posts: 960
Joined: Tue Apr 27, 2004 6:24 pm
Location: Wodonga
Contact:

Re: Build a long , sort of , picture heavy

#11 Post by Bill » Thu Sep 23, 2010 3:40 pm

Hi Dave, thanks for the information. 8)

Now just to test you a little bit further, for I have a question that you may be able to assist me with.
If ever there is a twist in a limb, what options do I have, if I have any, and what's the best way to fix it.

thanks,........Bill

dawallace45
Posts: 352
Joined: Fri Aug 13, 2004 7:16 pm
Location: Miriam Vale Queensland Australia

Re: Build a long , sort of , picture heavy

#12 Post by dawallace45 » Fri Sep 24, 2010 8:42 pm

Guys not ignoring you , just haven't had time to answer properly and post pictures of the attachment may be a few more days yet

David

dawallace45
Posts: 352
Joined: Fri Aug 13, 2004 7:16 pm
Location: Miriam Vale Queensland Australia

Re: Build a long , sort of , picture heavy

#13 Post by dawallace45 » Sun Sep 26, 2010 7:30 am

Longbow Steve asked for some more pictures of the grinding attachment I use on the big sander , so here goes

Image

The extension table is very simple , I like simple
Image

The feet are slightly adjustable

Image
I have another piece of threaded bar from the extension table to the sander as a further adjustment

Image
the adjustment for thickness is simple and the whole thing screws down onto the extension table

Image

Image

David

dawallace45
Posts: 352
Joined: Fri Aug 13, 2004 7:16 pm
Location: Miriam Vale Queensland Australia

Re: Build a long , sort of , picture heavy

#14 Post by dawallace45 » Sun Sep 26, 2010 7:44 am

Bill

I find the best way to deal with problems is just not to have them , by making sure that my form is nice and square , that my laminations are with in tolerances and that I use a good straight edge to give a accurate centre line so far I've not had a problem

But according to the stuff I've read if you do have a problem with a laminated bow your making what you do is put a 18" block of wood between the rider and the string so as to be able to see the twist better then mark the side the twist is going to , so if the twist is going to the right , file the string nock a little deeper on that side and then take off some more material on the whole right side of that limb ,

AS I've said in practice I really know noting of it as I haven't had the problem with laminated bows , now if your talking self bows that's another thing , I've finished self bows that were fine when I made them but after several weeks in my reloading room in the middle of summer they have achieved propeller status , even though they appeared to be thoroughly dry before hand

David

Bill
Supporter
Supporter
Posts: 960
Joined: Tue Apr 27, 2004 6:24 pm
Location: Wodonga
Contact:

Re: Build a long , sort of , picture heavy

#15 Post by Bill » Sun Sep 26, 2010 8:13 am

G' morning David, :) I take on board all that you have said and agree that, if I do everything correctly and not rush things from the start I should not have a problem.
thanks again,........Bill

longbow steve
Posts: 3116
Joined: Tue Jan 30, 2007 3:29 pm
Location: BLUE MOUNTAINS

Re: Build a long , sort of , picture heavy

#16 Post by longbow steve » Sun Sep 26, 2010 3:47 pm

Thanks Dave, That looks do able for me :D. I dont need the lam grinding aspect but could certainly use the table for riser fades. Steve

User avatar
Gringa Bows
Posts: 6331
Joined: Thu Aug 30, 2007 7:09 pm
Location: Bundaberg QLD

Re: Build a long , sort of , picture heavy

#17 Post by Gringa Bows » Sun Sep 26, 2010 4:16 pm

I like that set up Dave,but yours turned out a lot neater than mine :wink: mine had a bit of curve in the pulley bit that the sand paper goes on,so i didnt use it for lams,but yours seems to do the job well mate. :D

User avatar
greybeard
Supporter
Supporter
Posts: 2992
Joined: Tue Feb 07, 2006 9:11 am
Location: Logan City QLD

Re: Build a long , sort of , picture heavy

#18 Post by greybeard » Sun Sep 26, 2010 7:09 pm

Hi David,

A nice concise build a long and another good looking bow.

I have been toying with different ideas on how to make the fence on my lamination grinder more user friendly.

Your setup appears to be a simplistic solution.

If I have interpreted the photos correctly the coil spring applies enough pressure to stop the booker rod moving in the joining nut when grinding laminations.

Thanks,

Daryl.
"And you must not stick for a groat or twelvepence more than another man would give, if it be a good bow.
For a good bow twice paid for, is better than an ill bow once broken.
[Ascham]

“If a cluttered desk is a sign of a cluttered mind, of what, then, is an empty desk a sign?” [Einstein]

I am old enough to make my own decisions....Just not young enough to remember what I decided!....

dawallace45
Posts: 352
Joined: Fri Aug 13, 2004 7:16 pm
Location: Miriam Vale Queensland Australia

Re: Build a long , sort of , picture heavy

#19 Post by dawallace45 » Sun Sep 26, 2010 8:18 pm

Rod

I run the lams through then turn them over , measured them carefully with verniers and micrometer than they come out pretty even , with in .002 " all over

Daryl

Yep right , the spring is off a old trampoline , I love old trampolines , all that free steel , make good stuff out of them

Kayak racks , Benches , shelves and chook pens , love old trampolines

David

Post Reply