Tillering, with a twist

How to make a Bow, a String or a Set of Arrows. Making equipment & tools for use in Traditional Archery and Bowhunting.

Moderator: Moderators

Post Reply
Message
Author
Sabinus
Posts: 138
Joined: Tue Mar 26, 2013 8:56 pm

Tillering, with a twist

#1 Post by Sabinus » Sun Dec 15, 2013 9:07 pm

IMG_1254.jpg
IMG_1254.jpg (51.78 KiB) Viewed 5553 times
Hi Guys, well as you can see, I have hit a bit of a problem. I think I still have the limbs moving fairly well and evenly, but what has been a mild twist in the right limb today developed into a doozy of a twist in both limbs. The twist only becomes apparent when the bow is under tension, and the string is tracking down the center of the bow even when it is twisting like a crazy propeller. I have spent most of the day trying to remove wood from the 'stronger' edge of each limb, for absolutely no result. Is this a tillering issue or a characteristic of the wood? If it is tillering i am mystified how it's happened - the thickness of each limb is even across it's width. Should I try to steam/ heatgun the twist out, or just push on? I don't have any expectations from this my first bow, I just want to learn lessons that will benefit my next bow. Having said that, I'd really prefer this first attempt to be other than an 'epic fail'. I'm relying on your experience and advice! Thanks in advance
Darren

longbow steve
Posts: 3116
Joined: Tue Jan 30, 2007 3:29 pm
Location: BLUE MOUNTAINS

Re: Tillering, with a twist

#2 Post by longbow steve » Mon Dec 16, 2013 5:58 am

Hi Sabinus, What weight is it now? If it is light it is going to have little resistance to twisting. Imagine a thin lamination and how hard it would be to keep it from doing the same thing. I am assuming the thickness is consistent from side to side of the limb? Steve

User avatar
greybeard
Supporter
Supporter
Posts: 2994
Joined: Tue Feb 07, 2006 9:11 am
Location: Logan City QLD

Re: Tillering, with a twist

#3 Post by greybeard » Mon Dec 16, 2013 7:23 am

Sabinus wrote: The twist only becomes apparent when the bow is under tension, and the string is tracking down the center of the bow even when it is twisting like a crazy propeller.
Hi Darren,

If your measurements are correct you may have a poor piece of timber.

At this stage I would forget about the twist and get the tiller correct. Remember every time you remove wood the bow is shedding draw weight.

I have had bows with propeller twists and they shot fine because the string was tracking down the centre of the handle.

If the bow is not twisting through the handle I would finish it and shoot it, just be careful that the bow does not throw the string during the draw cycle.

Daryl.
"And you must not stick for a groat or twelvepence more than another man would give, if it be a good bow.
For a good bow twice paid for, is better than an ill bow once broken.
[Ascham]

“If a cluttered desk is a sign of a cluttered mind, of what, then, is an empty desk a sign?” [Einstein]

I am old enough to make my own decisions....Just not young enough to remember what I decided!....

Sabinus
Posts: 138
Joined: Tue Mar 26, 2013 8:56 pm

Re: Tillering, with a twist

#4 Post by Sabinus » Mon Dec 16, 2013 8:33 pm

Steve - yes the thickness of the limbs is consistent across their width. I didn't think about the thin-ness of the limbs being an issue, although now you mention it... The bow is currently 33lb@16" and I've nominally set 20lb @20" as my finishing weight, so hopefully I'm on track. My limbs are a bit trapezoidal in cross section at the moment, with the wide edge at the belly - would it be an idea to tiller a little on the sides of the bow to avoid the limbs getting too thin and twisty?
Daryl - thanks for the advice. looks like I will just have to push on and see what happens. Good to know this happens and may not be a disaster. When one's first piece of bow wood comes from a shovel handle I guess it shouldn't be a surprise that the grain on the belly is a bit 's' shaped.....
Thanks again guys, I will document the rest of this project, no matter how it turns out! already looking forward to starting the next one...
Darren

User avatar
yeoman
Posts: 1564
Joined: Mon Mar 08, 2004 1:32 pm
Location: Canberra

Re: Tillering, with a twist

#5 Post by yeoman » Tue Dec 17, 2013 5:56 am

I wouldn't worry too much about it. If the limb really is of consistent thickness across its width, it's just an inherent quality (or un-quality) of the timber. So as the British Government planned to announce if Germany invaded in World War II: Keep calm, and carry on.

Your right limb is minutely stiffer than the left.

You should also have a short string on it now I think.
https://www.instagram.com/armworks_australia/

Bow making courses, knife making courses, armour making courses and more:
http://www.tharwavalleyforge.com/

Articles to start making bows:
http://www.tharwavalleyforge.com/index. ... /tutorials

User avatar
greybeard
Supporter
Supporter
Posts: 2994
Joined: Tue Feb 07, 2006 9:11 am
Location: Logan City QLD

Re: Tillering, with a twist

#6 Post by greybeard » Tue Dec 17, 2013 8:55 am

Sabinus wrote:would it be an idea to tiller a little on the sides of the bow to avoid the limbs getting too thin and twisty?
Darren, the ratio is about eight to one when removing timber from the edge of the limb as opposed to removing it from the belly. Narrowing the limbs may increase the limb twist.

I should have asked earlier as to how wide the limbs are at the widest point, at mid limb and tip.

Daryl.
"And you must not stick for a groat or twelvepence more than another man would give, if it be a good bow.
For a good bow twice paid for, is better than an ill bow once broken.
[Ascham]

“If a cluttered desk is a sign of a cluttered mind, of what, then, is an empty desk a sign?” [Einstein]

I am old enough to make my own decisions....Just not young enough to remember what I decided!....

Sabinus
Posts: 138
Joined: Tue Mar 26, 2013 8:56 pm

Bow #1 -Closing Stages

#7 Post by Sabinus » Wed Dec 18, 2013 8:23 pm

IMG_1257.jpg
IMG_1257.jpg (42.69 KiB) Viewed 5517 times
IMG_1265.jpg
IMG_1265.jpg (51.43 KiB) Viewed 5517 times
IMG_1264.jpg
IMG_1264.jpg (40.37 KiB) Viewed 5517 times
IMG_1258.jpg
IMG_1258.jpg (35.85 KiB) Viewed 5517 times
IMG_1263.jpg
IMG_1263.jpg (60.33 KiB) Viewed 5517 times
Hi guys, well, Bow no.1 is getting near to conclusion. The twisted limbs are a bit of a drag, but I'm guessing the snaking grain on the limbs (pictured) might be the reason. Would this be right? I'm fairly happy with the tiller, but should the handle section be bending a little more? The bow is currently 28lb@17" and I'm now aiming for 25lb@20" before I fully brace the bow and shot it - I'm a bit unsure of how to get it there as the limbs seem super thin already. Mid- limb is around 1/3" thick by 1 3/8" wide. The handle is just under 5/8" thick by 1 3/8" wide, and the limb tips are around 3/8" thick by just under 5/8" wide. There is currently 1"- 1 1/8" inches of set in the limbs at this point. One last question guys - I wanted to cut a very narrow shelf 1/3"(?) maybe 1/2" above center - should I do this now, and take any effects into account with the final tillering stages?
Thanks again for reading guys, I'm really grateful for the assistance. Looking forward to when I have something to offer and can pay it forward!
Darren

User avatar
greybeard
Supporter
Supporter
Posts: 2994
Joined: Tue Feb 07, 2006 9:11 am
Location: Logan City QLD

Re: Bow #1 -Closing Stages

#8 Post by greybeard » Fri Dec 20, 2013 6:17 am

Darren,

Before doing any more tillering I would suggest that you go to the correct length string.

A bit more bending through the handle would be helpful and to shed a bit of mass you could narrow the bow a little between the handle and mid limb areas.

Rather than cutting in a shelf you could reduce the handle area and shoot off the hand. As a bonus you can choose a top limb.
01 Back Of Bow Handle Area.JPG
01 Back Of Bow Handle Area.JPG (29.28 KiB) Viewed 5452 times
Remember that your bow could lose four to five pounds or more of draw weight when shot in.

Shooting arrows will help to sort out the tiller but do not draw the bow past the point of what you had the bow on the tiller stick.

It would be helpful to keep the topic in one post to maintain continuity of the build a long.

Daryl.
"And you must not stick for a groat or twelvepence more than another man would give, if it be a good bow.
For a good bow twice paid for, is better than an ill bow once broken.
[Ascham]

“If a cluttered desk is a sign of a cluttered mind, of what, then, is an empty desk a sign?” [Einstein]

I am old enough to make my own decisions....Just not young enough to remember what I decided!....

User avatar
Stickbow Hunter
Supporter
Supporter
Posts: 11637
Joined: Sat Jul 26, 2003 8:33 pm
Location: Maryborough Queensland

Re: Tillering, with a twist

#9 Post by Stickbow Hunter » Fri Dec 20, 2013 8:36 am

Admin Note: Topics merged.

Jeff

Sabinus
Posts: 138
Joined: Tue Mar 26, 2013 8:56 pm

Re: Tillering, with a twist

#10 Post by Sabinus » Sat Dec 21, 2013 10:35 pm

IMG_1278.jpg
IMG_1278.jpg (46.59 KiB) Viewed 5427 times
IMG_1279.jpg
IMG_1279.jpg (46.08 KiB) Viewed 5427 times
IMG_1272.jpg
IMG_1272.jpg (42.36 KiB) Viewed 5427 times
Hi guys,
Daryl, thanks for the the suggestion and image suggesting the narrowed handle - I'd already gone ahead and cut a shelf (pictured), but luckily not so deep I couldn't carve it out and match the other side too (also pictured). Looks about 300% nicer, gives the choice of top limb, far more functional , and less mass has helped the handle area to flex ever so slightly. Thanks again. I'm currently about 25lb@19", so am planning only a few more scrapes to reach 25lb@20" before sanding an shooting in.
Stay tuned!
Darren

User avatar
yeoman
Posts: 1564
Joined: Mon Mar 08, 2004 1:32 pm
Location: Canberra

Re: Tillering, with a twist

#11 Post by yeoman » Sun Dec 22, 2013 5:52 am

It's looking pretty good Darren, you've done really well!
https://www.instagram.com/armworks_australia/

Bow making courses, knife making courses, armour making courses and more:
http://www.tharwavalleyforge.com/

Articles to start making bows:
http://www.tharwavalleyforge.com/index. ... /tutorials

User avatar
greybeard
Supporter
Supporter
Posts: 2994
Joined: Tue Feb 07, 2006 9:11 am
Location: Logan City QLD

Re: Tillering, with a twist

#12 Post by greybeard » Sun Dec 22, 2013 7:03 am

Darren, the tiller looks good, particularly when you had to deal with a propeller twist.

I am pleased you liked the handle shape and that you were able to get the bow bend through that area.

Well done,

Daryl.
"And you must not stick for a groat or twelvepence more than another man would give, if it be a good bow.
For a good bow twice paid for, is better than an ill bow once broken.
[Ascham]

“If a cluttered desk is a sign of a cluttered mind, of what, then, is an empty desk a sign?” [Einstein]

I am old enough to make my own decisions....Just not young enough to remember what I decided!....

Sabinus
Posts: 138
Joined: Tue Mar 26, 2013 8:56 pm

Re: Tillering, with a twist

#13 Post by Sabinus » Tue Dec 24, 2013 2:08 pm

IMG_1303.jpg
IMG_1303.jpg (91.92 KiB) Viewed 5408 times
IMG_1302.jpg
IMG_1302.jpg (77.45 KiB) Viewed 5408 times
IMG_1301.jpg
IMG_1301.jpg (45.64 KiB) Viewed 5408 times
IMG_1300.jpg
IMG_1300.jpg (42.33 KiB) Viewed 5408 times
IMG_1298.jpg
IMG_1298.jpg (51.5 KiB) Viewed 5408 times
IMG_1297.jpg
IMG_1297.jpg (50.48 KiB) Viewed 5408 times
Hi guys,
Well I think that's bow #1 finito - decided to get a bit lairy with the paint even, it's a kid's bow after all (made by a kid too!). Even after about 50 arrows the draw weight has not really dropped from final tiller, and string follow has held steady at 1 1/4". Although It's pretty awkward for me to shoot (see illustration!) being so small, the bow is absolutely silent, and the slight deflex in the limbs has rendered it entirely free of handshock. I decided to use shellac and beeswax polish for final finishing and weather proofing - never used shellac before and was wrapped with the warm hue it brings to the wood and the 'rustic' rawhide. I was also really pleased with the leather chord handle - I think I'll do a few more like this!
The real heart of the matter was a little earlier when I placed the finished item up on the shelf next to my Joe Vardon longbow - it was a warm feeling of achievement, of being pleased to have two bows sitting there where only one had before, but most of all it was an urge to add another, and another, and well I guess most of you already know how that one goes!
Thanks again to everyone who has taken the time to keep an eye on my early efforts and offer advice - the value of this is most certainly not lost on me, and I'm looking forward in future to being in a position to offer some similar assistance to others.
Darren

Dennis La Varenne
Posts: 1776
Joined: Sun Sep 07, 2003 10:56 pm
Location: Tocumwal, NSW. Australia

Re: Tillering, with a twist

#14 Post by Dennis La Varenne » Tue Dec 24, 2013 10:26 pm

Darren,

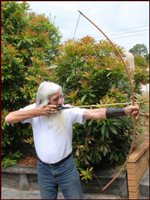
Contrary to ancient advice to avoid them, I have made propeller twisted bows since I began and never once had a problem with one of them. Each limb opposes the other equally and the limbs remain aligned as you noted yourself. If there is no problem, don't fix it.

If your string is tracking down the length of the bow and running through the middle of the handle or very close to it, it will shoot as good as any other. I have observed that trying to flatten out the propeller only ends up worsening it because you then have to do it to the opposing limb to bring the whole thing back to where you were before you started fixing it.

So long as your bow tillers evenly such that when drawn, a vertical line from string nock to string nock bisects the line of your arrow at 90 degrees or very close to it, it will shoot fine. 'Cast' or sideways bending in the limbs is more of a problem which your bow does not have. If the limbs were significantly out of tiller to each other, meaning that their curvatures were too dis-similar, their geometry as explained immediately above would not align too easily.

HOW TO ANALYSE TILLER
IMG_1278b.jpg
IMG_1278b.jpg (105.94 KiB) Viewed 5397 times
Using Photoshop, I draw some lines in strategic positions joining points on the limbs so as to see easily how each curve compares to the other thus -

1. In your picture IMG-1278, I rotated it so that the tiller stick is dead vertical, ignoring the line of the brickwork which can be very deceiving. This then showed that with a RED line drawn from nock to nock at 90 degrees to the vertical line of the tiller, the limb on the right side is higher, meaning that your bow is NOT lying straight in your tiller despite what the brickwork lines are telling your eye and that forces the right limb to bend more than the left despite any propeller.

NEVER JUDGE TILLER BY THE SHAPE OF THE LIMB. JUDGE IT BY THE AREA AND SHAPE OF THE QUADRANT SPACE BELOW IT. You will understand what I mean shortly.

2. Next, I have drawn a BLUE line between the middle of the tiller extended out to each string nock. Here you will notice that the gap at B is slightly greater than at A, but also, that the highest point of the arc at B is a little further out along the limb than at A. It is not great, but it IS there. If the right hand limb is to be a dedicated upper limb, then this difference is just enough to allow for the positive tiller necessary for the synchrony of the limbs. if it is the opposite, then almost certainly there will be felt a small amount of bump at the end of the power stroke as each limb tip reaches its end of travel at slightly different times.

The way you see these differences it to let your eyes blur slightly and look at the amount of SPACE below each limb on either side of the tiller stick. Holding up a long ruler at arm's length and placing it in your field of view so that it extends from nock to nock makes this space relationship quite obvious. Any difference is picked up by the eye MUCH better than trying to 'measure' how much actual bend is happening in each limb along its edge.

3. With 3 GREEN lines drawn vertically, you can now compare how much horizontal distance there is from the centre of the tiller to each of the nocks. As it turns out, distance C is greater than distance D which means that your bow is not sitting centrally in your tiller. That puts more bending strain on the right hand limb forcing it to bend more and hence the greater gap at B over A as explained in 2 above. The curvature of your A limb is slightly gentler compared to your B limb.

Many people advocate the placement of the bow in the tiller's cradle at the point where the arrow passes or close to it. The idea is understandable but wrong. With a wooden bow, it will change its limb tiller according to how you grip and draw it in very short order. The bow adapts itself to you rather than the other way round. It does not happen much if at all with glassed bows. You tiller your bow around its centre. When finished tillering to a stage where it is ready to be shot, you will immediately 'feel' where you need to place your bowhand on the grip in order for the bow to balance itself. That may mean that you have to take a grip slightly higher or slightly lower than where you intended, but let the bow tell you that rather than force it to do what you want. Your job is to bring all of its working parts into balance with each other, not you.

And none of this has anything to do with propeller twist. I have yet to see a bow which propeller twists itself to destruction. The one limb ALWAYS opposes the other equally and oppositely and keeps itself straight. I recognised this phenomenon very early in my bowmaking years when almost every naturally grown stave had some or great degrees of propeller. I couldn't actually find one which did not propeller, so i just ignored it, it seemed to ignore me and we got on fine together ever since.

So, concluding this little analysis, to remedy your apparent problem -

1. Forget about propeller and live with it.
2. In the case of this bow, move it along the tiller cradle about an inch or so to the right of the picture and I think you will find that all will be as was intended with no further work.
3. Finish it off and have fun with it.

If you can take a picture and bring it into Photoshop or some other drawing application, you can analyse your tillering as above. If you do not have a drawing app. then practice using a long ruler or two and holding them up to correspond with where I have drawn lines and you will still get the picture quite well.

ALSO, beware of backgroud grid patterns of any kind. They only work if the bow is placed centrally on the tiller and at right angles to the tiller and that whole is then placed against the background grid in exact parallel to those lines both vertically and horizontally. If you do not take this precaution, you, your tiller mounted bow and the grid pattern will be working at cross purposes if you see what I mean.
Dennis La Varénne

Have the courage to argue your beliefs with conviction, but the humility to accept that you may be wrong.

QVIS CVSTODIET IPSOS CVSTODES (Who polices the police?) - DECIMVS IVNIVS IVVENALIS (Juvenal) - Satire VI, lines 347–8

What is the difference between free enterprise capitalism and organised crime?

HOMO LVPVS HOMINIS - Man is his own predator.

Sabinus
Posts: 138
Joined: Tue Mar 26, 2013 8:56 pm

Re: Tillering, with a twist

#15 Post by Sabinus » Thu Dec 26, 2013 7:38 pm

Hi Dennis,
I'm flattered and grateful for the time you have spent dissecting and pointing out aspects of my first tillering effort. The one big thing I've learned from yourself and others is that propeller twist in wooden staves is fairly inescapable, and does not have to affect performance to a great degree if at all. If not for this forum and the wisdom contained within, I almost certainly would have 'corrected' this twisty bow all the way into kindling territory! As it happens, I added a nocking point to the string and a folded leather shelf to the handle of this bow today and am delighted (in a scaled back, 25lb fashion!) with how it performs. I use RhinoCAD in my job, and from now on will be scanning in my tiller images to apply the guidelines you have demonstrated. I can also see myself referring back to this little 'tillering treastise' of yours during future builds. Thanks again.
On another topic, I'm obviously as keen as mustard to embark on my next bow, and this time something at least 68" ntn, 45-50lb@28". In one of the archives on this site, Dennis, you request that we try to source Australian timbers first and foremost for our Bowyering exploits. In theory I agree wholeheartedly with this philosophy. Over the past few weeks however, This has seemed to shape up as a 'mission impossible'! In S.A., timber merchants seem profoundly disinterested in any type of small scale purchasing, let alone a small purchaser who is a bit fussy about their grain! I'm finding myself getting ready to hit Bunnings with my christmas vouchers in the next day or two to try and find a nice pair of hickory pick handles to splice into a full size stave. As I'm in the grip of a potentially lifelong obssesion, nothing is too much trouble, but this situation still feels a bit 'wrong'. I've been a craftsperson for more than half of my life, and when avaliability of simple materials holds back the avid maker there seems to be an imbalance in the natural order!
oh well, I'm rambling now. Looking forward to posting something new very soon. Thanks again (again!).
Darren

Dennis La Varenne
Posts: 1776
Joined: Sun Sep 07, 2003 10:56 pm
Location: Tocumwal, NSW. Australia

Re: Tillering, with a twist

#16 Post by Dennis La Varenne » Fri Dec 27, 2013 2:37 am

Darren,

If you are able to do so legally, try to get some kind of sapling in the bush growing wild. Don't get anything very large - nothing more than around 4 - 5 inches with the bark on. Split that lengthways and you will have two bow halves. Another thing that Yeoman does often is pick up some boards of Red Ironbark and back them with bamboo which he cuts out of the round and grinds flat on a linisher. You could also use the fairly common Spotted Gum which is a pretty decent bow wood. Commonly it presents as 20mm thick decking as does Red Ironbark. If you glue a handle block onto that of the same material, you will have a 1.5" deep handle which is plenty of depth for a handle.

If you want to try some ⅛" Hickory lams as backing (highly recommended by me), you can contact Mr Jim Boswell at Rudderbows Archery and he is prepared to ship 36" half lengths to Australia via USPS because they are shorter than the USPS minimum length of 44 inches. He will send 24 half-lengths which would be vastly cheaper than full length strips by FedEx. Butting them together at the handle or overlapping them with a skive joint will provide all the strength you need.

When you get a bit more experience up, you can use the hickory strips to pull your bow into quite a lot of reflex. I have done up to 5 inches so far on an ELB. It lost most of that, but was a very snappy and quick shooter indeed. I have more here now and I am going to start doing it on flatbows a la Ben Pearson did back in the early 1940s. He used to put 5 inches of reflex into his higher grade target bows just by bending the bow into reflex on a jig then applying the Hickory. It put the bow up a very goodly amount - somewhere around 10 - 15lbs, but you allow for that when you make the basic bow and you can always remove some of the Hickory thickness if you want as well as the belly. Your little 25lber you have just finished could perhaps take a backing if it didn't have the propeller.

In my explanations, I try to teach principles more so than to say - "such and such is your problem . . . do this to fix it." The technique-driven method can and does work, but sometimes it is better to get somebody to try to look at something and draw a principle from it which can then be later applied if it is understood. I now look at my raw stave before I start and analyse the problems before I make any shavings and then say to myself - what needs to be done to made X kind of bow work? What are its strengths and weaknesses? What problems am I likely to run into? If it starts going wrong, what have I done to make it so? How will I be able to tell? That's why I started to look at my bows (and those of others) from the aspect of 'bow geometry' if I can call it that. It allows me a systematic way of analysing what is happening to a very fine degree.
Bendmeters_2.jpg
Bendmeters_2.jpg (15.52 KiB) Viewed 5377 times
Russ-Wilcox-using bendmeter.jpg
Russ-Wilcox-using bendmeter.jpg (158.2 KiB) Viewed 5377 times
My next bit of old-fashioned apparatus will be the 'bend-meter' apparatus (above) of the 1940s which is basically a form of short chord of around 6 inches with an adjustable depth gauge of some kind in the middle. By placing the chord on any part of the belly (usually) of a bow and moving the depth gauge though its hole to just touch the belly, you then slide the meter around the belly from close to the handle to the tips and check that the depth gauge is touching all the way. That way you have ensured a perfectly even bend in a limb. A picture of a couple of bend meters is above. You can see the principle of use immediately.

Also, I ALWAYS mark my bows every 3 inches and number those marks 1 - 10 etc. As I tiller, I compare the amount of bend at numbered mark whatever with its mate on the other limb until both match. Whatever you take off the one limb will stiffen the other limb by the same amount. So you measure how much more bend you want in that limb and take off ONLY HALF that amount because the opposing limb will stiffen by the same amount at the same place.

I hope that makes sense. It was a hard learnt lesson on my part.
Basic-flatbow-design.jpg
Basic-flatbow-design.jpg (31.49 KiB) Viewed 5377 times
Lastly, I have attached a schematic of a basic fairly safe flatbow. It is broad where most of the load is born by the wood. The dimensions should get you somewhere between the goal posts with almost any reasonably dense wood and you can always remove more and fiddle with the design.

PS: Bendmeters are not very applicable to bows made from tree staves because of the irregularities in the surfaces, but anything made from boards is perfect for them.
Dennis La Varénne

Have the courage to argue your beliefs with conviction, but the humility to accept that you may be wrong.

QVIS CVSTODIET IPSOS CVSTODES (Who polices the police?) - DECIMVS IVNIVS IVVENALIS (Juvenal) - Satire VI, lines 347–8

What is the difference between free enterprise capitalism and organised crime?

HOMO LVPVS HOMINIS - Man is his own predator.

Sabinus
Posts: 138
Joined: Tue Mar 26, 2013 8:56 pm

Re: Tillering, with a twist

#17 Post by Sabinus » Fri Dec 27, 2013 10:12 pm

Dennis,
Thanks for this valuable advise and information. I'm starting to become more aware of the trees growing in my local environment. There is an overwhelming proliferation of eucalypts in my area, but feel that there may be sheoaks around as well. I'm looking forward to gluing reflex into laminated staves inthe future, although the next couple of bows may well be backed with cheaper materials such as jute or rawhide. Bow no. 1 was backed in dog chew rawhide and it seems to have worked well. I was very interested to see the images of ye olde bendmeter- what a lovely piece of equipment. I used the caveman version of this on my first bow - a flat block of hardwood, but your technique of dividing each limb into segments and then matching the curvature of each to it's opposing number is gold. I've adopted this from now. Equally appreciated is the principal of how a limb will effectively stiffen as it's partner is reduced - thanks for this hard-won knowledge.
I will also be referring back to the flatbow diagram included. I purchased two hickory tool handles today, and am still only dreaming of a stave over 40mm wide! With the hope of others hopefully I can determine the just how to maximise to potential of the materials I have. That will be the subject of another thread however.
Thanks again Dennis, and good luck with your future bowbuilding.
Darren

Dennis La Varenne
Posts: 1776
Joined: Sun Sep 07, 2003 10:56 pm
Location: Tocumwal, NSW. Australia

Re: Tillering, with a twist

#18 Post by Dennis La Varenne » Mon Dec 30, 2013 3:33 pm

Darren,

Two pick handles of Hickory should have enough width to make a decent bow without going to 40mm wide. Here is another bowmaking gem of wisdom for you to inscribe on the tablet of Bowyer's Commandments -

THE 2:1 RATIO - Where two bows are identical in every dimension except width, that bow whose limbs are twice as wide as the other (at the widest part) will be TWICE as heavy.

THE 8:1 RATIO - Where two bows are identical in every dimension except thickness, that bow whose limbs are twice as thick as the other will be EIGHT times as heavy.

Have a look at the following diagrams which are a simplified explanation of the 8:1 principle above -
thickness-draw weight ratio for 20lb bow.jpg
thickness-draw weight ratio for 20lb bow.jpg (111.46 KiB) Viewed 5349 times
thickness draw weight.jpg
thickness draw weight.jpg (113.73 KiB) Viewed 5349 times
Because of the physics involved in the ration of stress and strain involved in bending ever increasing thicknesses of a beam (bow limb) I doubt it would be as linear as these diagrams show. However, the above diagrams provide a set of reasonable 'working' numbers which show that to double a bow's draw weight, one only needs to increase its thickness by around 14-14.5%.

So, if you wanted to build your pick handle bow to say, 50lbs, you could just use the dimensions of your present 20lb bow as a starting point. On a bow that light, for every 2 inches it is lengthened (1 inch at each end) its draw weight will decrease by something in the range of 3-4lbs. So you can work backwards with your present bow (never mind the difference in the wood specie for the time being) to work out what its draw weight would have been at say 66 - 68 inches long, and once you have that number, you can then use the 8:1 ration to reasonably guesstimate how thick it would need to be to obtain whatever higher draw weight you may want.

Preferably, it will turn out too heavy which is good because you can then take wood off.

I have found that if you have the tiller pretty right at a good full brace height (fistmele), then it seldom changes thereafter so long as the wood is sound.

At that stage you can then start exercising it on your tiller at 2 inch intervals until about half draw SO LONG AS YOU HAVE NOT EXCEEDED YOUR DESIRED DRAW WEIGHT.

At that stage, say it draws 30lbs at 14 inches and you want a 50lb at 28 inches, if you do the simple exercise of allowing 3lbs for every inch, you could expect a bow which drew around the 72lb mark, ie (3x14)+30 at the worst and allowing 2lb/inch you could get a bow of 58lb. Not many bows draw greater per inch increments than these figures. Doing these simple sums will allow you a reasonable proximity to your desired draw weight.

Whatever you do, DO NOT draw the emerging bow past its intended draw weight at any stage of tillering. (Bowyer's commandment No 3)

If it reaches your desired draw weight at 20 inches for example, stop and start removing wood on the belly to sink it more. You will soon get an idea how much it is increasing per inch as you work it and then you can proceed with some confidence once you know this figure because you will have a much better idea of its final draw weight.

Try for about 5lbs over draw weight, because the bow will sink itself with use and final sanding along with the moderate amount of string follow it will develop. The additional 5lbs will allow for that eventuality.

By the way, those two backing materials you mentioned will not improve performance. You apply them only if you have reason to believer that the back of your bow sill lift splinters and begin to break. Backing is only to prevent this possibility. It can add a cosmetic improvement as well, but not performance. Reflexing is the only real way to improve the cast of a wood bow and that requires a backing which will not allow the belly wood to take as much set as it would otherwise take because its natural elasticity will resist the compression on the belly. Hickory and Bamboo are excellent for this. Bamboo seems to be best for the very dense hardwoods and Hickory will work with any of them.
Dennis La Varénne

Have the courage to argue your beliefs with conviction, but the humility to accept that you may be wrong.

QVIS CVSTODIET IPSOS CVSTODES (Who polices the police?) - DECIMVS IVNIVS IVVENALIS (Juvenal) - Satire VI, lines 347–8

What is the difference between free enterprise capitalism and organised crime?

HOMO LVPVS HOMINIS - Man is his own predator.

Sabinus
Posts: 138
Joined: Tue Mar 26, 2013 8:56 pm

Re: Tillering, with a twist

#19 Post by Sabinus » Thu Jan 02, 2014 12:26 am

Hi Dennis,
THanks for the information. Using the equations you have provided indicate that there is some kind of 50lb bow in my hickory billets -I'm going to do a take down with metal sleeves as a way of maximising the length of the billets, and playing to my strengths as a maker. Most things I've read tend to recommend limbs about 25% wider than my timber,for a hickory bow of this draw weight. I know all of these figures can be taken as guides only, but I am wondering if a narrower, thicker bow is at risk of developing more than the ideal amount of set. You mentioned that a bamboo backing helps to combat excessive string follow in recurved limbs - would a bamboo backing help to minimise set if I applied one to this new bow? In the same spirit of ballpark figures, how thick might this backing be at it's crown (if the bamboo was from a 4" diameter pole)? I'd rather err on the side of the backing being too thin rather than overpowering the belly of the bow. I'm going to employ a backing of some sort in any case, even if it is just some insurance against an explosive malfunction - I've sourced some deerskin rawhide in perfect flat strips that would serve this purpose well.
When making my last (first) bow, I began tillering before I had a set of scales, and had not yet heard of commandment #3 of tillering either - I'm looking forward to being a bit gentler on this stave, which may reduce set a tiny bit more. Thanks to your information and advice Dennis, I hope that tillering my pick handle take-down may be a more measured, predictable and time efficient process. Feel free to follow and of course contribute to the thread- my hope is it may successfully document the building of a pickhandle bow, and serve as a valuable resource to others in the future.
Thanks again,
Darren

Dennis La Varenne
Posts: 1776
Joined: Sun Sep 07, 2003 10:56 pm
Location: Tocumwal, NSW. Australia

Re: Tillering, with a twist

#20 Post by Dennis La Varenne » Fri Jan 03, 2014 1:25 am

Darren,

Backings as we understand them now were originally applied to the backs of wood bows only to minimise the risk of breakage originating with slivers of wood lifting on the bow's back if that wood was not especially tension resistant. In my reading of early 20th century bowmaking, bowmakers started applying backings to all bows as a kind of prophylaxis against breakage whether the bow really needed it or not.

The later use of bamboo and quarter-sawn sapwood hickory lams were used to add power to the bow by what we now call 'Perry reflexing', that is, the application of the backing after the bow is tillered whilst on a jig which held the bow in reflex after the backing lamination was applied and left to dry. This clever method resulted in a bow which had a back which at rest had a back which was in a degree of compression and a belly which was in a degree of tension both of which states are the complete opposite of the normal resting state of a bow.

The reason why Dan Perry backed his bows AFTER tillering them was that the limbs were in balance and when he applied the backing laminations, the limbs would be just as equally in the opposite direction - usually about 4 - 5 inches of reflex - so the backing lam did not affect the tiller.

In older times, the backing was applied as the stave was roughed out and brought to the stage of beginning tillering. The backing lam was then glued to the back on a jig, then tillered. That method meant that much of the benefit of the reflex was lost during tillering as the bow was sunk to intended draw weight. The amount of reflex was actually reduced during tillering. Nevertheless, there was always some remaining reflex and that was always beneficial.

Perry reflexing after tillering does not require further tillering. It just requires sinking. In case you have not looked up our glossary of archery terms already, to SINK a bow is to reduce its draw weight. Doing this only requires that full length scrapes are taken from each limb alternatively so that the existing tiller is not spoiled. Taking full length scrapes will gradually sink the bow, but in my experience, leaves more of the reflex intact - at least more so that the old method.

The greatest benefit of the Perry system over the old system is that of having the limbs at rest in the opposite state to normal which means that when the bow is drawn, there is a part of the draw where the bow is moving from compression (back) and tension (belly) through a neutral state to the normal state of tension/compression. The genius of this invention is that the bow limbs are storing energy while they are being drawn even though they move from the compression/tension to the normal tension/compression state at full draw. Therefore, the limbs are under less bending load compared to a normally tillered bow for the same amount of limb travel.

This concept bears some thinking about for it to register for a lot of bowyers, but once grasped, it is obvious and so simple a concept.

Back to your question about backing though, unless you intend to put reflex into your bow, a backing of woven jute, linen or silk is fine and will do the job quite well. Hickory is a wood which is especially tension resistant and I have a good few bows from the stuff here which would surely have blown had they been made of some other stuff due to the chevrons on their back and sides. There is not really much benefit to applying rawhide over the others above.unless you want a more traditional American type of bow which is where the technique seems to have originated. I have applied jute backing to 2 or 3 bows now in a rather messy operation, but Yeoman has found that woven rolls of it can be bought at Bunnings which simplifies the operation greatly. It wasn't available when I did mine, so I had to apply it in individual strings for the length of the bow and snipping off the overhangs at the sides as I moved outward to the sides of the bow. What made it messy was that I had to lay down a full length bead of PVA glue and lay the length of jute string into it one at a time until the whole back was covered. I ended up with quarter inch pads of glue on my fingertips.

With the woven jute, linen or silk, you just size the back of the bow with PVA with your strips of backing cut to a generous overhang around the sides and tip with some overlap at the handle, smooth it out with your finger or some kind of spatula or suitable tool, let the PVA set, then repeat for however may layers you want. Two or three is usually quite enough.

The cast of the bow will not improve, but its durability will. I have read and tried the Hickman method of applying silk on one flatbow which is supposed to minimise set in a bow and that is to apply the backing (silk in Hickman's case) with a good amount of tension. Hickman applied his silk in such a way that with the silk anchored at the handle, the silk was stretched until there was a 50lb load on the silk which equated to around 2 inches of stretch in a bowlimb length of silk. The bow was not reflexed of course and the silk was stretched after it was laid on a bed of glue and left to adhere under tension. Hickman and others at the time avowed that when applied correctly, the normal amount of set which bows took was markedly reduced because the silk under tension helped pull the limbs straight again.

I have tried it on one Hickory bow I have here and the idea seems to hold up.

By the way, Hickman, or Clarence N. Hickman was a working physicist during the 1920s in the US who was also an archer and along with Paul Klopsteg (both PhDs) put their physicist brains into what made bows work. From their work which showed conclusively that the so called 'flatbow' was greatly superior to the previous D-section English pattern bow in every aspect that we now use bows of this fundamental design today. It took about 10 years in the US for the traditional Victorian style D-section bow to vanish almost entirely from target archery and bowhunting in the US.

Another scientist engineer by name of Forest Nagler in the same era developed their designs into bows which were tapered in both thickness AND width and still keep the wood within its elastic limit to minimise or even prevent any set developing. Hickman and Klopsteg's work developed a bow which was parallel sided in section and varied only in width as it moved from handle to tip. This meant that to keep a bow within its elastic limit, as the draw weight increased, the width had to increase because the thickness was pretty much defined by the wood's elastic limit and resulted in a bow of defined thickness. Some of their bows in higher draw weights were wide to the point of absurdity.

Nagler's work showed that a bow could be made much narrower and arguably more sensible in proportions by varying both thickness AND width by measuring the elastic limit on the wood at many points along the limb from the handle to the tip and he found that a bow could be made which narrowed from handle to tip which is sensible, did not have to be wide to the point of ugliness and could be progressively tapered toward the tip in a mathematically predictable way resulting in an eliptical tiller rather than a circular tiller. Neither is better than the other in terms of the bending load on the bow limbs, but Nagler's allows for an aesthectically far more pleasing appearance which is just as functional and durable.

Could I aver at this stave that when you join your handles to your sleeves that you orient them such that the edge of the grain shows on the back and belly of the stave. This quarter-sawn orientation makes better use of the wood's greatest strength. You should still back it, but you will have an additional string to your durability bow. I assume you understand what quarter-sawn orientation means. Generally it is the best orientation to use in terms of safety and durability in a bow which has been milled from logs.
Dennis La Varénne

Have the courage to argue your beliefs with conviction, but the humility to accept that you may be wrong.

QVIS CVSTODIET IPSOS CVSTODES (Who polices the police?) - DECIMVS IVNIVS IVVENALIS (Juvenal) - Satire VI, lines 347–8

What is the difference between free enterprise capitalism and organised crime?

HOMO LVPVS HOMINIS - Man is his own predator.

User avatar
yeoman
Posts: 1564
Joined: Mon Mar 08, 2004 1:32 pm
Location: Canberra

Re: Tillering, with a twist

#21 Post by yeoman » Fri Jan 03, 2014 5:30 am

I usually tiller a bow to 14" draw or so when I plan to Perry-reflex it. This is to make sure the limbs are balanced, and reduce the amount of tillering needed afterwards. I usually use staves that would break at full draw without the backings.

I have found that if I used dimensions for a bow that would normally give about 40 lb with no backing, can be made into bows of up to 50 lb with similar or less set when Perry reflexed.

I once pulled a bow into three inches of reflex out of the form. I found that as I tillered, the reflex increased. Others have reported the same. Reason being that as belly material is removed, there is less resistance to the backing's desire to return to its original length, and pulls itself shorter, thus more reflex. This does, however make bracing almost exponentially more challenging.

The work of Klopsteg, Nagler and Hickman has been hugely influential for me. It is their work that led me to develop spreadsheets, formulae and means & methods to make engineered bows. It has allowed me to make some absolute ripper bows, and accelerated my understanding of bow design.
https://www.instagram.com/armworks_australia/

Bow making courses, knife making courses, armour making courses and more:
http://www.tharwavalleyforge.com/

Articles to start making bows:
http://www.tharwavalleyforge.com/index. ... /tutorials

Dennis La Varenne
Posts: 1776
Joined: Sun Sep 07, 2003 10:56 pm
Location: Tocumwal, NSW. Australia

Re: Tillering, with a twist

#22 Post by Dennis La Varenne » Fri Jan 03, 2014 9:50 am

Dave above is also responsible for activating much of my understanding of how fairly basic maths can be applied to bowmaking with very predictable results.

The major think that he explained as the basis of the involved maths was the importance and simplicity of doing bending tests which allow predictions to be made on individual pieces of bow wood rather than rely the use of rupture figures taken from timber industry listings which use an average figure based on the testing of very many samples of the one material.

Without the bending test to ascertain the bending properties of a specific sample of bow wood with a high level of accuracy, the rest of the calculations would not be do-able.

Hooray for maths (and Dave !!
Dennis La Varénne

Have the courage to argue your beliefs with conviction, but the humility to accept that you may be wrong.

QVIS CVSTODIET IPSOS CVSTODES (Who polices the police?) - DECIMVS IVNIVS IVVENALIS (Juvenal) - Satire VI, lines 347–8

What is the difference between free enterprise capitalism and organised crime?

HOMO LVPVS HOMINIS - Man is his own predator.

Post Reply