Laminated Wood Bow/Horn Tips.

Where to source materials etc. Also the place to show off your new bow or quiver etc.... Making things belongs in Traditional Crafts.

Moderator: Moderators

Post Reply
Message
Author
User avatar
greybeard
Supporter
Supporter
Posts: 2992
Joined: Tue Feb 07, 2006 9:11 am
Location: Logan City QLD

Laminated Wood Bow/Horn Tips.

#1 Post by greybeard » Sun Jun 06, 2010 12:00 am

Having observed Grahame's progress in building his tri laminated longbow I decided to build one similar to his bow using a vernier calliper to guide me through the process.

Grahame's work helped me to refine the core lamination thickness and the required degree of taper. The back and belly laminations were not an issue as they could be modified during the tillering process. I did however run a taper from mid limb to the tips on the back lamination.

The American ash lamination [almost vertical grain] which was to be the back of the bow was a little "banana shaped" in the plan view so a string line was used to mark a true center line. The plan of the bow was marked out according to the center line.

When gluing up all wood laminated bows never force the laminations to a straight line as they will want to go back to their memory when you shape the bow to the laid out plan. As a side note bamboo can fight even harder to get back to its original state.

I do not need to go into the detail of preparing the laminations etc as Grahame did an excellent job with his commentary and photos in his “Not Rocket Science" post.

The bow that I am building has equal length limbs which will require a little more effort in the tillering department. If push comes to shove I can modify the little bump in the handle area to lengthen a limb.
The halfway length of the stave, 36"] was marked and 4" either side of this mark would approximate the handle section. The limbs were then marked out in 6" increments.

Although I knew the back and belly laminations were over the required thickness it left various options open for tillering and poundage adjustments.

Unlike selfbows made from bush billets where the back of the bow is left intact or worked down to a satisfactory growth ring the growth rings have already been violated in bows made from milled timber.

After shaping the plan of the bow on a hi-speed belt sander I was able to mark out the belly profile of the stave. After some work on the belly using a sharp spokeshave [thanks Grahame] I could start to floor tiller the stave. After removing what seemed like half a log from the belly the stave it would hardly bend. After awhile the penny dropped, I was dealing with a laminated stave with built in reflex and not a bush billet.

During the stages of removing wood from the belly the verniers were used at the markings to ensure wood was removed equally from each limb. At this early stage plus or minus the thickness of a sheet of paper was close enough. Between each spoke shaving session I would sandpaper the belly to true up the "D" profile. Having removed as much wood as I dare from the belly I suspected that the back was too strong.

A quick session on the tiller board confirmed my thoughts. The handle to just past the mid limb section was too stiff. I also had to take into account the amount of reflex built in from mid limb to the tips.

After spoke shaving and sanding the back of the bow the verniers were used to check the uniformity of the limbs.

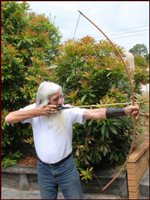
The photo illustrates the tiller of the bow using the verniers to arrive at this point. The tiller is marginally out but I will make the adjustments on the braced bow.
01 Bows .jpg
01 Bows .jpg (29.36 KiB) Viewed 1217 times
The next step was to make the string nocks from a block of Asian buffalo horn. As this was my first attempt at making horn nocks I followed a step by step plan floating around in the grey matter.

In hindsight [which is a wonderful thing] I would opt for the tips of the horn rather than a slab.

The photos will illustrate the various steps.

Step 1; mark out the section of horn to be used and the position for the pilot hole. A 1/8" drill bit is a good size. As the top nock was to have a second groove for a looped bow stringer I made it a little deeper. I used a drill press which allows you to set the drill depth.
04 Horn Nocks .jpg
04 Horn Nocks .jpg (151.19 KiB) Viewed 1217 times
Step 2; ream out the pilot hole using the modified spade bit. For the project I used a 12mm bit.
05 Horn Nocks .jpg
05 Horn Nocks .jpg (94.71 KiB) Viewed 1217 times
Step 3; cut the required sections out of the block and mark out the basic shape. Use whatever tools/method that you have available to remove the excess material.
08 Horn Nocks.jpg
08 Horn Nocks.jpg (95.72 KiB) Viewed 1217 times
Step 4; shape a suitable piece of wood to the profile of the spade bit to do a dry run for fit before you attack the tips of the bow. Use the spade bit to mark out the shape on the limb tips.
11 Horn Nocks.jpg
11 Horn Nocks.jpg (124.86 KiB) Viewed 1217 times
Step 5; when happy with the fit epoxy the tips to the bow. Precautions should be taken to make sure the tips stay in place while the epoxy cures. Shape the horn and file the string grooves. If needed use the spade bit to mark reference points on the horn tips so you don't remove too much material.
12 Horn Nocks.jpg
12 Horn Nocks.jpg (29.56 KiB) Viewed 1217 times
The bow after being braced and short drawn a few times.
13 Horn Nocks.jpg
13 Horn Nocks.jpg (30.99 KiB) Viewed 1217 times
Presently the bow draws 32# @ 17" but poundage will be shed as the bow settles into full draw. Anticipated finished draw weight is around 45#.

Although the tiller has moved a little it will be adjusted as the bow settles into full draw. I am happy with the belly of the bow so all adjustments will be made to the back of the bow. When the bow has settled in it will get a final cleanup/sanding and a good rubbing with bees wax.

Tiller boards can be a useful tool but I prefer to do final tillering on a braced bow rather than chasing it all over the tiller board.

Suitable timber and accurate measurements can save you a lot of trips to the tiller board.

Laminated wood bows can be made with basic tools and cost less than taking the family to a fast food outlet.

After a busy day I like to relax with a home brew or two.

Daryl.
Last edited by greybeard on Mon Oct 24, 2011 7:03 pm, edited 1 time in total.
"And you must not stick for a groat or twelvepence more than another man would give, if it be a good bow.
For a good bow twice paid for, is better than an ill bow once broken.
[Ascham]

“If a cluttered desk is a sign of a cluttered mind, of what, then, is an empty desk a sign?” [Einstein]

I am old enough to make my own decisions....Just not young enough to remember what I decided!....

User avatar
otis.drum
Posts: 972
Joined: Wed Jan 28, 2009 5:30 am
Location: cape york

Re: Laminated Wood Bow/Horn Tips.

#2 Post by otis.drum » Sun Jun 06, 2010 7:08 am

daryl,
i love the little coaster in the shape of a pellet.
...otis...

User avatar
GrahameA
Posts: 4692
Joined: Thu Mar 10, 2005 4:28 pm
Location: Welcome to Brisneyland, Oz

Re: Laminated Wood Bow/Horn Tips.

#3 Post by GrahameA » Sun Jun 06, 2010 7:20 am

Morning Daryl.

Looks great.

All.

What Daryl did not tell you was that the bow was not a quick job - those horn tips have taken around 3 days - on and off - to make.

In my opinion the two of us have learnt heaps making the bows. Especially in how thick to make the core lamination. :shock: But there have been other lessons - eg you can make bows "by eye" which appeals to artist in me and you can "engineer" bows using careful measurement and in both cases end up with a great bow.

Daryl's bow is more "Victorian" in style - it is the sort of bow you would expect Horace Ford to walk out onto the line with. Whereas mine is more "Medieval/Tudor" - the sort of bow perhaps Ascham would relate to.
Laminated wood bows can be made with basic tools and cost less than taking the family to a fast food outlet.

Yep. For a shaping a bow like this or mine you can buy all the tools you need for under $100:00 and you will have them for the next one. Spend a little more and you have tools for a lifetime. The spokeshave and a good oilstone are an investment that just keeps on paying. If you go to the markets and look around you can buy used and abused spokeshaves for less - and in my opinion the old spokeshave are better. The hardest thing is cutting the laminations so you need to find a saw somewhere. You do not need to rough shape the stave - it just saves a lot of shaving.

As a bit of a general comment both of these bows have been a change from the usual laminated glass bows and may cause a sudden flurry of timber laminated bows. We need to perfect the process. :D

The other Bow - http://www.ozbow.net/phpBB3/viewtopic.php?f=3&t=9807
Grahame.
Shoot a Selfbow, embrace Wood Arrows, discover Vintage, be a Trendsetter.

"Unfortunately, the equating of simplicity with truth doesn't often work in real life. It doesn't often work in science, either." Dr Len Fisher.

Post Reply