
Currently in Process of replacing images
Edit 6/6/2010
Daryl's Bow - http://www.ozbow.net/phpBB3/viewtopic.php?f=3&t=9823 These two posts should be read together.
Afternoon All.
Yeah - it is another one of those long posts.
It all started out a few months ago when Daryl and I were talking about the issues associated with building longbows. i.e The difficulties in getting good timber plus the mass issue of some timber and the requirement of different properties Back and Belly. Then about a month ago the topic was raised again this time seriously looking at what we could use. There was some New Guinea Rosewood on the shelf and we knew that is was a light timber. Plus there was some Hard Rock Maple that was left over from an earlier project so that took carer of the core and the belly of the bow but what about the back. Hickory - it appeared on the list of stocked timbers that out favourite timber supplier had. One phone call later and the situation was the stockist had no Hickory available but did have some American Ash and recommended that as an alternative. So it was over to Watt's Woods and we purchased a length of American Ash.
So now we had all the required timber available and so did the correct thing and put it all in the rack for some time in the future.
The Archery Australia Nationals came along and that they chewed up every second of spare time I had. With the Nationals over I decided to spend a bit of time building a bow as I had a couple of ideas I wanted to try out.
So over a cup of Coffee Daryl and I sketched out some rough bow dimensions - an educated guess. I decided I would build a bow as a bit of a prototype to see if the assumptions were correct. And it would give us something that could be modified in the future.
Rough Dimensions.
Essentially, I was going to laminate some American Ash (forming the back of the bow) to some New Guinea Rosewood (which would form the core) and on the other side of the Rosewood laminate some Hard Rock Maple (which be the belly of the bow). The downside was I was restricted to a 6' stave for the moment unless I wanted to splice the Rosewood. That can wait for the future.
So it was off to the Bandsaw. Set up it up and start sawing the timber to provide the pieces. We jiggled the timber around a bit to minimise the amount of sawdust I would produce.
Hard Rock Maple going through the saw.
And Again
Bit Rosewood.
Trimming to size
American Ash
Splitting the Rosewood - two lams , one for Daryl's bow
Trimming to size.
As can be see from the above photos that making a bow does involve a bit of resawing. You don't need a bandsaw. You can do the same using a Circular Sawbench or even a Circular saw. You just need to to set up the guides before you do the cutting. The downside is the cut will be rougher so it will let you have the opportunity to do a bit more planing/sanding.
We had decided to go with a tapered core. I have seen of laminated bows that used parallel laminations and I was concerned that I may cut into the core on the belly and so to prevent this I tapered the core.
A small aside here - if you do not know how to sharpen planes, spokeshaves, etc., go and learn before you start doing this.
Tapering the core (Rosewood Lamination using a spokeshave.
And then flattening the hills and valleys out.
Not "Rocket Science". (Pic Heavy.)
Moderator: Moderators
Not "Rocket Science". (Pic Heavy.)
Last edited by GrahameA on Sun Jun 06, 2010 7:33 am, edited 2 times in total.
Grahame.
Shoot a Selfbow, embrace Wood Arrows, discover Vintage, be a Trendsetter.
"Unfortunately, the equating of simplicity with truth doesn't often work in real life. It doesn't often work in science, either." Dr Len Fisher.
Shoot a Selfbow, embrace Wood Arrows, discover Vintage, be a Trendsetter.
"Unfortunately, the equating of simplicity with truth doesn't often work in real life. It doesn't often work in science, either." Dr Len Fisher.
Re: Not "Rocket Science". (Pic Heavy.)
And then because the taper is not correct you get to take a bit more off.
Now, if you have access to one a long plane is a great tool for doing this sort of Work. Daryl did happen to mention that he had purchased such an item some time ago at a Garage Sale. The catch was it was not sharp nor was set up correctly. .
No to worry.... some time later I had sharpened the blade and set the plane up and now it is/was taking off long paper thin shavings and I was hearing the beautiful sound a of a sharp plane cutting timber.
You still get to sand everything so that all the laminations fit neatly against each other - thin glue lines. Remember, we are using glue not gap filler.
Then it was a matter of dropping everything onto an existing Longbow form, checking that there were no gaps present and getting the seal of approval by Spot the Quality Inspector.
The main reason for the use of the form was that it enabled me to build in a bit of reflex to the "stave" and hopefully there would be less string-follow. You could just as easily clamp everything to anything straight.
So here we go. With the Timber Laminations washed down to make sure they are all clean and dust, dirt and oil free it is simply a matter of mixing some glue, buttering the pieces. and then placing them on the form and clamping together.
Butter
Clamp
And then lots of clamps.
And a day later you can pop the stave off the form and mark out a rough shape of the bow and start shaping/sanding.
If you look closely you can see the pencil lines that form the rough outline of the bow and where I will sand to.
The mark out a aris on the stave and start shaping the bow with a spokeshave.
Last edited by GrahameA on Mon May 31, 2010 2:56 pm, edited 2 times in total.
Grahame.
Shoot a Selfbow, embrace Wood Arrows, discover Vintage, be a Trendsetter.
"Unfortunately, the equating of simplicity with truth doesn't often work in real life. It doesn't often work in science, either." Dr Len Fisher.
Shoot a Selfbow, embrace Wood Arrows, discover Vintage, be a Trendsetter.
"Unfortunately, the equating of simplicity with truth doesn't often work in real life. It doesn't often work in science, either." Dr Len Fisher.
Re: Not "Rocket Science". (Pic Heavy.)
More marking.
And simply using your sharp - for those who missed I said "Sharp" - spokeshave remove all the timber that you do not want. Be Warned - do not cut against the grain. If you do you will rip chunks out of the timber.
Use the spokeshave wth finesse - don't rush it. It takes longer to make a new stave than the time you save by stuffing up the work with the spokeshave.
Eventually you will get it down to the stage where you can use a tillering string to check out the shape.
I just shaped the bow by "eye" and took very few measurement - as much as exercise in shaping as anything. When I did take measure and tried to make the tow limbs the same the bow would go out of tiller. This was/is due to the properties of the timber and one end of the Ash lamination being weaker than the other.
Yes, the bow does bend through the handle. The bow is not "Round Compass" as I prefer a shape that is closer to a Parabola.
Essentially for sometime it is going to be a series of take some timber off in the right spots - go back to the tillering board - take some more off until you start approaching the poundage.
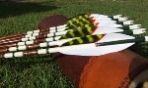
Then cut some nocks.
Make nice nocks. The nocks on this bow are probably the best I have done - practice is good.
Then make a string and string the bow and see what it pulls on the scales.
Hmm ... it was a little over weight. I was running out of timber on the belly and so I decided to take some off the back. So using a spokeshave i took off a paper thin shaving over the full length of the back. Then back to check the weight and then to the tiller board to check the tiller. Be warned - weight will drop very quick when you take if off the back.
So I have it down to weight and am serving the string prior to doing some test shots. It goes 56 1/2 lb @ 28"
And simply using your sharp - for those who missed I said "Sharp" - spokeshave remove all the timber that you do not want. Be Warned - do not cut against the grain. If you do you will rip chunks out of the timber.
Use the spokeshave wth finesse - don't rush it. It takes longer to make a new stave than the time you save by stuffing up the work with the spokeshave.
Eventually you will get it down to the stage where you can use a tillering string to check out the shape.
I just shaped the bow by "eye" and took very few measurement - as much as exercise in shaping as anything. When I did take measure and tried to make the tow limbs the same the bow would go out of tiller. This was/is due to the properties of the timber and one end of the Ash lamination being weaker than the other.
Yes, the bow does bend through the handle. The bow is not "Round Compass" as I prefer a shape that is closer to a Parabola.
Essentially for sometime it is going to be a series of take some timber off in the right spots - go back to the tillering board - take some more off until you start approaching the poundage.
Then cut some nocks.
Make nice nocks. The nocks on this bow are probably the best I have done - practice is good.
Then make a string and string the bow and see what it pulls on the scales.
Hmm ... it was a little over weight. I was running out of timber on the belly and so I decided to take some off the back. So using a spokeshave i took off a paper thin shaving over the full length of the back. Then back to check the weight and then to the tiller board to check the tiller. Be warned - weight will drop very quick when you take if off the back.
So I have it down to weight and am serving the string prior to doing some test shots. It goes 56 1/2 lb @ 28"
Last edited by GrahameA on Mon May 31, 2010 2:58 pm, edited 2 times in total.
Grahame.
Shoot a Selfbow, embrace Wood Arrows, discover Vintage, be a Trendsetter.
"Unfortunately, the equating of simplicity with truth doesn't often work in real life. It doesn't often work in science, either." Dr Len Fisher.
Shoot a Selfbow, embrace Wood Arrows, discover Vintage, be a Trendsetter.
"Unfortunately, the equating of simplicity with truth doesn't often work in real life. It doesn't often work in science, either." Dr Len Fisher.
Re: Not "Rocket Science". (Pic Heavy.)
- 53.jpg (39.96 KiB) Viewed 4525 times
- 56.jpg (33.64 KiB) Viewed 4525 times
A couple of days later I got to shoot the bow. I am very happy with how well it shoots and already have the plans for #2 in my brain.
The bow has had around a 100 arrows through it and it has just a touch of reflex still in it - it appears however to having stopped taking string follow, It does shoot fast but need to wait for Chrony to tell how.
Essentially there is very little technology in making this bow and it well within the capability of most people. You just need to take it slowly.
Another great experience and somewhere you can see the effort of Daryl using the same concepts having learnt from the issue with my bow.
Grahame.
Shoot a Selfbow, embrace Wood Arrows, discover Vintage, be a Trendsetter.
"Unfortunately, the equating of simplicity with truth doesn't often work in real life. It doesn't often work in science, either." Dr Len Fisher.
Shoot a Selfbow, embrace Wood Arrows, discover Vintage, be a Trendsetter.
"Unfortunately, the equating of simplicity with truth doesn't often work in real life. It doesn't often work in science, either." Dr Len Fisher.
Re: Not "Rocket Science". (Pic Heavy.)
Thanks for the many pics.
Maybe not rocket science but bow science.
Regards
John
Maybe not rocket science but bow science.
Regards
John

Re: Not "Rocket Science". (Pic Heavy.)
Grahame,
awesome build along. i love the bend through the handle design. could you possibly put up a full draw pic that shows the full length of the limbs.
i have been thinking of a very similar idea of late. so it's interesting that this has come up now. i have been becoming a bit bored making glass bows and have started looking at, and have a number of wood and bamboo bows ready or half done.
i had the idea (obviously you had it too) of making an all wood bow with the charateristics of a glass bow, where the light core was sandwiched between other materials with flex and compression qualities. i planned to use either bamboo, or alternatively, stringybark as a backing. the bamboo would be tapered before glue up, where as the stringy could be tapered later. then use the light tulip oak for the core, as i do with the glass bows and some ironwood on the belly for good its compression handling properties. do you think this would work?
also it's hard to see the shape of your bow limbs. is it a flat bow or 'D' shaped, or closer to a hill style limb? or something different again.
...otis...
Re: Not "Rocket Science". (Pic Heavy.)
I just love all the goodies you've got in that work shop Grahame.
Its always a great learning curve when you post a thread like this thanks again.
Cheers Wayno
Its always a great learning curve when you post a thread like this thanks again.
Cheers Wayno
Justastik Arrow Craft, Its all about the Wood.
Re: Not "Rocket Science". (Pic Heavy.)
Evening All.
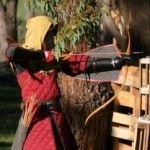
I will add some closeups so you can see the section of the bow.
Here is a pic of the whole bow almost at full draw.
Note string angle and thus no stack.  Plus nice relaxed grip on the bow so I do not torque it.
The cross-section of the bow is almost square and then I have arised the edges tp prevent stress concentrations.otis.drum wrote:also it's hard to see the shape of your bow limbs. is it a flat bow or 'D' shaped, or closer to a hill style limb? or something different again.
I will add some closeups so you can see the section of the bow.
Here is a pic of the whole bow almost at full draw.
- 01 BOWS 056.JPG (136.75 KiB) Viewed 4432 times
Last edited by GrahameA on Wed Jun 02, 2010 7:56 am, edited 2 times in total.
Grahame.
Shoot a Selfbow, embrace Wood Arrows, discover Vintage, be a Trendsetter.
"Unfortunately, the equating of simplicity with truth doesn't often work in real life. It doesn't often work in science, either." Dr Len Fisher.
Shoot a Selfbow, embrace Wood Arrows, discover Vintage, be a Trendsetter.
"Unfortunately, the equating of simplicity with truth doesn't often work in real life. It doesn't often work in science, either." Dr Len Fisher.
Re: Not "Rocket Science". (Pic Heavy.)
thanks grahame, when you say 'square' do you mean actually square or are you refering to rectangle? with rounded edges obviously.
...otis...
Re: Not "Rocket Science". (Pic Heavy.)
Hi Otis.
At the handle it is a tad over 1" wide and 3/4" thick. Call it rectangular - it is not the Classic D shape. And it does shoot nice.
At the handle it is a tad over 1" wide and 3/4" thick. Call it rectangular - it is not the Classic D shape. And it does shoot nice.
Grahame.
Shoot a Selfbow, embrace Wood Arrows, discover Vintage, be a Trendsetter.
"Unfortunately, the equating of simplicity with truth doesn't often work in real life. It doesn't often work in science, either." Dr Len Fisher.
Shoot a Selfbow, embrace Wood Arrows, discover Vintage, be a Trendsetter.
"Unfortunately, the equating of simplicity with truth doesn't often work in real life. It doesn't often work in science, either." Dr Len Fisher.
Re: Not "Rocket Science". (Pic Heavy.)
Why the difference between belly and back? Because removing the back is reducing the tension required to bend the bow?Be warned - weight will drop very quick when you take if off the back.
Is the required tension for bending much stronger than compression? How does that work exactly?!?

Re: Not "Rocket Science". (Pic Heavy.)
Hi Grahame,
What are the minimum tools needed to complete this. Been keen to try a bingham project for awhile and I have a mate who has a really good workshop and if I can get the timbers I'd like to give this a go.
Simon
What are the minimum tools needed to complete this. Been keen to try a bingham project for awhile and I have a mate who has a really good workshop and if I can get the timbers I'd like to give this a go.
Simon
"With staff in hand, the hunter stood on Radholme's dewy lawn" The Hunters Song (Olde Lancashire Poem) by Richard Parkinson.
-
Stickbow Hunter

- Supporter

- Posts: 11637
- Joined: Sat Jul 26, 2003 8:33 pm
- Location: Maryborough Queensland
Re: Not "Rocket Science". (Pic Heavy.)
Interesting bow Grahame. You sure like making it hard for yourself using the hand tools.
Jeff
Jeff
Re: Not "Rocket Science". (Pic Heavy.)
Hi Graham, this question may sound as if it answered itself, as simple as that. But was it important in the design of this bow as to where the grain of the timbers are facing/laying when your cutting them on the bandsaw. So when all the timbers come together in the glueing up process can the the grain run across or must it run the length of the timbers as in a one piece self bow...........thanks...........Bill.
Re: Not "Rocket Science". (Pic Heavy.)
Morning All.
Something to cut the timber,
Something to flatten the faces - plane or even a long sanding stick
Clamps of some form when gluing the timber together.
A spokeshave( or equivalent) for shaping the bow
Something to cut the nocks and some sand paper to smooth it all down.
Plus a nice Coffee mug -with Coffee - and a radio tuned into a Classic Hits station. http://www.arn.com.au/players_flash/4kq/player.html
As an aside Perry makes bows using a small axe and a bowyer's float - ask him what he uses to cut the nocks probably a pocket knife.
Hi Kevin. Don't know, it is just an observation of mine. It is probably related to exactly where the neutral axis lies and the the properties of the timber composite. Plus the strain rates back and belly are probably different and thus the neutral axis migrates as the bow is loaded.. I should sit down with a pencil and a piece of paper and have good think about it.Why the difference between belly and back? Because removing the back is reducing the tension required to bend the bow?Be warned - weight will drop very quick when you take if off the back.
Is the required tension for bending much stronger than compression? How does that work exactly?!?
Hi Simon. Something like this:Hi Grahame,
What are the minimum tools needed to complete this. Been keen to try a bingham project for awhile and I have a mate who has a really good workshop and if I can get the timbers I'd like to give this a go.
Simon
Something to cut the timber,
Something to flatten the faces - plane or even a long sanding stick
Clamps of some form when gluing the timber together.
A spokeshave( or equivalent) for shaping the bow
Something to cut the nocks and some sand paper to smooth it all down.
Plus a nice Coffee mug -with Coffee - and a radio tuned into a Classic Hits station. http://www.arn.com.au/players_flash/4kq/player.html
As an aside Perry makes bows using a small axe and a bowyer's float - ask him what he uses to cut the nocks probably a pocket knife.
Hi Jeff. It is good for the soul and during winter it keeps you warm. After a few summer bows if I was smart I would madly build a few bows over the next couple of months. I didn't even need the fan on. In addition there is something pleasant about working with hand tools - as long as they are sharp.Interesting bow Grahame. You sure like making it hard for yourself using the hand tools.
Jeff
Hi Bill. You still want the the grain running along the length of the bow. The tensile and compressive strength of the timber is significantly greater with grain as compared to across the grain. If the core material was only acting as a spacer then it could be oriented in any direction as it would not be taken and compressive or tensile load. We can see that in modern limbs where materials like Syntactic Foam and Ceramic/Epoxy composites are used to form the core. However such limbs are much thinner than these. (As a point of interest I see that wood cores are being talked about again in high performance limbs.) Other composite structures use material like edge grain Balsa for composite cores.Hi Graham, this question may sound as if it answered itself, as simple as that. But was it important in the design of this bow as to where the grain of the timbers are facing/laying when your cutting them on the bandsaw. So when all the timbers come together in the glueing up process can the the grain run across or must it run the length of the timbers as in a one piece self bow...........thanks...........Bill.
All - Took the bow for a shoot yesterday. I am really happy with it and it is shooting very fast. At the moment I am putting it down to the light limbs. Plus the bow has developed no more string follow, almost all the initial reflex came out of the bow within the first 100 arrows however, since then is has not increased. I want to build a more "sophisticated" version.(It is about now I wish I had paid more attention such stuff at various stage.)
Grahame.
Shoot a Selfbow, embrace Wood Arrows, discover Vintage, be a Trendsetter.
"Unfortunately, the equating of simplicity with truth doesn't often work in real life. It doesn't often work in science, either." Dr Len Fisher.
Shoot a Selfbow, embrace Wood Arrows, discover Vintage, be a Trendsetter.
"Unfortunately, the equating of simplicity with truth doesn't often work in real life. It doesn't often work in science, either." Dr Len Fisher.
Re: Not "Rocket Science". (Pic Heavy.)
Thanks for that Grahame,........Bill

Re: Not "Rocket Science". (Pic Heavy.)
thanks grahame ive been thinking for some time now to try and make my first self bow youve given me some insperation to start one , like you i like my hand tools and make my arras by hand even cut the fethers with sissors as you sed using hand tools and then hand sanding them round gives me a feeling of acomplishment and satisfaction when their finished.
...nev...
...nev...
i hunt animals because they have legs and can run away ................plants dont
Re: Not "Rocket Science". (Pic Heavy.)
Yep, I agree with Grahame that hand tools are the way to go! I remember when I was 16 and I helped my dad renovate a 300 year old timber framed farm building. We managed to salvage a tonne of timber and when using automated tools they couldn't cope with seasoned english oak heartwood and motors burnt (drop saw and 2 makita drills) out so we did it the old way and learn't to love every piece of timber in that house!
Simon
Simon
"With staff in hand, the hunter stood on Radholme's dewy lawn" The Hunters Song (Olde Lancashire Poem) by Richard Parkinson.
Re: Not "Rocket Science". (Pic Heavy.)
Grahame, thanks for the tool tips. I have access to pretty much all of these except a spokeshave.
How do you know how much to taper the laminates? Do you recommend doing a binghams project first to cut my teeth or give this a go? Do you know much about the suitability of Sugar Gum?
How do you know how much to taper the laminates? Do you recommend doing a binghams project first to cut my teeth or give this a go? Do you know much about the suitability of Sugar Gum?
"With staff in hand, the hunter stood on Radholme's dewy lawn" The Hunters Song (Olde Lancashire Poem) by Richard Parkinson.
Re: Not "Rocket Science". (Pic Heavy.)
Morning All
If I want the core to occupy 1/3 of the bow then it needs to 1/3 of the total thickness at pont along the completed bow. Similarly it was too comprise a 1/4 or a 1/2. You then taper it appropriately.
Projects are a good way to go if you know little as I do/did you will get a finished working result. Bingham's have sorted all the issues over the years. Know nothing of Sugar Gum.muntries wrote:Grahame, thanks for the tool tips. I have access to pretty much all of these except a spokeshave.
How do you know how much to taper the laminates? Do you recommend doing a binghams project first to cut my teeth or give this a go? Do you know much about the suitability of Sugar Gum?
If I want the core to occupy 1/3 of the bow then it needs to 1/3 of the total thickness at pont along the completed bow. Similarly it was too comprise a 1/4 or a 1/2. You then taper it appropriately.
Grahame.
Shoot a Selfbow, embrace Wood Arrows, discover Vintage, be a Trendsetter.
"Unfortunately, the equating of simplicity with truth doesn't often work in real life. It doesn't often work in science, either." Dr Len Fisher.
Shoot a Selfbow, embrace Wood Arrows, discover Vintage, be a Trendsetter.
"Unfortunately, the equating of simplicity with truth doesn't often work in real life. It doesn't often work in science, either." Dr Len Fisher.