My Knife Buildalong

Blades. Knife-making, Flintknapping, sharpening broadheads, etc. A showcase for the talents of Cutlery and Artillery Artisans, and a place to sell and source wares, as well as materials, vendors etc.

Moderator: Moderators

Message
Author
Coach

My Knife Buildalong

#1 Post by Coach » Sun Apr 29, 2007 5:15 pm

I have started this on my site , thought I would share it here as well .
OK , let me start by saying I have no idea what I'm doing :lol: This is how I will be doing it and not nessacarily the way it should be done .

So far this is what I have done , the rest may take a week or so to be finished .
First I drew a knife on some paper and cut it out . Then I traced the pattern onto my Circular Saw blade .
Image
Now I get ready to cut it out with my quality angle grinder from Supacheap Auto , cost me a whole $17 :lol:
Image
Here it is halfway through .Make sure you always wear eye protection , no good if ya can't see what ya doing :wink:
Image
Here is the blank cut out .
Image
Now I tidy it up a bit on my bench grinder
Image
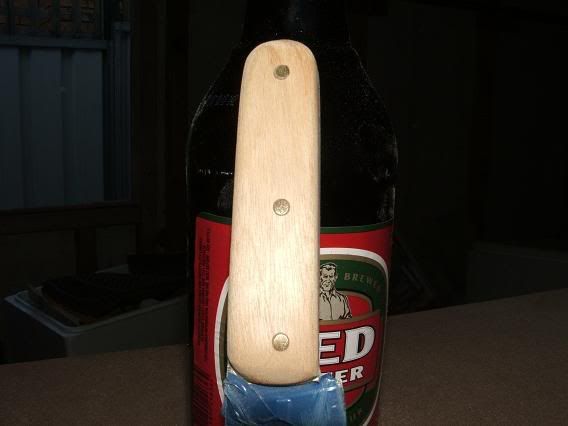
Drill some holes in the handle for the pins that will hold the scales on
Image

And here we have the blank ready for the next stage of more grinding of the edge etc
Image

As I said , I am no expert , so any suggestions much appreciated :D I will post more as I do it :wink:

Oky doky ,, no buildalong would be complete without mistakes , so you learn what NOT to do :lol:

I bought a Disc attatchment for my drill to put the Bevel on the blade ,,a Linisher would be better .

Here I am starting to grind it
Image
I cant seem to get both angles consistent , it may just be practise , but as I said , a linisher may be better , as thats what I have read .
Here are some pics of the angles/mess and I also polished some of the marks out of the blade ,, you will see whats left of the mark . Maybe I can fix the Bevel with a file , we will see later .
Image
Image
Image
When it comes down to it ,, I suppose it is only cosmetic , but I want it to be perfect ,, maybe a big ask first time around .
See ya again soon :D

Well I bought a bloody big Mill file today and tidied up the bevel . Not perfect but a lot better :D Can anyone tell me what the difference is between a Mill and a Bastard file ? The guys in the Hardware here had no idea :shock:
Image

Todays update .
I heat treated the knife by dragging out the little Weber . Must get a blow torch :wink:
Image
Image
I heated the steel up to a point where a Magnet wouldn't stick.
Then I quenched it in a bucket of old cooking oil.
Image
After this I ran a file across it to see if the file would dig in , well it did , so I repeated the process a second time and the file skated across the blade without digging as much :? I got these directions off another website .
From there it went into the oven set on 200 C for 45 minutes to anneal the blade IE to take out some of the brittleness .
This is what it looks like after the process
Image
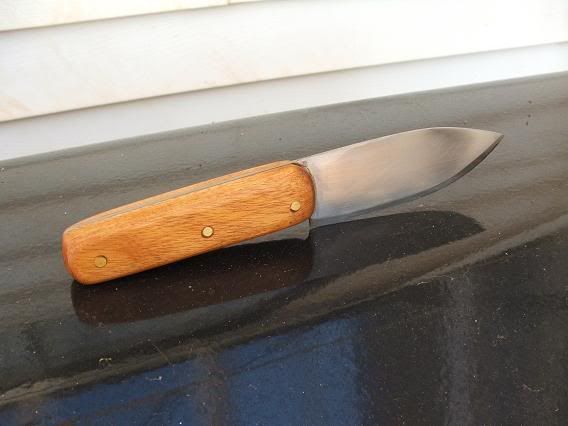
And this is what it is looking like after a little bit of a clean up with some 180 grit sandpaper .
Image
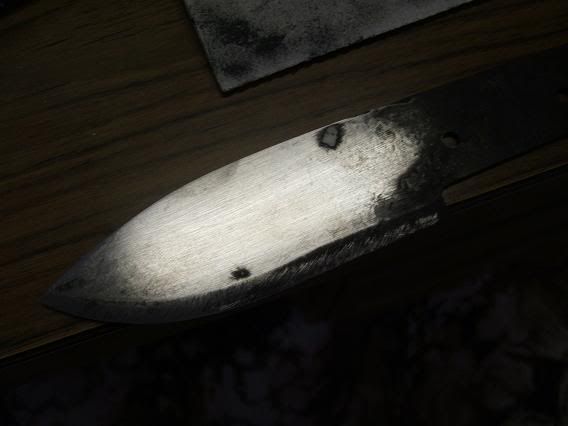
I will clean it up more later , not sure if I'll take it so far as a Mirror finish though .
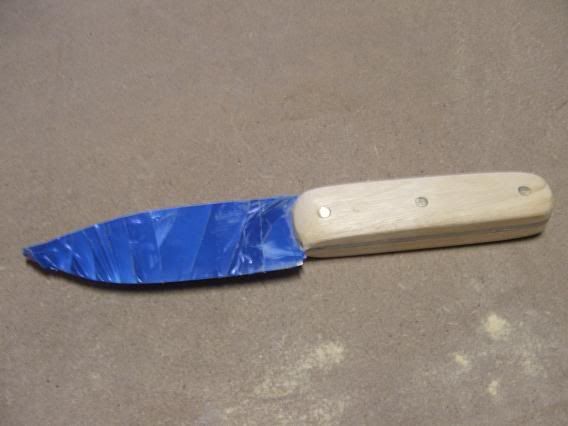
All thats need then is to put a handle on it . More to come on that later .
:D
DAMN ,, I just noticed I forgot to drill some more holes for the epoxy to go into on the handle !! Oh well I'm sure it will be right :roll:

Poppy
Posts: 193
Joined: Wed Mar 30, 2005 1:49 pm
Location: Belli Park Sunshine Coast QLD

#2 Post by Poppy » Sun Apr 29, 2007 6:00 pm

Thanks Coach it looks great. This has got me inspired. :D
Now I know what to do with all my old saw blades (Carpenter)
I'm looking forward to seeing the complete job (lots of Pics please).
Cheers
Paul

User avatar
jindydiver
Posts: 1333
Joined: Thu Jun 24, 2004 3:06 pm
Location: ACT

#3 Post by jindydiver » Sun Apr 29, 2007 6:34 pm

Good on you for giving it a go from scratch. It sure is fun and addictive.

You have all the steps down pat but there are a few things that could help you make a better knife.

The steel in those small blades isn’t very good. The first go at hardening it should have made it hard as a file and the fact that it didn’t tells you that they have used some unknown mix of steel in that blade.

If you want to get the bevels the same on both sides you have to practice a lot with that disc grinder. Because you have the grit moving in the opposite direction when you turn the blade over it is hard to judge the angle. You will get a more even grind if you draw a line down the centre of the edge also, so that you know where the centre is and can judge better how much you have taken off. You can use one of these…
Image

Because you can’t tell what the steel is you can’t know what the best tempering temperature will be for it so you can either test it or go by colour (works best if you know the steel too). You can test it by cutting and heat treating pieces and then destroying them in your vice. To do it by colour you clean the pieces after heat treatment and then you can see what colour they get too at each temperature in your oven. When you destroy enough bits to know what colour works best for that steel. A good all-round temper is to bring the steel to straw colour, but this might be too hard for that steel particularly because it is so thin. Go down to your local hire shop and see if you can have the blades out of their brick cutters when they change them, the bigger the better, and you will get some more reliable steel.

And just a comment on the design.
You know what you want in a knife but you might want to thing about stopping the edge before it gets all the way back to the handle, or putting a finger groove into the handle to help you keep your finger away from the edge. Having that sharp corner hard up against the end of the handle will bite you one day and seeing as you will be using it on goats you risk Q fever if you cut your hand while gutting one.


I hope this helps you :)
Mick


Nearly all men can stand adversity, but if you want to test a man's character, give him power.

Abraham Lincoln

Coach

#4 Post by Coach » Sun Apr 29, 2007 6:41 pm

Yeah , it was supposed to have a Ricasso , but I slipped :oops:

Even if I had a center line , I would still probably have stuffed it up :roll:

I think maybe it didnt get hard enough , as I dropped it when I took it out of the BBQ , and it took a bit to pick it up and maybe had cooled down too much , will see how it goes , I can't be perfect all the time :lol: :lol: As for the Straw colour , it didn't turn that colour at all in the oven , it just stayed black .

Thanx for the tips :)

User avatar
jindydiver
Posts: 1333
Joined: Thu Jun 24, 2004 3:06 pm
Location: ACT

#5 Post by jindydiver » Sun Apr 29, 2007 6:46 pm

Getting it into the quench fast is important, especialy with such a thin piece of stock. Next time, when you check with the magnet put it back in for 30 seconds or so to make sure it is hot enough and then go to the quench.

After the quench you can clean that black crap off on the grinder, just be carefull so it doesn't get too hot. Don't wear gloves and then you can be sure to tell when it is getting hot. Then you will be able to see the tempering colour :wink:
Mick


Nearly all men can stand adversity, but if you want to test a man's character, give him power.

Abraham Lincoln

Coach

#6 Post by Coach » Sun Apr 29, 2007 6:48 pm

Ahh , OK .

User avatar
ole_silver
Posts: 451
Joined: Sat Jan 01, 2005 9:15 am
Location: Townsville, Qld

#7 Post by ole_silver » Sun Apr 29, 2007 8:13 pm

hey coach.........

this is all great mate , again very well done.. congrates to u ..

jindy... you are wonderful mate, lots of great help.. my hat off to you..


i am off to the hire shop.. looking for blades..

regards
Steve...
ole_silver1..................

"have a go now, 'fore ya can't have a go at all"

User avatar
Stickbow Hunter
Supporter
Supporter
Posts: 11637
Joined: Sat Jul 26, 2003 8:33 pm
Location: Maryborough Queensland

#8 Post by Stickbow Hunter » Sun Apr 29, 2007 8:26 pm

Excellent build-a-long Coach, I am enjoying it. I like your honesty with saying when you made a mistake etc too!!! Us mere mortals are used to doing such things. :lol:

Jeff

User avatar
Bandit
Posts: 55
Joined: Wed Nov 08, 2006 7:55 pm
Location: newcastle
Contact:

#9 Post by Bandit » Sun Apr 29, 2007 8:36 pm

great thread! makes me want to go dust off dads tools and see what he's got! hehe good pictures too. does it matter what type of wood you use for the handle?
cheers
*attack life, its going to kill you anyway*

Coach

#10 Post by Coach » Mon Apr 30, 2007 6:42 am

Bandit wrote: does it matter what type of wood you use for the handle?
cheers
I don't know whether it matters , but I will be using a piece of hardwood I scrounged up , no idea what it is . In the future I will be getting some exotic woods and Antler :D

User avatar
jindydiver
Posts: 1333
Joined: Thu Jun 24, 2004 3:06 pm
Location: ACT

#11 Post by jindydiver » Mon Apr 30, 2007 6:53 am

All that matters in your handle material is that it is stable, that is it stays the same size in 2 years as it was when you put it on. If it isn't it will come away from the tang and let crap in there, if that happen then before you know it you have to re-do your handle.
Mick


Nearly all men can stand adversity, but if you want to test a man's character, give him power.

Abraham Lincoln

Coach

#12 Post by Coach » Mon Apr 30, 2007 5:25 pm

On to the handle .
I was going to use this , but it split on me :cry:
Image
Anyway , I got some other crappy looking wood and marked out the holes for the pins like this
Image
Then I clamped both bits together and sanded the front of the handle even , as you can't really do it on the Knife
Image
Once that was done I assembled the handle on the knife with some 3/16 threaded brass rod like this and cut the rod flush with the handle
Image
Here are all the bits ready for assembly
Image
I epoxied everything in sight ,,,,,, I mean in place 8) Wiping off any excess off the blade and clamped it all up
Image

Next I will be shaping the handle and applying a finish and that will be it
:D

Coach

#13 Post by Coach » Tue May 01, 2007 5:02 pm

I shaped the handle today . First I put some Tape on the blade to stop me from getting cut as well as to save it a bit from scratches from the sanding .
Image
Handle roughed out
Image
Handle finished
Image

Just need to stain it and it's finished . I will post a pic of it all tomorrow . I hope this has been of some help to you fellas that want to give it a go
:D

jape

#14 Post by jape » Tue May 01, 2007 5:14 pm

Great work and a good 'build along' to look at Coach. I have had some success with wide industrial band-saw blades for similar knives, the steel is much better and takes a razor edge. If anything it can be too brittle and need some softening but for paring knives, skinners it is very quick and easy to grind a good edge. The old fashioned 'insulation tape' is good for a quick 'wrapped' handle too if you can find it, the cloth stuff. It is impregnated with something that is sticky so they don't slip at all. yet it doesn't get messy on clothes etc.
jape

User avatar
Stickbow Hunter
Supporter
Supporter
Posts: 11637
Joined: Sat Jul 26, 2003 8:33 pm
Location: Maryborough Queensland

#15 Post by Stickbow Hunter » Tue May 01, 2007 7:07 pm

Thanks for taking us through your knife building process. That handle wood does need a stain alright. :wink: :D

Jeff

Coach

#16 Post by Coach » Tue May 01, 2007 7:11 pm

Yeah Jeff it sure does , pretty boring :roll: But I would rather use 2nd rate products while learning than waste the good stuff :wink: It's all still a learning process , and boy , do I have a lot to learn :lol:

User avatar
Stickbow Hunter
Supporter
Supporter
Posts: 11637
Joined: Sat Jul 26, 2003 8:33 pm
Location: Maryborough Queensland

#17 Post by Stickbow Hunter » Tue May 01, 2007 7:36 pm

I would rather use 2nd rate products while learning than waste the good stuff
Yeah, I can understand that. :D

Jeff

Coach

#18 Post by Coach » Wed May 02, 2007 3:59 pm

Here it is with the handle stained .
Image

User avatar
Stickbow Hunter
Supporter
Supporter
Posts: 11637
Joined: Sat Jul 26, 2003 8:33 pm
Location: Maryborough Queensland

#19 Post by Stickbow Hunter » Wed May 02, 2007 5:53 pm

It looks better stained. You will have to be careful your hand doen't slip forwards.

Jeff

Coach

#20 Post by Coach » Wed May 02, 2007 6:00 pm

The handle still looks horrible though :roll:
You will have to be careful your hand doen't slip forwards.
Nah , I'll give it to someone else :lol: :wink:

User avatar
Stickbow Hunter
Supporter
Supporter
Posts: 11637
Joined: Sat Jul 26, 2003 8:33 pm
Location: Maryborough Queensland

#21 Post by Stickbow Hunter » Wed May 02, 2007 6:10 pm

Nah , I'll give it to someone else
:shock: :lol:

Jeff

Stewart Townsend
Posts: 51
Joined: Sun Apr 09, 2006 6:02 pm
Location: Burpengary Queensland

#22 Post by Stewart Townsend » Wed May 02, 2007 9:36 pm

A couple of suggestions -

If you used a larger disk on your drill it might help (for little expense). Like a 10-12 inch one, then you can do a 5 - 6 inch blade and stay away from the centre.

If you can get smaller grit use it.

Some people suggest a coke bottle shape for a handle. In the centre a palm swell and the end flaring out a bit (from upside). I have used a oval (from upside) shape as well. Factory knives are for one size, you have the benefit of making it for your hand which is a great benefit.

Well done.

wysper
Posts: 25
Joined: Fri Jul 06, 2007 4:59 pm
Location: Hamilton, New Zealand

#23 Post by wysper » Tue Jul 24, 2007 12:53 pm

Thanks Coach

Looks like a great way to start for us NEWBIES.

Have saved the link to this thread as a book mark.

Coach

#24 Post by Coach » Tue Jul 24, 2007 3:54 pm

Glad it helped ,, although looking back on this ,, it is a little embarassing :oops:
Maybe I'll do a new one , now that I have better tools and my skill level has increased and the knives now look better :wink:

User avatar
gundy
Posts: 1602
Joined: Tue Jul 29, 2003 8:10 pm
Location: VIC

#25 Post by gundy » Tue Jul 24, 2007 4:59 pm

Go for it Coach. I need to finish the ones I started.... :oops:

Go get one of thos 'Multitool' bolt on attachments with 8" main wheel and bolt it to your grinder. Your quality and skill level will 10-fold overnight.

They cost around $200-$250 from memory. Maybe less these days.

You can hollow or flat grind with them.

Without taking over your thread, here are the results I got with the Multitool attachment. If I can do it, you could easily with the passion you have for it!
Attachments
G3.jpg
G3.jpg (47.22 KiB) Viewed 4928 times
G2.jpg
G2.jpg (43.87 KiB) Viewed 4928 times
G1.jpg
G1.jpg (38.75 KiB) Viewed 4929 times

Coach

#26 Post by Coach » Tue Jul 24, 2007 7:21 pm

Pretty damn good Gundy :D I have a linisher now which does a good job , so maybe I will do another ,, will see how motivated I get :wink:
Now tell me how you got those claw marks in the blade 8)

User avatar
gundy
Posts: 1602
Joined: Tue Jul 29, 2003 8:10 pm
Location: VIC

#27 Post by gundy » Tue Jul 24, 2007 7:45 pm

I got a stamp made up...

I went to go into a big 'knife making venture' one day, but without a dust extractor, I could not handle the dust, so gave up until such time as I get one.

The logo was a part of my business (?) name, being Instinctive Edge Knives.

Its all sitting on the shelf, I just need a dust extractor...:)

Get into it mate, especially if you have a linisher now.

I would suggest flat grinding over hollow, it is easier.

wysper
Posts: 25
Joined: Fri Jul 06, 2007 4:59 pm
Location: Hamilton, New Zealand

#28 Post by wysper » Wed Jul 25, 2007 6:53 am

Coach wrote:Pretty damn good Gundy :D I have a linisher now which does a good job , so maybe I will do another ,, will see how motivated I get :wink:
Now tell me how you got those claw marks in the blade 8)

Is a linisher like a grinder on steroids?
What does it do that a bench grinder or the hand held one in the tutorial doesnt?

I thoght the claw marks were a great makers mark too!

wysper
Posts: 25
Joined: Fri Jul 06, 2007 4:59 pm
Location: Hamilton, New Zealand

#29 Post by wysper » Wed Jul 25, 2007 7:16 am

For instance, would something like this do the trick?
It is on an auction site here in NZ
Attachments
ryobi.jpg
ryobi.jpg (60.01 KiB) Viewed 4883 times

Coach

#30 Post by Coach » Wed Jul 25, 2007 5:13 pm

That looks like it would do the job ,, the belt sander on it is also known as a linisher . It will give better/flatter grinds .
I have a linisher similar to this
http://www.google.com/imgres?imgurl=htt ... AU225AU226

Post Reply